All About ASP.NET and ASP.NET Core 2 Hosting BLOG

Tutorial and Articles about ASP.NET and the latest ASP.NET Core

ASP.NET Hosting - ASPHostPortal.com :: Scaffolding for ASP.NET Webforms

clock January 7, 2015 05:41 by author Ben

Those who knows ASP.NET MVC, might already knows the power of scaffolding. With VS.Net 2013 we will have scaffold template included for asp.net web forms.  By scaffold template you can generate a boilerplate code for asp.net web forms in a min. The Web Forms scaffold generator can automatically build Create-Read-Update-Delete (CRUD) views based on a model.


Step by Step example of using scaffold template inside asp.net web forms to generate CRUD operations.

Step 1:
Download VS.Net 2013 Express Preview

Step 2:
Create Asp.net WebForm Project

Step 3:
Add Model Class and named it as "Product.cs"  (Right click Model class and Add new class)


Step 4:
Create POCO Class with following content in it.  Yes you can take advantage of DataAnnotations of Entity framework.

using System;
using System.Collections.Generic;
using System.ComponentModel.DataAnnotations;
using System.Linq;
using System.Web;

namespace WebApplication3.Models
{
    public class Product
    {
        [ScaffoldColumn(false)]
        public int ID { get; set; }

        [StringLength(25)]  
        public string ProductName { get; set; }
        public string Description { get; set; }
       
        [DataType(DataType.Currency)]
        public int Price { get; set; }       
    }
}


In above code

  • [ScaffoldColumn(false)] will not generate any presentation code for that field
  • [StringLenght(25)] will limit product name upto 25 characters only.
  • [DataType(DataType.Currency)] will limit to enter only proper currency value.

Step 5:
Build your application.  (Cntrl + Shift + B)

Step 6:
Now its time to use scaffold template to generate code for CRUD operations in asp.net web forms.
Right click on model class and add scaffold for Product class.


Step 7:
Click on Add button as shown in figure to "Generates ASP.NET Web Forms pages for read/write operations based on a given data model."


Step 8:
Select Model class as "Product.cs", Since we haven't created or have any data context class, select "Add new data context" and Click on "Add" button.


Step 9:
If you wish you can change name of your data context class.  For this demo purpose I am keeping everything to default generated by VS.Net.  Press "OK" button.


Step 10:
You will noticed that VS.Net 2013 has generated new data context file inside model folder and has also created CRUD operations for Product class.


Step 11:
Run the application and enjoy the boilerplate code...  You will also noticed that web forms project has extension-less url and also has responsive design using Twitter bootstrap out of the box...

Type the url: /Product  notice it is extension-less url and


Click on "Create new" link and create new product

Data Entry few product.  Notice fancy validation on entering wrong values.  "Everything is out of box, you don't need to write a single line of code to make this working... Isn't that cool"


Product Listing


Similarly you can edit record, delete record. Hope you enjoyed this post...


ASP.NET 4.5 Hosting - ASPHostPortal.com :: Enabling Unobtrusive Validation From Scratch in ASP.NET 4.5 Webforms

clock December 19, 2014 04:55 by author Ben

I used to be fiddling with ASP.NET 4.5 and Visual Studio 2012 particularly with all the new Validation attributes and i identified they function great, specially the new unobtrusive validation, then I attempted to permit this sort of validation over a new Vacant Net Software, and that i identified that this just isn't out-of-the-box, you'll need to create some configurations to your Net Application.

You'll find a few ways to allow the unobtrusive validation over a Internet Software:

Through the web.config file

<configuration> 
  <appsettings> 
   <add key="ValidationSettings:UnobtrusiveValidationMode" value="WebForms"> 
  </add></appsettings> 
 </configuration> 

Via the Global.asax file

protected void Application_Start(object sender, EventArgs e)
{
   ValidationSettings.UnobtrusiveValidationMode = UnobtrusiveValidationMode.None;
}

On each page:

protected void Page_Load(object sender, EventArgs e)
{
   this.UnobtrusiveValidationMode = System.Web.UI.UnobtrusiveValidationMode.WebForms;
}

To disable the unobtrusive validation set the UnobtrusiveValidationMode property to None. Unobtrusive validation is actually enabled by default in ASP.Net 4.5.

We'll start with a simple example, create an Empty Web Application and add a MasterPage called Site.master and a content page for this master called Default.aspx.
Add the following code to the Default.aspx file:

<asp:TextBox runat="server" ID="txt" />
    <asp:RequiredFieldValidator ErrorMessage="txt is required" ControlToValidate="txt" runat="server" Text="*" Display="Dynamic" />
    <asp:Button Text="Send info" runat="server" />

If you try to run a simple ASPX page using a validator, the following exception will be thrown:

    "WebForms UnobtrusiveValidationMode requires a ScriptResourceMapping for 'jquery'. Please add a ScriptResourceMapping named jquery(case-sensitive)". Before fixing this, let's disable the unobtrusive validation to see the result.

On the page:

protected void Page_Load(object sender, EventArgs e)
{
   this.UnobtrusiveValidationMode = System.Web.UI.UnobtrusiveValidationMode.None;
}

Now run the page and the validation will work as it used to work in ASP.Net 4.0 If you examine the rendered HTML, you will see that the gross inline script is rendered:

<script type="text/javascript">
//<![CDATA[
var Page_Validators =  new Array(document.getElementById("ContentPlaceHolder1_ctl00"));
//]]>
</script>

<script type="text/javascript">
//<![CDATA[
var ContentPlaceHolder1_ctl00 = document.all ? document.all["ContentPlaceHolder1_ctl00"] : document.getElementById("ContentPlaceHolder1_ctl00");
ContentPlaceHolder1_ctl00.controltovalidate = "ContentPlaceHolder1_txt";
ContentPlaceHolder1_ctl00.errormessage = "txt is required";
ContentPlaceHolder1_ctl00.display = "Dynamic";
ContentPlaceHolder1_ctl00.evaluationfunction = "RequiredFieldValidatorEvaluateIsValid";
ContentPlaceHolder1_ctl00.initialvalue = "";
//]]>
</script>


<script type="text/javascript">
//<![CDATA[

var Page_ValidationActive = false;
if (typeof(ValidatorOnLoad) == "function") {
    ValidatorOnLoad();
}

function ValidatorOnSubmit() {
    if (Page_ValidationActive) {
        return ValidatorCommonOnSubmit();
    }
    else {
        return true;
    }
}
       
document.getElementById('ContentPlaceHolder1_ctl00').dispose = function() {
    Array.remove(Page_Validators, document.getElementById('ContentPlaceHolder1_ctl00'));
}
//]]>
</script>

Now let's re-enable the unobtrusive validation. In order to fix the previous exception, we need to install the following Nuget packages: (I like to install jQuery first to get the latest version, although this is not required.)

  1. jQuery
  2. ASPNET.ScriptManager.jQuery
  3. Microsoft.AspNet.ScriptManager.MSAjax
  4. Microsoft.AspNet.ScriptManager.WebForms

At this point, if you run the application again, the exception will be gone =) how cool eh?. This is because the following Nuget packages automatically register the scripts needed with the ScriptManager control.

Let's examine the code added by these Nuget packages using ILSpy:

AspNet.ScriptManager.jQuery

public static class PreApplicationStartCode
    {
        public static void Start()
        {
            string str = "1.8.1";
            ScriptManager.ScriptResourceMapping.AddDefinition("jquery", new ScriptResourceDefinition
            {
                Path = "~/Scripts/jquery-" + str + ".min.js",
                DebugPath = "~/Scripts/jquery-" + str + ".js",
                CdnPath = "http://ajax.aspnetcdn.com/ajax/jQuery/jquery-" + str + ".min.js",
                CdnDebugPath = "http://ajax.aspnetcdn.com/ajax/jQuery/jquery-" + str + ".js",
                CdnSupportsSecureConnection = true,
                LoadSuccessExpression = "window.jQuery"
            });
        }
    }

Microsoft.AspNet.ScriptManager.MSAjax

public static void Start()
{
    ScriptManager.ScriptResourceMapping.AddDefinition("MsAjaxBundle", new ScriptResourceDefinition
    {
        Path = "~/bundles/MsAjaxJs",
        CdnPath = "http://ajax.aspnetcdn.com/ajax/4.5/6/MsAjaxBundle.js",
        LoadSuccessExpression = "window.Sys",
        CdnSupportsSecureConnection = true
    });
    PreApplicationStartCode.AddMsAjaxMapping("MicrosoftAjax.js", "window.Sys && Sys._Application && Sys.Observer");
    PreApplicationStartCode.AddMsAjaxMapping("MicrosoftAjaxCore.js", "window.Type && Sys.Observer");
    PreApplicationStartCode.AddMsAjaxMapping("MicrosoftAjaxGlobalization.js", "window.Sys && Sys.CultureInfo");
    PreApplicationStartCode.AddMsAjaxMapping("MicrosoftAjaxSerialization.js", "window.Sys && Sys.Serialization");
    PreApplicationStartCode.AddMsAjaxMapping("MicrosoftAjaxComponentModel.js", "window.Sys && Sys.CommandEventArgs");
    PreApplicationStartCode.AddMsAjaxMapping("MicrosoftAjaxNetwork.js", "window.Sys && Sys.Net && Sys.Net.WebRequestExecutor");
    PreApplicationStartCode.AddMsAjaxMapping("MicrosoftAjaxHistory.js", "window.Sys && Sys.HistoryEventArgs");
    PreApplicationStartCode.AddMsAjaxMapping("MicrosoftAjaxWebServices.js", "window.Sys && Sys.Net && Sys.Net.WebServiceProxy");
    PreApplicationStartCode.AddMsAjaxMapping("MicrosoftAjaxTimer.js", "window.Sys && Sys.UI && Sys.UI._Timer");
    PreApplicationStartCode.AddMsAjaxMapping("MicrosoftAjaxWebForms.js", "window.Sys && Sys.WebForms");
    PreApplicationStartCode.AddMsAjaxMapping("MicrosoftAjaxApplicationServices.js", "window.Sys && Sys.Services");
}
private static void AddMsAjaxMapping(string name, string loadSuccessExpression)
{
    ScriptManager.ScriptResourceMapping.AddDefinition(name, new ScriptResourceDefinition
    {
        Path = "~/Scripts/WebForms/MsAjax/" + name,
        CdnPath = "http://ajax.aspnetcdn.com/ajax/4.5/6/" + name,
        LoadSuccessExpression = loadSuccessExpression,
        CdnSupportsSecureConnection = true
    });
}

Microsoft.AspNet.ScriptManager.WebForms

public static void Start()
{
    ScriptManager.ScriptResourceMapping.AddDefinition("WebFormsBundle", new ScriptResourceDefinition
    {
        Path = "~/bundles/WebFormsJs",
        CdnPath = "http://ajax.aspnetcdn.com/ajax/4.5/6/WebFormsBundle.js",
        LoadSuccessExpression = "window.WebForm_PostBackOptions",
        CdnSupportsSecureConnection = true
    });
}

As you can see these Nuget packages automatically register the scripts using the ScriptManager object (besides installing the required JavaScript files)

Run the application and examine the rendered HTML. You will note that it's much cleaner now, in this case the inline script has been moved to an external file that can be rendered using bundles to increase performance. The rendered script looks like:

<script src="Scripts/WebForms/MsAjax/MicrosoftAjaxWebForms.js" type="text/javascript"></script>
<script src="Scripts/jquery-1.8.1.js" type="text/javascript"></script>

Much better right?. Notice how ASP.Net used HTML5 custom attributes:

<input name="ctl00$ContentPlaceHolder1$txt" type="text" id="ContentPlaceHolder1_txt" />
    <span data-val-controltovalidate="ContentPlaceHolder1_txt" data-val-errormessage="txt is required" data-val-display="Dynamic" id="ContentPlaceHolder1_ctl00" data-val="true" data-val-evaluationfunction="RequiredFieldValidatorEvaluateIsValid" data-val-initialvalue="" style="display:none;">*</span>
    <input type="submit" name="ctl00$ContentPlaceHolder1$ctl01" value="Send info" onclick="javascript:WebForm_DoPostBackWithOptions(new WebForm_PostBackOptions(&quot;ctl00$ContentPlaceHolder1$ctl01&quot;, &quot;&quot;, true, &quot;&quot;, &quot;&quot;, false, false))" />

The data-val-* are custom attributes used by the unobtrusive validation engine

If you click the button to trigger the validation you will be pleased to see that it works as expected...but we are not done yet =/

The settings we have applied won't work if you intend to use an UpdatePanel control (yeah the evil UpdatePanel again...). This is because this control requires a ScriptManager control on the page (or MasterPage) and we do not have any yet. So let's add a simple ScriptManager control to the master page and see what happens. Add the following code to the Site.master page right under the <form...

<asp:ScriptManager runat="server" ID="scriptManager">
        </asp:ScriptManager>

Run the page again and fire the validation... oops... the client validation has gone =( We only have server validation. I'm not sure why this happens but my best guess is that the just added ScriptManager control is overriding our code settings.

To fix it, change the declaration of the ScriptManager control on the Site.master page to:

<asp:ScriptManager runat="server" ID="scriptManager1">
        <Scripts>
            <asp:ScriptReference Name="MsAjaxBundle" />
            <asp:ScriptReference Name="jquery" />
            <asp:ScriptReference Name="WebForms.js" Assembly="System.Web" Path="~/Scripts/WebForms/WebForms.js" />
            <asp:ScriptReference Name="WebUIValidation.js" Assembly="System.Web" Path="~/Scripts/WebForms/WebUIValidation.js" />
            <asp:ScriptReference Name="MenuStandards.js" Assembly="System.Web" Path="~/Scripts/WebForms/MenuStandards.js" />
            <asp:ScriptReference Name="GridView.js" Assembly="System.Web" Path="~/Scripts/WebForms/GridView.js" />
            <asp:ScriptReference Name="DetailsView.js" Assembly="System.Web" Path="~/Scripts/WebForms/DetailsView.js" />
            <asp:ScriptReference Name="TreeView.js" Assembly="System.Web" Path="~/Scripts/WebForms/TreeView.js" />
            <asp:ScriptReference Name="WebParts.js" Assembly="System.Web" Path="~/Scripts/WebForms/WebParts.js" />
            <asp:ScriptReference Name="Focus.js" Assembly="System.Web" Path="~/Scripts/WebForms/Focus.js" />
            <asp:ScriptReference Name="WebFormsBundle" />
        </Scripts>
    </asp:ScriptManager>

Run the application and our little example will work again as expected

Sadly these new settings are the equivalent to the settings added by code and we need to add them to be able to use the traditional Microsoft AJAX controls.

There's one last thing we need to configure, this is because there's actually a bug with the ValidationSummary control.

To test it, update the Default.aspx page as follows:

<asp:ValidationSummary ID="ValidationSummary1" runat="server" />
    <br />
    <br />
    <br />
    <br />
    <br />
    <br />
    <br />
    <br />
    <br />
    <br />
    <br />
    <br />
    <br />
    <br />
    <br />
    <br />
    <br />
    <br />
    <br />
    <br />
    <br />
    <br />
    <br />
    <br />
    <br />
    <br />
    <br />
    <br />
    <br />
    <br />
    <br />
    <br />
    <br />
    <br />
    <br />
    <br />
    <br />
    <br />
    <br />
    <br />
    <br />
    <br />
    <br />
    <br />
    <br />
    <br />
    <br />
    <br />
    <br />
    <br />
    <br />
    <br />
    <br />
    <br />
    <asp:TextBox runat="server" ID="txt" />
    <asp:RequiredFieldValidator ErrorMessage="txt is required" ControlToValidate="txt" runat="server" Text="*" Display="Dynamic" />
    <asp:Button Text="Send info" runat="server" />

Now run the page again, scroll down until you can see the button and click it... woot your page jumped to the top... the workaround to solve this little bug is to add the following code to the Site.master

<script>
            window.scrollTo = function () {

            };
        </script>


ASP.NET Hosting - ASPHostPortal.com :: ASP.NET Patterns : MVC, MVP and MVVM

clock December 16, 2014 07:42 by author Ben

ASPHostPortal - In this article I would prefer to tell you just what the big difference in between these designs. Let’s commence with all the initial primary 1 - Model-View-Controller - it is a basic sample that applies in the several systems and every day tends to make simpler existence for programmers. If you ask computer software Architects about “How to apply this pattern”, I think you will get a pair of various answers and respectively a couple of answers. Basically, there is certainly 1 common point in these designs - is separation of User Interface (UI) from company logic, it allows do function for front-end developers not thinking about plan code. In the event you bear in mind college or university programming, it had been an enormous bunch of lines of code, composed in code behind (for instance) of .aspx documents, which is not a great practice.


MVC has a few key components: View (consumer interface), Product (company logic) and Controller (contains the logic that modifications the design because of to consumer steps, implements Use Situation). The fundamental idea of this pattern is that the controller and look at is determined by product, but the product will not depend on these two elements. It just permits you to definitely create and check a product without having realizing something concerning the sights and controllers. Preferably, the controller also will not must know about see (even though in follow this can be not often the situation) and, ideally, a single can switch controllers presentation, along with the exact same controller can be utilized for various sights (as an example, the controller might depends on person who is logged in). The consumer sees a check out, creates some motion, this motion redirects towards the controller and subscribes for adjustments from the product, controller makes particular operations with info design, and also the see will get the newest point out of the design and displays it for the consumer.

Implementation in ASP.NET looks like as follows (instance taken from MSDN [5]). Presentation - this can be a common aspx markup:

<html>
<body>
    <form id="start" method="post" runat="server">
        <asp:dropdownlist id="recordingSelect" runat="server" />
        <asp:button runat="server" text="Submit" onclick="SubmitBtn_Click" />
        <asp:datagrid id="MyDataGrid" runat="server" enableviewstate="false" />
    </form>
</body>
</html>

Model – a separate class, which has methods for obtaining data (model implementations often includes Data Access Level):

public class DatabaseGateway
{
   public static DataSet GetRecordings()
   {
     DataSet ds = ...
     return ds;
   }
 
   public static DataSet GetTracks(string recordingId)
   {
      DataSet ds = ...
      return ds;
   }
}

Example of a model is not the best in this case, but it’s still not always need to have a really describe the business model in the classes, sometimes it’s enough to work with DataSets. The most interesting thing is the implementation of the controller, in fact it’s code behind of aspx page

using System;
using System.Data;
using System.Collections;
using System.Web.UI.WebControls;
 
public class Solution : System.Web.UI.Page
{
    private void Page_Load(object sender, System.EventArgs e)
    {
        if (!IsPostBack)
        {
            DataSet ds = DatabaseGateway.GetRecordings();
            recordingSelect.DataSource = ds;
            recordingSelect.DataTextField = "title";
            recordingSelect.DataValueField = "id";
            recordingSelect.DataBind();
        }
    }
 
    void SubmitBtn_Click(Object sender, EventArgs e)
    {
        DataSet ds = DatabaseGateway.GetTracks((string)recordingSelect.SelectedItem.Value);
 
        MyDataGrid.DataSource = ds;
        MyDataGrid.DataBind();
    }
    #region Web Form Designer generated code
    override protected void OnInit(EventArgs e)
    {
        //
        // CODEGEN: This call is required by the ASP.NET Web Form Designer.
        //
        InitializeComponent();
        base.OnInit(e);
    }
 
    /// <summary>
    /// Required method for Designer support - do not modify
    /// the contents of this method with the code editor.
    /// </summary>
    private void InitializeComponent()
    {
        this.submit.Click += new System.EventHandler(this.SubmitBtn_Click);
        this.Load += new System.EventHandler(this.Page_Load);
 
    }
    #endregion
}

This approach will allow us to easily write tests for the model, but not for the controller (of course, all things are possible, but we need to try).

[TestFixture]
public class GatewayFixture
{
    [Test]
    public void Tracks1234Query()
    {
 
        DataSet ds = DatabaseGateway.GetTracks("1234");
        Assertion.AssertEquals(10, ds.Tables["Track"].Rows.Count);
    }
 
    [Test]
    public void Tracks2345Query()
    {
        DataSet ds = DatabaseGateway.GetTracks("2345");
        Assertion.AssertEquals(3, ds.Tables["Track"].Rows.Count);
    }
 
    [Test]
    public void Recordings()
    {
        DataSet ds = DatabaseGateway.GetRecordings();
        Assertion.AssertEquals(4, ds.Tables["Recording"].Rows.Count);
 
        DataTable recording = ds.Tables["Recording"];
        Assertion.AssertEquals(4, recording.Rows.Count);
 
        DataRow firstRow = recording.Rows[0];
        string title = (string)firstRow["title"];
        Assertion.AssertEquals("Up", title.Trim());
    }
}


This sample also is made up from the 3 parts. Looking at the diagram, it really is distinct that for representation is not essential to subscribe for adjustments inside the product, the controller is renamed as Presenter, lets illustration learn about modifications. Current strategy allows you to develop an abstraction of representation. To apply this pattern, you should create interfaces of illustration. Every illustration can have interfaces with a sets of strategies and qualities which can be required for presenter, presenter initializes with correct interface, subscribes for the events of illustration and offers data when it necessary. This approach permits you to develop programs utilizing the methodology of TDD (Test-driven development). This pattern can be utilized to ASP.NET, let us take a look at the prior instance. Depart representation and product from your earlier example, and code behind of the page we'll modify just a little bit.

//Abstract View
public interface ISolutionView
{
    string SelectedRecord { get; }
    DataSet Recordings { set; }
    DataSet Tracks { set; }
}
 
//Presenter
public class SolutionPresenter
{
    private ISolutionView _view;
    
    public SolutionPresenter(ISolutionView view)
    {
        _view = view;
    }
    
    public void ShowTracks()
    {
        DataSet ds = DatabaseGateway.GetTracks(_view.SelectedRecord);
        _view.Tracks = ds;
    }
    
    public void Initialize()
    {
        DataSet ds = DatabaseGateway.GetRecordings();
        _view.Recordings = ds;
    }
}
 
 
//View
public class Solution : System.Web.UI.Page, ISolutionView
{
    private SolutionPresenter _presenter;
    
    private void Page_Load(object sender, System.EventArgs e)
    {
        if(!IsPostBack)
        {
            _presenter.Initialize();
        }
    }
 
    override protected void OnInit(EventArgs e)
    {
        base.OnInit(e);
        _presenter = new SolutionPresenter(this);
        submit.Click += delegate { _presenter.ShowTracks(); };
    }
 
    public string SelectedRecord
    {
        get { return (string)recordingSelect.SelectedItem.Value; }
    }
    
    public DataSet Recordings
    {
        set
        {
            recordingSelect.DataSource = value;
            recordingSelect.DataTextField = "title";
            recordingSelect.DataValueField = "id";
            recordingSelect.DataBind();
        }
    }
    
    public DataSet Tracks
    {
        set
        {
            MyDataGrid.DataSource = value;
            MyDataGrid.DataBind();
        }
    }
}

Right now we have logic within the presenter, and we have been able to examination SolutionPresenter with I SolutionView individually by using Mocks.

Model-View-ViewModel

Right here once again, you will find 3 elements: model, see, as well as a 3rd part - an additional model referred to as ViewModel. This pattern is ideal for technologies, where there is a two-way Binding (synchronization) of elements to the product, as in WPF. Big difference between MVVM and MVP pattern is that for MVVM SelectedRecord property, from your previous illustration, needs to be positioned inside of the ViewModel, and it should be synchronized with the required field of see. So, this is the essential thought of ??WPF. ViewModel - it is type of tremendous converter that converts information of product to the representation, it describes the fundamental homes from the check out and the logic of conversation with the design.


ASP.NET 4.5 Hosting - ASPHostPortal.com :: Uploading Several Data files Employing jQuery and Generic Handler in ASP.NET 4.5

clock December 5, 2014 09:11 by author Ben

This post describes the best way to upload numerous data files in ASP.NET Kinds using the jQuery and Generic Handler. Generally builders utilize the FileUpload Server management to add data files from the client device for the server that's rendered as as an Enter factor and set to file and helps you to pick out the file or various information. We can easily make use of the jQuery to help make an Ajax connect with towards the server and Submit the many picked documents for the Generic Handler as opposed to an entire webpage postback.


On this short article for creating the application, I am utilizing Visual Studio 2013 that has the framework 4.5.1. So, let us start with all the following course of action.

Creating WebForms

Step 1: Open Visual Studio and create the ASP.NET Web Application.

Step 2: Select the WebForms project template to proceed.

Visual Studio automatically creates the project and adds files and folders to the project by default.

Creating WebForm


Step 1: Just right-click on the project and add a new folder named "UploadedFiles".


Step 2: Just right-click on the project and add a new Web Form and replace the body content from the following content:

<form id="form1" runat="server">

    <h2>ASP.NET</h2>
    <p class="lead">Selcting Multiple Files using jQuery and Generic Handler</p>  


    <div class="form-group">
        <div>
            <asp:Label runat="server" AssociatedControlID="MultipleFilesUpload">Select Files</asp:Label>           
            <asp:FileUpload ID="MultipleFilesUpload" runat="server" AllowMultiple="true" />          

        </div>
    </div>
    <div class="form-group">
        <div class="col-md-offset-2 col-md-10">
            <asp:Button runat="server" ID="BtnUpload" Text="Upload Files" CssClass="btn btn-default" />
        </div>
    </div>  
 </form>


In the code above, I used the AllowMultiple property of FileUpload that is set to true. It is one of the HTML 5 features used in here.

Step 2: Now in the <head> section add the following code:

<script src="Scripts/jquery-1.10.2.js"></script>

<link href="Content/bootstrap.css" rel="stylesheet" />

<link href="Content/Site.css" rel="stylesheet" />

<script type="text/javascript">
    $(document).ready(function () {
        $("#BtnUpload").click(function (event) {
            var uploadfiles = $("#MultipleFilesUpload").get(0);
            var uploadedfiles = uploadfiles.files;
            var fromdata = new FormData();
            for (var i = 0; i < uploadedfiles.length; i++) {
                fromdata.append(uploadedfiles[i].name, uploadedfiles[i]);
            }
             var choice = {};
            choice.url = "UploadHandler.ashx";
            choice.type = "POST";
            choice.data = fromdata;
            choice.contentType = false;
            choice.processData = false;
            choice.success = function (result) { alert(result); };
            choice.error = function (err) { alert(err.statusText); };
            $.ajax(choice);
            event.preventDefault();
        });
    });
</script>

Via the code over, the data files are chosen inside the file upload handle working with the information residence of the DOM factor. the loop iterates by means of many of the information then calls the append() method of the FormData to incorporate the data files into the FormData item.

Now, the info is usually to be sent into the server. The £.ajax() is employed to transfer the information. The choice item supplies numerous options such as focus on URL and HTTP process. Now we have set the URL home on the GenericHandler file named UploadHandler.ashx . We now have established the contentType and processData home to phony with which the jQuery will not likely URL encode the info while sending into the server. The achievements and mistake properties are utilised to display the messages as a result of an warn.

Creating Generic Handler

Step 1: Add the Generic Handler by right-clicking on the project named UploadHandler.


Step 2: Modify the code with the following code:

namespace UploadMultipleFilesApp
{
    public class UploadHandler : IHttpHandler
    {
        public void ProcessRequest(HttpContext context)
        {
            if (context.Request.Files.Count > 0)
            {
                HttpFileCollection SelectedFiles = context.Request.Files;
                for (int i = 0; i < SelectedFiles.Count; i++)
                {
                    HttpPostedFile PostedFile = SelectedFiles[i];
                    string FileName = context.Server.MapPath("~/UploadedFiles/" + PostedFile.FileName);
                    PostedFile.SaveAs(FileName);                   
                }
            }
            else
            {
                context.Response.ContentType = "text/plain";
                context.Response.Write("Please Select Files");
            }
            context.Response.ContentType = "text/plain";
            context.Response.Write("Files Uploaded Successfully!!");
        }
        public bool IsReusable
        {
            get
            {
                return false;
            }
        }
    }
}

In this article we will see which the information which might be posted to your server and will be accessed using the Ask for object. Each individual element in the HttpFileCollection is of type HttpPostedFile. FileName property is utilized to receive the file identify of posted file and return it and also the similar name id used to conserve the file.

Run WebForm

Now run the webform and choose the files as shown below that the files are selected.


After clicking on Upload Files, the message is generated.


Summary

This article explained the best way to choose numerous information and add them utilizing jQuery and Generic Handler in ASP.NET Web Forms. Joyful Coding and thanks for looking at.


ASP.NET 4.5 Hosting - ASPHostPortal.com :: Add Multiple Files Utilizing ASP.NET 4.5

clock November 28, 2014 05:07 by author Ben

In earlier versions of ASP.NET (edition under ASP.NET 4.5), we didn't have any inbuilt functionality to add several files at the same time. ASP.NET FileUpload handle permits uploading just one file in a time. Alternate answers to add numerous files are third party controls like Telerik or Devexpress. We can also use various jQuery Plugin like Uploadify to attain comparable performance.


In ASP.NET 4.5, we can add multiple documents simultaneously making use of ASP.NET FileUpload control. In ASP.NET 4.5, FileUpload Control support HTML5 several attribute.

Under are the steps to add numerous information utilizing ASP.NET 4.5 :

  1. In Visual Studio 2012, In Visual Studio 2012, create a new website using .Net 4.5 framework.
  2. Add a new web form (for example FileUpload.aspx) in newly created website.
  3. In code-beside file of FileUpload.aspx, write following code for FileUpload Control:

<asp:fileupload AllowMultiple="true" id="MultipleFileUpload" runat="server">
</asp:fileupload>

In above code, I have set AllowMultiple property of FileUpload Control to true.

Add one button to upload multiple files using FileUpload Control on button click.

<asp:Button ID="btnUpload" runat="server" Text="Upload" OnClick="btnUpload_Click" />

Write below code on button click event handler.

protected void btnUpload_Click(object sender, EventArgs e)
    {
        if (MultipleFileUpload.HasFiles)
        {
            StringBuilder UploadedFileNames = new StringBuilder();

            foreach (HttpPostedFile uploadedFile in MultipleFileUpload.PostedFiles)
            {
                string FileName = HttpUtility.HtmlEncode(Path.GetFileName(uploadedFile.FileName));
                uploadedFile.SaveAs(System.IO.Path.Combine(Server.MapPath("~/Files/"), FileName));
                UploadedFileNames.AppendFormat("{0}<br />", FileName);
            }
            Response.Write("Uploaded Files are : <br/>" + UploadedFileNames);
        }
    }

On button click, I am checking for multiple files and saving those files into Files folder of web application.
Compile source code and run the website application.


I had selected five images to upload. Once I had clicked on Upload button, all five images were uploaded successfully in Files folder.


ASPHostPortal.com to Launch New Data Center in Hong Kong

clock November 25, 2014 08:10 by author Ben

ASPHostPortal.com to Start New Data Center in Hong Kong on November 2014

ASPHostPortal is known for credible and loyal hosting solutions. Apart from the reliability in the ASPHostPortal Uptime, which features 99.9 per cent common uptime, ASPHostPortal also provides outstanding data center which displays ASPHostPortal large speed and large overall performance web hosting package deal. Lately, ASPHostPortal.com launch its new Data Center in Hons Kong on November 2014 with space for more than 10.000 physical servers, and allowing customers’ to satisfy their  data residency needs.

The brand new facility will provide consumers and their finish customers with ASPHostPortal.com providers that meet up with in-country info residency needs. It will also complement the existing ASPHostPortal.com Asia (Singapore) Data Center. The Hong Kong Data Center will offer the full variety of ASPHostPortal.com website hosting infrastructure services, which includes bare steel servers, virtual servers, storage and networking.

ASPHostPortal offers the perfect mixture of affordability and dependability. They have an excellent uptime history with numerous months this 12 months boasting a lot more than 99.9% typical uptime. Their hosting bundle displays velocity and efficiency. Their information heart might take significantly from the credit rating for such superb providers. The brand new data center will allow clients to copy or integrate data between Asia Data Center with higher transfer speeds and unmetered bandwidth (at no charge) in between amenities.

“With ASPHostPortal, picking the Data Center area is really a totally free function and alternative to all consumers. The shopper just chooses US, Europe, Asia or Australia. It is straightforward, intuitive and convenient. The choice is totally free, and there will never be any other cost to the person related with this choice,” said Dean Thomas, Manager at ASPHostPortal.com.

Customers that have any questions on the feature and also the choice which is most suitable for his or her functions ought to truly feel totally free to get in touch with ASPHostPortal via their 24/7/365 customer assistance crew. ASPHostPortal may help you select the right choice that will best fit your needs.

To find out more about new data center in Hong Kong, please visit http://asphostportal.com/Hosting-Data-Center-HongKong.

About ASPHostPortal.com:

ASPHostPortal.com is a hosting business that greatest support in Windows and ASP.NET-based hosting. Solutions consist of shared web hosting, reseller hosting, and SharePoint hosting, with specialty in ASP.NET, SQL Server, and architecting very scalable solutions. Like a top little to mid-sized company web hosting provider, ASPHostPortal.com attempt to supply essentially the most technologically advanced hosting options obtainable to all customers across the world. Security, reliability, and efficiency are in the core of web hosting operations to make certain every site and/or software hosted is extremely secured and performs at ideal stage.


ASP.NET MVC Hosting - ASPHostPortal.com :: How to Structure The Application in ASP.NET MVC Areas

clock November 25, 2014 05:11 by author Ben

This week I discovered a difficulty related to structuring an ASP.NET MVC web applications one advancement crew was dealing with. The things they have been trying to do was quite straightforward: to create a folder framework each having their particular subfolders for View/Controller/Scripts/CSS and so on. The appliance assets like JS/CSS etc. were not getting rendered properly. The difficulty was owing to NET.config file lying underneath the subfolder, which when moved to the Views folder below that subfolder things went good. The purpose of this post just isn't to debate regarding the specifics of that difficulty and it is solution.But to discuss regarding how we will very easily framework our ASP.NET MVC Web application as per distinct modules, which is an clear need for just about any big application.


ASP.NET MVC follows the paradigm of “Convention Over Configuration” and default folder structure and naming conventions operates good to get a smaller sized software. But for relatively bigger a single there is a necessity to customise.The framework also offers adequate provisions for the same.You'll be able to have your personal controller manufacturing facility to get custom methods to making the controller classes and custom see engine for finding the rendering the sights. But when the necessity would be to structure the applying to distinct subfolders as per modules or subsites I believe using “Area” in ASP.NET MVC will likely be useful to make a streamlined software.

You can add a area to some ASP.NET MVC undertaking in Visual Studio as shown beneath.

Here I have added an area named “Sales”. As shown in the figure below a folder named “Areas” is created with a subfolder “Sales”. Under “Sales” we can see the following

  • The standard folder of Models/Views/Controllers
    • A Web.config under the Views folder. This contains the necessary entries for the RazorViewEngine to function properly
  • A class named SalesAreaRegistration.

The code (auto generated) for the SalesAreaRegistration class is shown below:

public class SalesAreaRegistration : AreaRegistration
{
    public override string AreaName
    {
        get
        {
            return "Sales";
        }
    }
 
    public override void RegisterArea(AreaRegistrationContext context)
    {
        context.MapRoute(
            "Sales_default",
            "Sales/{controller}/{action}/{id}",
            new { action = "Index", id = UrlParameter.Optional }
        );
    }
}

System.Web.Mvc.AreaRegistration may be the summary base class use registering the places to the ASP.NET MVC Web Application. The method void RegisterArea(AreaRegistrationContext context) must be overriden to sign up the realm by providing the route mappings. The class System.Web.Mvc.AreaRegistrationContext encapsulates the mandatory information (like Routes) required to sign-up the area.

In Global.asax.cs Application_Start occasion we must RegisterAllAreas() technique as demonstrated under:

AreaRegistration.RegisterAllAreas();

The RegisterAllAreas method looks for all types deriving from AreaRegistration and invokes their RegisterArea method to register the Areas.

Now with the necessary infrastructure code in place I have added a HomeController and Index page for the “Sales” area as shown below.

I have to change the Route Registration for the HomeController to avoid conflicts and provide the namespace information as shown below:

public static void RegisterRoutes(RouteCollection routes)
{
            routes.IgnoreRoute("{resource}.axd/{*pathInfo}");
 
            routes.MapRoute(
                "Default", // Route name
                "{controller}/{action}/{id}", // URL with parameters
                new { controller = "Home", action = "Index", id = UrlParameter.Optional },// Parameter defaults
                new String[] { "AreasDemo.Controllers" }
            );
}

Now I will add a link to the Sales area by modifying the _Layout.cshtml as shown below:

<li>@Html.ActionLink("Sales", "Index", "Home", new { area="Sales"},null)</li>

Here I am navigating to the area “Sales” from the main application so I have to provide area information with routeValues. The following overload is being used in the code above:

public static MvcHtmlString ActionLink(this HtmlHelper htmlHelper, string linkText, string actionName, string controllerName, object routeValues, object htmlAttributes);


ASP.NET 4.5 Hosting - ASPHostPortal :: Integrate Stripe .Net Payment Processing Library With your ASP.Net 4.5 C# Application

clock November 11, 2014 06:05 by author Ben

The advantages of Stripe

Accepting payment cards on-line has not been less difficult than it's now. Businesses like Stripe have created it simple for builders like ourselves to include sophisticated payment methods into our internet programs without having to bother with the safety compliance and audits which are typically associated with payment card info storage.


Stripe lets you preserve customers’ details securely, create custom made payment structures, and also develop customized payment programs for multiple or one customers.

Stripe.Net

Stripe.Net is definitely an open resource library to the Microsoft .NET Framework that permits straightforward integration into your .NET tasks. Today we are going to only be masking the integration of Stripe.Net into an ASP.NET undertaking, however you can study the documentation and find out more regarding how to use the Stripe.Net library on the Stripe.Net Github repository.

Our Project

For your goal of the tutorial, we are going to be producing a brand new ASP.Net internet application. Should you already have an application that you simply want to combine Stripe.Web with, which is amazing! If not, or for those who have by no means developed an ASP.Net application, follow these initial step to obtain up and running.

Very first, we'd like to create the venture. We will do that by opening up Microsoft Visual Studio, and picking Visual C# > Web > ASP.Net Web Forms Application. Notice that we have been utilizing the .NET 4.5 Framework on the best from the window, really feel totally free to change the framework model in your liking. Push OK.

Referencing the Stripe.Net Library

When you have your software open up in Visual Studio, you’re likely to require to put in the Stripe.Net library to use it is classes and methods inside your program. By reading the Stripe.Net Github page, we have discovered the library is obtainable like a NuGet package in Visual Studio, which is the optimal way to integrate the library, so that is how we’re going to do it. Within your solution explorer locate the References listing and proper click on it. You will see a choice labelled “Manage NuGet Packages…”, click that alternative within the dropdown menu.

You'll be prompted with the Control NuGet Packages window. Navigate down the remaining menu and click on Online. Now you'll be able to kind Stripe.Net to the lookup bar in the top left corner in the window, and (if you are related to the world wide web) you will note the Stripe.Net library seem within the center of the window. Set up the package and you'll notice that it installs the json.NET and Stripe.NET package inside the references listing. The explanation this occurs, would be that the Stripe.Net library relies on the json.NET library, so that you must include it into your references directory to ensure that Stripe.Net to operate.

Authentication

The last step of integration in this process, is verifying your account with Stripe. The designated authentication method that Stripe has provided for us is their developer API Key. This key is unique to each Stripe user and verifies your account so Stripe knows which user account all of your transactions belong to.

We only need to place this API Key into our application once by opening up the Web.config file and placing the following code before the </configuration> tag.

<appSettings>
  <add key="StripeApiKey" value="[your API Key]"/>
</appSettings>

Now you’re all set to use the Stripe.NET library in your application! Just remember to reference the json.NET and Stripe.NET libraries in any files you are using Stripe.NET functionality.


ASP.Net 4.5 Hosting - ASPHostPortal.com :: How You Can Develop Asynchronous Device Page in ASP.Net 4.5

clock November 4, 2014 05:15 by author Ben

Within this tutorial we'll make use of the most recent ASP.Net 4.5 methods to come back up with a asynchronous gadget web page via help of Visual Studio Express.

The sample software that we're going to use listed here makes use of new async and awaits key phrases and they're obtainable in .NET 4.5 and Visual Studio 2012. This allows the complier to hold the responsibility of getting care from the complex transformations that are necessary for asynchronous programming. Also the compiler will allow you to write the code using the C#'s synchronous manage movement constructs. Therefore the compiler on its own applies the transformations which can be necessary to deploy call-backs. This is done in order to prevent blocking threads.


ASP.Net asynchronous web pages has to comprise in the Web page directive and Async feature label set to “true”. The code detailed under demonstrates the Page directive with all the value of Async attribute set to accurate for the DeviceAsync.aspx page.

<%@ Page Async="true" Language="C#" AutoEventWireup="true"
    CodeBehind="DeviceAsync.aspx.cs" Inherits="WebAppAsync.DeviceAsync" %>

The below code reflects the Device synchronous Page_Load method as well as the DeviceAsync asynchronous page. In case the browser supports the HTML5 <mark> element, the changes can be seen in DeviceAsync in yellow highlight.

protected void Page_Load(object sender, EventArgs e)
{
   var deviceService = new DeviceService();
   DeviceGridView.DataSource = deviceService.GetDevice();
   DeviceGridView.DataBind();
}

The below displays the asynchronous version:
protected void Page_Load(object sender, EventArgs e)
{
    RegisterAsyncTask(new PageAsyncTask(GetDeviceSvcAsync));
}

private async Task GetDeviceSvcAsync()
{
    var deviceService = new DeviceService();
    DeviceGridView.DataSource = await deviceService.GetDeviceAsync();
    DeviceGridView.DataBind();
}

The beneath lists the changes that were applied to permit DeviceAsync page to be asynchronous.

  • This is a need to to set the Webpage directive Async attribute to "true".
  • The RegisterAsyncTask indicates is deployed to sign up an asynchronous task that includes of the code which can be operated asynchronously.
  • The new GetDeviceSvcAsync approach is labelled with the async key phrase that informs the compiler to make callbacks for parts of the body and in addition to generate a Job of its personal which is returned.
  • Should you recognize, we appened "Async" towards the asynchronous technique title although this is not required however it is the conference while you're writing asynchronous methods.
  • The return sort in the Task defines the perform in progress and offers the callers of the approach having a deal with through which to halt for your completion of the asynchronous operation. The return type in the new GetDeviceSvcAsync method is Activity.
  • Internet support call helps make use of the await keyword.
  • The asynchronous web service API was referred to as GetDeviceAsync.

GetDeviceAsync is another asynchronous method that's known as inside of the GetDeviceSvcAsync method physique. Task<List<Device>> is immediately returned by a GetDeviceAsync that will finally full on the availability of the info. For your purpose that you'd not want to proceed additional just before you have the device data, the code waits for the task making use of the await keyword. 1 might make usage of the await keyword just in techniques annotated with all the async search term.

Until finally we have the completion from the task, the thread is not blocked from the await search term. It indications up the rest of the method as being a callback within the job, and immediately returns. Within the completion in the awaited activity, that callback will likely be invoked thereby resuming the implementation from the method right exactly where it left off.

The below code displays the GetDevice and GetDeviceAsync techniques:

public List<Device> GetDevice()
{
   var uri = Util.getServiceUri("Device");
   using (WebClient webClient = new WebClient())
   {
        return JsonConvert.DeserializeObject<List<Device>>(
            webClient.DownloadString(uri)
        );
    }
}

public async Task<List<Device>> GetDevicesAsync()
{
    var uri = Util.getServiceUri("Devices");
    using (HttpClient httpClient = new HttpClient())
    {
        var response = await httpClient.GetAsync(uri);
        return (await response.Content.ReadAsAsync<List<Device>>());
    }
}

The asynchronous modifications which were utilized are same as those applied to the DevicesAsync above.

  • Async key phrase was used to annotate the method signature, the return sort was changed to Task<List<Device>>, and Async was appended for the technique title.
  • The asynchronous HttpClient is utilized rather than synchronous WebClient class.
  • The await keyword was used to the HttpClient GetAsync asynchronous method.

The below image displays the asynchronous device see.

The browsers screen of the gadget info is same concerning the check out that's created by the synchronous contact. Here the only difference will be the asynchronous model might be more execute ant below main hefty loads.

Methods that are hooked up with RegisterAsyncTasks will likely be executed instantly after PreRender. 1 may also utilize async void page events directly as may be seen from the under code:

protected void Page_Load(object sender, EventArgs e) {
    await ...;
    // do work
}

The disadvantage for the async occasions is that the programmers now don't have the complete use of the occasions when activities are applied. Example, in case both an .aspx as well as a .Master signifies Page_Load occasions and a minimum of 1 of them is asynchronous, there's no guarantee from the execution.

Getting a developer, it is recommended to apply the above stated procedure to come up with the asynchronous unit web page making use of the newest ASP.Net 4.5 systems.


ASP.NET MVC SignalR Hosting - ASPHostPortal.com :: Create a Real-Time Message Board Making use of ASP.Net MVC 5, SignalR 2, and KnockoutJS

clock October 28, 2014 06:05 by author Ben

Have you ever questioned how Facebook sends you notifications the instant you receive a new information, friend request, or remark? Does the customer constantly look for new events? Doesn’t that consume a whole lot of memory within the user’s side? What sort of pressure does that place on Facebook’s servers?


Due to HTMl five as well as the support of web sockets in modern browsers, this performance can be achieved with out over-taxing the user or even the server. Leveraging a library like SignalR for .NET or Socket.IO for Node.js, most of the very hard perform around working with web sockets is already completed to suit your needs.

On this tutorial, we’re planning to build a real-time concept board, very similar to Facebook. Although this will not be something you should model and drive to manufacturing as-is, it could supply you with the fundamental groundwork for creating your own personal real-time net application.

Let's Start

Start the Project - Initial, begin a new ASP.Net MVC 5 project from Visual Studio 2013. You can title it what ever you want, but I named the undertaking “MessageBoardTutorial”. Make sure you place a checkmark close to "Web API".


Get dependencies with NuGet - Let’s go on and get downloading our required libraries out of the best way. We can get every thing with NuGet, saving us plenty of your time. Within the Remedy Explorer, right-click around the project name and click on “Manage NuGet Packages…” from the context menu.

Initial, you'll want to update all the packages presently set up to their newest variations. Be aware that because MVC 4, all the MVC libraries are bin deployed, so you will need to update them when commencing a fresh undertaking. On the still left, simply click on “Updates->nuget.org” and also you will see each of the offers that must be up-to-date. Just click on on “Update All” and allow NuGet do its thing.
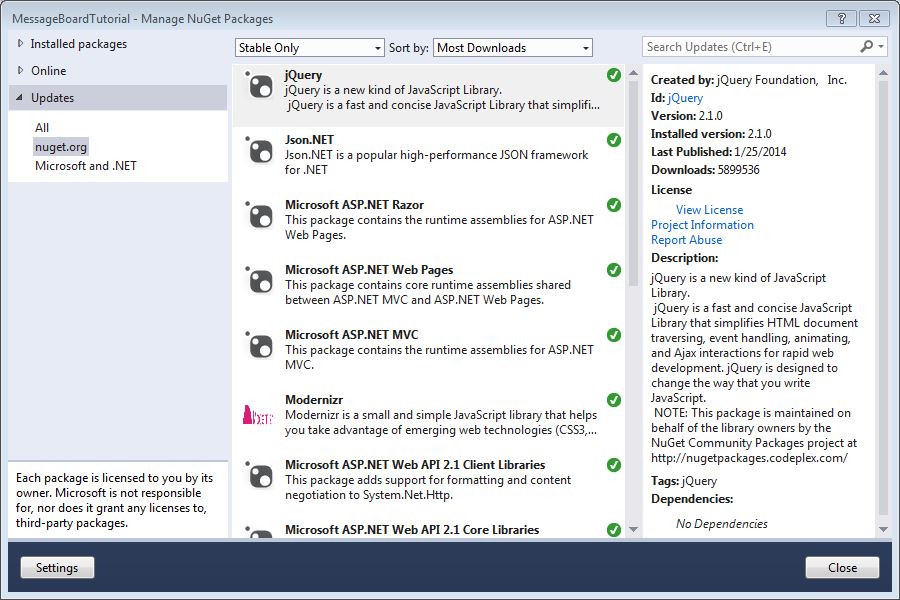

When that's done, near the window. Open up the Package Supervisor Console in Tools > NuGet Package Manager > Package Manager Console. We must set up a few a lot more deals for this tutorial. Run the subsequent commands to set up the deals we need for this tutorial.

PM> Install-Package EntityFramework
PM> Install-Package Microsoft.AspNet.SignalR
PM> Install-Package Moment.js
PM> Install-Package KnockoutJS

NuGet will put in several dependencies that SignalR 2 needs. Additionally, you will get yourself a good tiny readme.txt. Feel free to read this, but we are going to be covering this listed here also.

The Front End

We are going to now truly commence coding. The Layout - First, we've got to go into the structure file and simplify issues somewhat - we don't truly require the responsive menu for this tutorial. Open /Views/Shared/_Layout.cshtml. It ought to now search such as this, assuming you failed to modify the default directories:

<!DOCTYPE html>
<html>
<head>
    <meta charset="utf-8" />
    <meta name="viewport" content="width=device-width, initial-scale=1.0">
    <title>@ViewBag.Title</title>
    @Styles.Render("~/Content/css")
    @Scripts.Render("~/bundles/modernizr")
</head>
<body>
    <div class="container body-content">
        @RenderBody()
    </div>
 
    @Scripts.Render("~/bundles/jquery")
    @Scripts.Render("~/bundles/bootstrap")
    @RenderSection("scripts", required: false)
</body>
</html>

Edit the Home Controller and Index View - We will only need a single controller and view for this software. Inside the Remedy Explorer, open Controllers > HomeController and take away all Steps except for Index.

Now, open up the Index check out and just delete every thing. If you are a neat freak like me, truly feel totally free to eliminate another views inside the Views > Home.

Edit the View - Under is the see for your application. In case you are new to KnockoutJS, a few of this may appear unfamiliar. I will clarify a lot more when we get to the JavaScript inside the up coming section. Just be aware that wherever the thing is a "data-bind" attribute, the component is joined into a JS worth we are tracking with Knockout.

We're mostly using regular CSS courses from Bootstrap. Bootstrap gives us a quick way to incorporate a responsive grid framework for our view. The still left column includes our "login" type and also the proper the information board itself.

@{
    ViewBag.Title = "Land of Ooobook";
}
 
<div class="jumbotron">
    <h1>Land of Ooobook</h1>
    <p>Candy Kingdom's Social Network</p>
</div>
 
<div class="container">
    <div class="row">
        <div class="col-md-4">
            <form class="pad-bottom" data-bind="visible: !signedIn(), submit: signIn">
                <div class="form-group">
                    <label for="username">Sign In</label>
                    <input class="form-control" type="text" name="username" id="username" placeholder="Enter your userame" />
                </div>
                <button type="submit" class="btn btn-primary">Sign In</button>
                <br />
            </form>
 
            <div data-bind="visible: signedIn">
                <p>You are signed in as <strong data-bind="text: username"></strong></p>
            </div>
        </div>
        <div class="col-md-8">
            <div data-bind="visible: notifications().length > 0, foreach: notifications">
                <div class="summary alert alert-success alert-dismissable">
                    <button type="button" class="close" data-dismiss="alert" aria-hidden="true">×</button>
                    <p data-bind="text: $data"></p>
                </div>
            </div>
 
            <div class="new-post pad-bottom" data-bind="visible: signedIn">
                <form data-bind="submit: writePost">
                    <div class="form-group">
                        <label for="message">Write a new post:</label>
                        <textarea class="form-control" name="message" id="message" placeholder="New post"></textarea>
                    </div>
                    <button type="submit" class="btn btn-default">Submit</button>
                </form>
            </div>
 
            <ul class="posts list-unstyled" data-bind="foreach: posts">
                <li>
                    <p>
                        <span data-bind="text: username" class="username"></span><br />
                    </p>
                    <p>
                        <span data-bind="text: message"></span>
                    </p>
 
                    <p class="no-pad-bottom date-posted">Posted <span data-bind="text: moment(date).calendar()" /></p>
 
                    <div class="comments" data-bind="visible: $parent.signedIn() || comments().length > 0">
                        <ul class="list-unstyled" data-bind="foreach: comments, visible: comments().length > 0">
                            <li>
 
                                <p>
                                    <span class="commentor" data-bind="text: username"></span>
                                    <span data-bind="text: message"></span>
                                </p>
                                <p class=" no-pad-bottom date-posted">Posted <span data-bind="text: moment(date).calendar()" /></p>
                            </li>
                        </ul>
 
                        <form class="add-comment" data-bind="visible: $parent.signedIn, submit: addComment">
                            <div class="row">
                                <div class="col-md-9">
                                    <input type="text" class="form-control" name="comment" placeholder="Add a comment" />
                                </div>
                                <div class="col-md-3">
                                    <button class="btn btn-default" type="submit">Add Comment</button>
                                </div>
                            </div>
                        </form>
                    </div>
                </li>
            </ul>
        </div>
    </div>
 
</div>
 
@section scripts {
    <script src="~/Scripts/moment.js"></script>
    <script src="~/Scripts/jquery.signalR-2.0.3.min.js"></script>
    <script src="~/signalr/hubs"></script>
    <script src="~/Scripts/knockout-3.1.0.js"></script>
    <script src="~/Scripts/board.js"></script>
}

Add a bit of CSS - We have a few custom CSS classes on top of what Bootstrap provides. Currently, /Content/Site.css is in your style bundle. Open it and replace everything above the validation helper classes with this:

.pad-bottom {
    margin-bottom: 10px;
}
 
.no-pad-bottom {
    margin-bottom: 0;
}
 
.new-post {
    background-color: #c9e0fc;
    padding: 15px 10px;
}
 
.username {
    font-weight: bold;
    color: #ff6a00;
}
 
.commentor {
    font-weight: bold;
    color: #004bff;
}
 
.posts li .date-posted {
    font-size: 12px;
    font-style: italic;
}
 
.posts li {
    border-bottom: 1px solid #CCC;
    padding: 15px 0;
}
 
.posts li:first-child {
    border-top: 1px solid #CCC;
}
 
.posts .comments {
    background-color: #efefef;
    margin-top: 10px;
    padding: 10px;
    padding-left: 30px;
}
 
.posts .comments li {
    padding-top: 10px;
    border: 0;
}
 
form.add-comment  {
    margin-top: 10px;
    margin-bottom: 10px;
}

The JavaScript

Create a script - In the Scripts directory, make a new script called board.js. This script will contain the client-side logic for the application.

Edit the script - Let's begin with our script.

A message board is made of posts and comments to those posts. Let's define those objects.

var post = function (id, message, username, date) {
    this.id = id;
    this.message = message;
    this.username = username;
    this.date = date;
    this.comments = ko.observableArray([]);
 
    this.addComment = function (context) {
        var comment = $('input[name="comment"]', context).val();
        if (comment.length > 0) {
            $.connection.boardHub.server.addComment(this.id, comment, vm.username())
            .done(function () {
                $('input[name="comment"]', context).val('');
            });
        }
    };
}
 
var comment = function (id, message, username, date) {
    this.id = id;
    this.message = message;
    this.username = username;
    this.date = date;
}

A submit has an observable variety of remarks. This enables it in order that when new remarks come in, it's immediately displayed within the view.

We've outlined our submit and remark objects. Now let's define our view design that is the glue from the application.

var vm = {
    posts: ko.observableArray([]),
    notifications: ko.observableArray([]),
    username: ko.observable(),
    signedIn: ko.observable(false),
    signIn: function () {
        vm.username($('#username').val());
        vm.signedIn(true);
    },
    writePost: function () {
        $.connection.boardHub.server.writePost(vm.username(), $('#message').val()).done(function () {
            $('#message').val('');
        });
    },
}
 
ko.applyBindings(vm);

We have an observable array of posts (which have an observable array of remarks). We even have an observable assortment of notifications, which inform customers of latest posts or comments on their posts. Our view model tracks the username and if a user is signed in. Finally, a view design can include techniques.

Next, we've a way for loading posts, which is known as when the web page hundreds and the user connects into a SignalR hub. The posts are loaded from the Net API controller which we are going to make later. Each and every submit is additional to the observable assortment of posts. Each and every from the post's feedback are added to the comments observable variety of the submit. This really is a really verbose method of performing this, but I wanted to make it distinct what was happening right here.

function loadPosts() {
$.get('/api/posts', function (data) {
    var postsArray = [];
    $.each(data, function (i, p) {
        var newPost = new post(p.Id, p.Message, p.Username, p.DatePosted);
        $.each(p.Comments, function (j, c) {
            var newComment = new comment(c.Id, c.Message, c.Username, c.DatePosted);
            newPost.comments.push(newComment);
        });
 
        vm.posts.push(newPost);
        });
    });
}

The rest of the script has to do with SignalR connections and methods. We'll get back to that later. Below is the entire board.js script.

var post = function (id, message, username, date) {
    this.id = id;
    this.message = message;
    this.username = username;
    this.date = date;
    this.comments = ko.observableArray([]);
 
    this.addComment = function (context) {
        var comment = $('input[name="comment"]', context).val();
        if (comment.length > 0) {
            $.connection.boardHub.server.addComment(this.id, comment, vm.username())
            .done(function () {
                $('input[name="comment"]', context).val('');
            });
        }
    };
}
 
var comment = function (id, message, username, date) {
    this.id = id;
    this.message = message;
    this.username = username;
    this.date = date;
}
 
var vm = {
    posts: ko.observableArray([]),
    notifications: ko.observableArray([]),
    username: ko.observable(),
    signedIn: ko.observable(false),
    signIn: function () {
        vm.username($('#username').val());
        vm.signedIn(true);
    },
    writePost: function () {
        $.connection.boardHub.server.writePost(vm.username(), $('#message').val()).done(function () {
            $('#message').val('');
        });
    },
}
 
ko.applyBindings(vm);
 
function loadPosts() {
    $.get('/api/posts', function (data) {
        var postsArray = [];
        $.each(data, function (i, p) {
            var newPost = new post(p.Id, p.Message, p.Username, p.DatePosted);
            $.each(p.Comments, function (j, c) {
                var newComment = new comment(c.Id, c.Message, c.Username, c.DatePosted);
                newPost.comments.push(newComment);
            });
 
            vm.posts.push(newPost);
        });
    });
}
 
$(function () {
    var hub = $.connection.boardHub;
    $.connection.hub.start().done(function () {
        loadPosts(); // Load posts when connected to hub
    });
 
    // Hub calls this after a new post has been added
    hub.client.receivedNewPost = function (id, username, message, date) {
        var newPost = new post(id, message, username, date);
        vm.posts.unshift(newPost);
 
        // If another user added a new post, add it to the activity summary
        if (username !== vm.username()) {
            vm.notifications.unshift(username + ' has added a new post.');
        }
    };
 
    // Hub calls this after a new comment has been added
    hub.client.receivedNewComment = function (parentPostId, commentId, message, username, date) {
        // Find the post object in the observable array of posts
        var postFilter = $.grep(vm.posts(), function (p) {
            return p.id === parentPostId;
        });
        var thisPost = postFilter[0]; //$.grep returns an array, we just want the first object
 
        var thisComment = new comment(commentId, message, username, date);
        thisPost.comments.push(thisComment);
 
        if (thisPost.username === vm.username() && thisComment.username !== vm.username()) {
            vm.notifications.unshift(username + ' has commented on your post.');
        }
    };
});

The Data Layer - We will be making use of Entity Framework as well as the Code First sample for our straightforward info layer.

Inside the Models directory, develop a brand new C# class referred to as MessageBoard.cs. Our data designs are little, and in our scenario we'll just place them in a single file alongside with all the data context.

using System;
using System.Collections.Generic;
using System.ComponentModel.DataAnnotations;
using System.Data.Entity;
using System.Linq;
using System.Web;
 
namespace MessageBoardTutorial.Models
{
    public class MessageBoardContext : DbContext
    {
        public DbSet<Post> Posts { get; set; }
        public DbSet<Comment> Comments { get; set; }
    }
 
    public class Post
    {
        [Key]
        public int Id { get; set; }
        public string Message { get; set; }
        public string Username { get; set; }
        public DateTime DatePosted { get; set; }
        public virtual ICollection<Comment> Comments { get; set; }
    }
 
    public class Comment
    {
        [Key]
        public int Id { get; set; }
        public string Message { get; set; }
        public string Username { get; set; }
        public DateTime DatePosted { get; set; }
        public virtual Post ParentPost { get; set; }
    }
}

Although the actual database doesn't yet exist, it will likely be produced if the application deems it essential. Should you maintain your internet.config unchanged, it's going to develop it within your LocalDB instance of SQL Server Specific.

The API

The script requirements a technique to get in touch with to get the posts to the concept board. Whilst we could just tack a technique on to our HomeController that would try this, we can equally as effortlessly create an ASP.Web Internet API controller which will fetch and immediately convert the posts into a JSON format.

Create the API Controller - In the Solution Explorer, right click on the Controllers directory and click on Add > Web API Controller Class (v2) in the context menu. Add a new Web API controller and call it PostsController.cs

Write the API
- Replace the code with the below. Our API will simply return a JSON or XML-serialized array of all of the posts and comments on the message board when a client calls http://[yoursite]/api/posts.

using System;
    using System.Collections.Generic;
    using System.Linq;
    using System.Net;
    using System.Net.Http;
    using System.Web.Http;
    using MessageBoardTutorial.Models;
 
    namespace MessageBoardTutorial.Controllers
    {
        public class PostsController : ApiController
        {
            private MessageBoardContext _ctx;
            public PostsController()
            {
                this._ctx = new MessageBoardContext();
            }
 
            // GET api/<controller>
            public IEnumerable<post> Get()
            {
                return this._ctx.Posts.OrderByDescending(x => x.DatePosted).ToList();
            }
        }
    }
</post></controller>

Handle circular references - If you look at our data models, a Post contains a virtual collection of comments, and a Comment contains a virtual Post that refers to the comment's parent. This circular reference will freak out Web API's serialization method. To solve this, just add the following line of code to the Register method in the WebApiConfig class located at App_Start/WeApiConfig.cs
   
config.Formatters.JsonFormatter.SerializerSettings.ReferenceLoopHandling =
    Newtonsoft.Json.ReferenceLoopHandling.Ignore;

Circular references will now be ignored.

Implementing the SignalR Hub

SignalR provides a relationship between clientele and also the server. Clients connect to a SignalR Hub. The Hub can then contact client-side occasions on a single, some, or all related clients. The Hub tracks which consumers are linked to it. This can be the center of real-time net programs. Within our case, a client generates a fresh submit or comment, which phone calls a method around the Hub. The Hub then calls a method on all of the message board's connected users that inserts the brand new submit or remark.

In a nutshell, the awesomeness of SignalR is that it may call JavaScript capabilities on any browser linked to it. The outdated assemble is clientele could only get in touch with server-side features. This type of functionality could only be achieved via long-polling (a customer working an infinite loop that calls a server method).
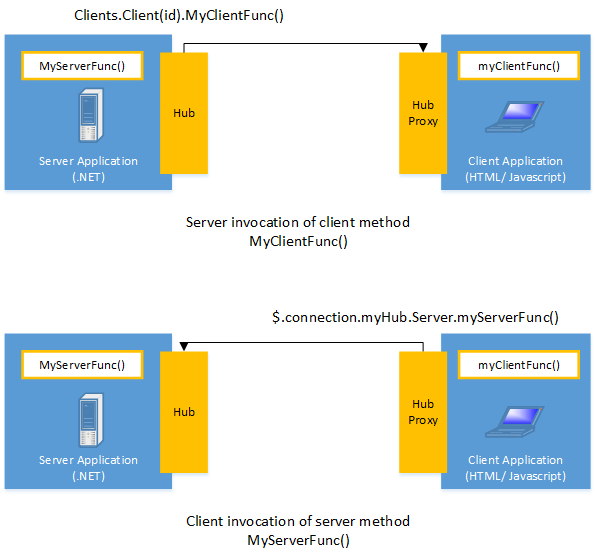

Newer browsers connect to hubs via HTML 5 web sockets. For older browsers, there are long-polling and "forever frame" fallbacks.

Map the hubs - In order for SignalR to begin and for the web application to map the connection hubs, we must create an OWIN startup class. Lucky for us, this just involves a couple of clicks and a line of code. Right-click on the solution and add a new item. Find the OWIN Startup Class template. Name this file "Startup.cs". Now, you just have to add one line of code in the Configuration method to map the hubs.

using System;
using System.Threading.Tasks;
using Microsoft.Owin;
using Owin;
 
[assembly: OwinStartup(typeof(MessageBoardTutorial.Startup))]
 
namespace MessageBoardTutorial
{
    public class Startup
    {
        public void Configuration(IAppBuilder app)
        {
            app.MapSignalR();
        }
    }
}

Create the Hub - Make a new directory in the root of your project called Hubs. Now, right-click on this new directory and click on Add > New Item... in the context menu. Create a new SignalR Hub Class called BoardHub.cs.
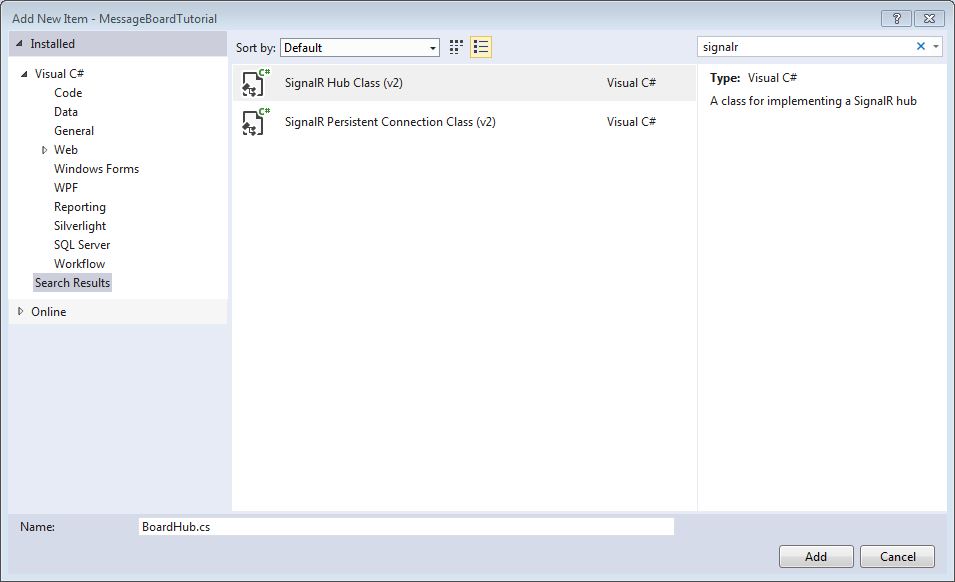

Replace the code in the file with the below:

using System;
using System.Collections.Generic;
using System.Linq;
using System.Web;
using Microsoft.AspNet.SignalR;
using MessageBoardTutorial.Models;
 
namespace MessageBoardTutorial.Hubs
{
    public class BoardHub : Hub
    {
        public void WritePost(string username, string message)
        {
            var ctx = new MessageBoardContext();
            var post = new Post { Message = message, Username = username, DatePosted = DateTime.Now };
            ctx.Posts.Add(post);
            ctx.SaveChanges();
 
            Clients.All.receivedNewPost(post.Id, post.Username, post.Message, post.DatePosted);
        }
 
        public void AddComment(int postId, string comment, string username)
        {
            var ctx = new MessageBoardContext();
            var post = ctx.Posts.FirstOrDefault(p => p.Id == postId);
 
            if (post != null)
            {
                var newComment = new Comment { ParentPost = post, Message = comment, Username = username, DatePosted = DateTime.Now };
                ctx.Comments.Add(newComment);
                ctx.SaveChanges();
 
                Clients.All.receivedNewComment(newComment.ParentPost.Id, newComment.Id, newComment.Message, newComment.Username, newComment.DatePosted);
            }
        }
    }

}

The Hub contains a method for writing a new post and a method for writing a new comment. Both methods are called from the client and ultimately call client-side methods for connected users.

For example, the writePost client-side method is called when a user writes a new post:

writePost: function () {
    $.connection.boardHub.server.writePost(vm.username(), $('#message').val()).done(function () {
        $('#message').val('');
    });
},

This method calls the WritePost method on the Hub. After the new post is added to the database, the Hub then calls the receivedNewPost method on all connected clients.

Clients.All.receivedNewPost(post.Id, post.Username, post.Message, post.DatePosted);

From BoardHub.cs

hub.client.receivedNewPost = function (id, username, message, date) {
    var newPost = new post(id, message, username, date);
    vm.posts.unshift(newPost);
 
    // If another user added a new post, add it to the activity summary
    if (username !== vm.username()) {
        vm.notifications.unshift(username + ' has added a new post.');
    }
};

From board.js

The Hub sends info about the new submit to this client method, which then helps make a brand new Publish JavaScript object and adds it to the starting from the view model's posts observable array. This new post is instantaneously displayed for all related customers since Knockout is observing this array. A brand new notification can also be produced for all customers other than the creator of the new publish.

Adding a remark follows the same pattern, although the client callback method differs marginally:

hub.client.receivedNewComment = function (parentPostId, commentId, message, username, date) {
    // Find the post object in the observable array of posts
    var postFilter = $.grep(vm.posts(), function (p) {
        return p.id === parentPostId;
    });
    var thisPost = postFilter[0]; //$.grep returns an array, we just want the first object
 
    var thisComment = new comment(commentId, message, username, date);
    thisPost.comments.push(thisComment);
 
    if (thisPost.username === vm.username() && thisComment.username !== vm.username()) {
        vm.notifications.unshift(username + ' has commented on your post.');
    }
};

The ID of the parent post of the comment is sent to the client, which then adds the new comment to the comments observable array of the post

Finally, let us run this point

Now you can construct and operate the project! Ooo is in dire need of a social community.

Go on and open up two browser windows and "log in" as a various person on every. Recognize how once you include a submit in a single window, it instantaneously is additional towards the other window in addition to a notification. Now, the Ice King can annoy princesses on-line too! Effectively, possibly that is not all that good.


Cheap ASP.NET 4.5 Hosting

We’re a company that works differently to most. Value is what we output and help our customers achieve, not how much money we put in the bank. It’s not because we are altruistic. It’s based on an even simpler principle. "Do good things, and good things will come to you".

Success for us is something that is continually experienced, not something that is reached. For us it is all about the experience – more than the journey. Life is a continual experience. We see the Internet as being an incredible amplifier to the experience of life for all of us. It can help humanity come together to explode in knowledge exploration and discussion. It is continual enlightenment of new ideas, experiences, and passions


Author Link

 photo ahp banner aspnet-01_zps87l92lcl.png


Corporate Address (Location)

ASPHostPortal
170 W 56th Street, Suite 121
New York, NY 10019
United States

Tag cloud

Sign in