All About ASP.NET and ASP.NET Core 2 Hosting BLOG

Tutorial and Articles about ASP.NET and the latest ASP.NET Core

ASP.NET Hosting - ASPHostPortal.com :: Create DropDown and MultiselectDropDown Controls for ASP.NET

clock September 7, 2015 06:32 by author Dan

Description

This article discusses about two user controls written in ASP.NET. Working on a project recently, I needed to develop a custom DropDown control with multiselect options in the form of CheckBox. I searched around for something simple, yet useful for my needs, and I wasn't able to find anything, so I developed my own control. Later, I reused the code to create a regular DropDown control (no multiselect checkbox options). The two controls can be merged into one, but I might do that at a later stage. On to the controls.

DropDown

This control can be bound to a IListSource to fetch data to be populated, in addition to the regular Items collection that can be populated from the asp. Here are a few examples of how this control can be used in ASPX.

<%@ Register Src="Controls/DropDown.ascx" TagName="DropDown" TagPrefix="thp" %>

<thp:DropDown ID="DropDown1" runat="server" Width="200">
     <Items>
          <asp:ListItem Text="Some text" Value="0" Selected="True" />
          <asp:ListItem Text="Another option" Value="1" />
     </Items>
</thp:DropDown>

<thp:DropDown ID="DropDown2" runat="server" Width="200" DataSourceID="DataSource1"
            DataTextField="Name" DataValueField="Id" />

<thp:DropDown ID="DropDown3" runat="server" Width="200"
 OnNeedDataSource="DropDown3_NeedDataSource"
         DataTextField="Name" DataValueField="Id" OnClientChange="onDropDownChange" />

Here's a screenshot of what the above code would render:

Both controls support the following data events:

  • ItemDataBound - Fired after the object has been bound to an Item. The argument passes both the bound object (DataObject) and theListItem.
  • NeedDataSource - Fired when there's no DataSourceID specified. This event is helpful when you want to manually populate the controls with your data. See the source code provided for specifics on this, you can use either Items collection or create custom list source (or both).

MultiselectDropDown

The code and usage is exactly as the DropDown control. Here's a screenshot of all of the above scenarios:

The styling in the attached project uses .skin files in the default theme. You can easily modify these to fit your needs. Everything can be styled.

I hope you find this code useful. I recommend this to anyone that wants to start developing custom controls as it has very important features implemented, such as the IPostBackDataHandler interface to pass data between postbacks in a custom manner. It also features some niceDataBinding examples and how you can use and modify these to perform specific tasks.

Best ASP.NET 4.6 Hosting Recommendation

ASPHostPortal.com provides its customers with Plesk Panel, one of the most popular and stable control panels for Windows hosting, as free. You could also see the latest .NET framework, a crazy amount of functionality as well as Large disk space, bandwidth, MSSQL databases and more. All those give people the convenience to build up a powerful site in Windows server. ASPHostPortal.com offers ASP.NET MVC hosting starts from $1/month only. They also guarantees 30 days money back and guarantee 99.9% uptime. If you need a reliable affordable ASP.NET Hosting, ASPHostPortal.com should be your best choice.


ASP.NET Hosting - ASPHostPortal.com :: How to solve can’t see the .mdf file in the App_data folder?

clock August 31, 2015 06:07 by author Dan

For those who’re following the ASP.NET Movies tutorial from Microsoft and you get to the stage where you are supposed to look at the Movies.mdf data file, you may encounter some problems. There are quite a few, and these issues aren’t unique to the movies sample and can happen to anyone trying to create projects in this way. Here are a list of problems and solutions.

Problem: The database ‘…MVCMOVIE\MVCMOVIE\APP_DATA\MOVIES.MDF’ cannot be opened because it is version 706. This server supports version 655 and earlier. A downgrade path is not supported.

Solution: [It’s likely you’re running Visual Studio Web Developer or VS2010]

  1. You need to install the SQL Server Data Tools and LocalDB.
  2. Verify the MovieDBContext connection string specified on the previous page of the tutorial.

Problem: “InvalidOperation Exception was unhandled by user code” The supplied SqlConnection does not specify an initial catalog.

Solution: [It’s likely you’re running Visual Studio Web Developer or VS2010]

  1. You need to install the SQL Server Data Tools and LocalDB.
  2. Verify the MovieDBContext connection string specified on the previous page of the tutorial. Or
  3. You might get away with just adding “Initial Catalog=Movies;” into the connection string.

Problem: The App_Data folder in the solution explorer didn’t contain the .mdf file

Solution:

  1. In the Solution Explorer, click ‘show all files’.
  2. Then click the refresh button.
  3. Then expand the App_Data folder

Problem: The App_Data folder still doesn’t show anything.

Solution:

  1. F5 (Debug) the solution.
  2. Navigate to <location>/Movies in IE- this step populates the database. You could also try using update-database in nuget package manager console.
  3. Go back to visual studio and refresh the App_Data folder.

– This solution applies to other projects, if your .mdf isn’t there or the tables aren’t there, just try navigating to the main DbSet controller class first. This is because the migrations to code first changes are lazily applied. You can write some code in your startup that ensures all pending migrations are added to the database before any other code is run, which is generally handy anyway. I’ll be covering this in another blog post soon.

Best ASP.NET 4.6 Hosting Recommendation

ASPHostPortal.com provides its customers with Plesk Panel, one of the most popular and stable control panels for Windows hosting, as free. You could also see the latest .NET framework, a crazy amount of functionality as well as Large disk space, bandwidth, MSSQL databases and more. All those give people the convenience to build up a powerful site in Windows server. ASPHostPortal.com offers ASP.NET MVC hosting starts from $1/month only. They also guarantees 30 days money back and guarantee 99.9% uptime. If you need a reliable affordable ASP.NET Hosting, ASPHostPortal.com should be your best choice.


ASP.NET MVC 6 Hosting - ASPHostPortal :: Remote Validation in ASP.NET MVC

clock August 24, 2015 08:07 by author Kenny

Remote Validation in ASP.NET MVC

ASP.NET is an open-source server-side Web application framework designed for Web development to produce dynamic Web pages. It was developed by Microsoft to allow programmers to build dynamic web sites, web applications and web services. ASP.NET MVC gives you a powerful, patterns-based way to build dynamic websites that enables a clean separation of concerns and that gives you full control over markup. Remote validation is used to make server calls to validate data without posting the entire form to the server when server side validation is preferable to client side.  It's all done set up model and controller which is pretty neat. 

Using the Code

To implement remote validation in an application we have two scenarios, one is without an additional parameter and the other is with an additional parameter. First we create an example without an additional parameter. In this example we check whether a username exists or not. If the username exists then that means the input user name is not valid. We create a view model class "UserViewModel" under the Models folder and that code is:

using System.Web.Mvc;  
namespace RemoteValidation.Models   
{  
    public class UserViewModel   
    {  
        public string UserName   
        {  
            get;  
            set;  
        }  
        public string Email   
        {  
            get;  
            set;  
        }  
    }  
}


Now we create a static data source, in other words we create a static list of UserViewModel in which we could check whether a username exists or not. You can also use the database rather than a static list. The following code snippet is for StaticData.

using RemoteValidation.Models;  
using System.Collections.Generic;  
 
namespace RemoteValidation.Code   
{  
    public static class StaticData   
    {  
        public static List < UserViewModel > UserList   
        {  
            get {  
                return new List < UserViewModel >   
                {  
                    new UserViewModel   
                    {  
                        UserName = "User1", Email = "[email protected]"  
                    },  
                    new UserViewModel   
                    {  
                        UserName = "User2", Email = "[email protected]"  
                    }  
                }  
            }  
        }  
    }  


Now we create a controller "ValidationController" in which we create an action method to check whether a user name exists or not and return a result as a JSON format. If the username exists then it returns false so that the validation is implemented on the input field. The following code snippet shows ValidationController under the Controllers folder.

using RemoteValidation.Code;  
using System.Linq;  
using System.Web.Mvc;  
 
namespace RemoteValidation.Controllers   
{  
    public class ValidationController: Controller   
    {  
        [HttpGet]  
        public JsonResult IsUserNameExist(string userName)   
        {  
            bool isExist = StaticData.UserList.Where(u = > u.UserName.ToLowerInvariant().Equals(userName.ToLower())).FirstOrDefault() != null;  
            return Json(!isExist, JsonRequestBehavior.AllowGet);  
        }  
    }  
}


Now we add remote validation on the UserName of the UserViewModel property as in the following code snippet.

using System.Web.Mvc;  
 
namespace RemoteValidation.Models   
{  
    public class UserViewModel   
    {  
        [Remote("IsUserNameExist", "Validation", ErrorMessage = "User name already exist")]  
        public string UserName   
        {  
            get;  
            set;  
        }  
        public string Email   
        {  
            get;  
            set;  
        }  
    }  


As in the preceding code snippet, the IsUserNameExist is a method of ValidationController that is called on the blur of an input field using a GET request. Now we create UserController under the Controllers folder to render a view on the UI.

using RemoteValidation.Models;  
using System.Web.Mvc;  
 
namespace RemoteValidation.Controllers   
{  
    public class UserController: Controller   
    {  
        [HttpGet]  
        public ActionResult AddUser()   
        {  
            UserViewModel model = new UserViewModel();  
            return View(model);  
        }  
    }  

Now we add jquery.validate.js and jquery.validate.unobtrusive.js to the project and create a bundle as in the following code snippet.

using System.Web.Optimization;  
 
namespace RemoteValidation.App_Start   
{  
    public class BundleConfig   
    {  
        public static void RegisterBundles(BundleCollection bundles)   
        {  
            bundles.Add(new StyleBundle("~/Content/css").Include(  
                "~/Content/css/bootstrap.css",  
                "~/Content/css/font-awesome.css",  
                "~/Content/css/site.css"));  
 
            bundles.Add(new ScriptBundle("~/bundles/jquery").Include(  
                "~/Scripts/jquery-{version}.js"));  
 
            bundles.Add(new ScriptBundle("~/bundles/jqueryval").Include(  
                "~/Scripts/jquery.validate*"));  
        }  
    }  

Thereafter we add the following keys in the web.config file.

<add key="ClientValidationEnabled" value="true" />   
<add key="UnobtrusiveJavaScriptEnabled" value="true" />  


Thereafter we create a view for the AddUser action method. The following code snippet is for the AddUser view.

@model RemoteValidation.Models.UserViewModel  
 
< div class = "panel panel-primary" > < div class = "panel-heading panel-head" > Add User < /div>    
    <div class="panel-body">    
        @using (Html.BeginForm())    
        {    
            <div class="form-horizontal">    
                <div class="form-group">    
                    @Html.LabelFor(model => model.UserName, new { @class = "col-lg-2 control-label" })    
                    <div class="col-lg-9">    
                        @Html.TextBoxFor(model => model.UserName, new { @class = "form-control" })    
                        @Html.ValidationMessageFor(model => model.UserName)    
                    </div > < /div>    
                <div class="form-group">    
                    @Html.LabelFor(model => model.Email, new { @class = "col-lg-2 control-label" })    
                    <div class="col-lg-9">    
                        @Html.TextBoxFor(model => model.Email, new { @class = "form-control" })    
                        @Html.ValidationMessageFor(model => model.Email)    
                    </div > < /div>                    
                <div class="form-group">    
                    <div class="col-lg-9"></div > < div class = "col-lg-3" > < button class = "btn btn-success"  
                     id = "btnSubmit"  
                     type = "submit" > Submit < /button>    
                    </div >
               < /div>    
            </div >  
} < /div>    
</div >   
@section scripts   
{  
    @Scripts.Render("~/bundles/jqueryval")  

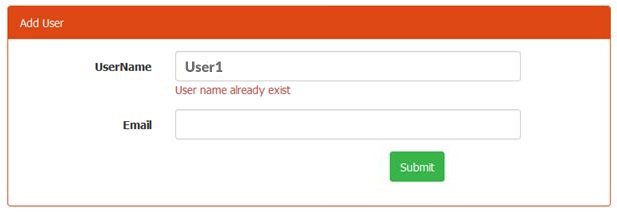
Let's run the application and put values into the user name field to execute the remote validation as in the following image.

Figure 1: Remote validation on user name

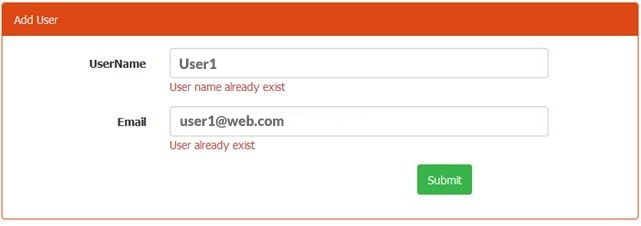
Now we move to another option, we pass an additional parameter in the remote validation. We pass both the user name and email as a parameter and check whether the username and email combination exist or not on the email input. That's why we add one more method in ValidationController as in the following code snippet for it.

[HttpGet]  
public JsonResult IsUserExist(string email, string userName)   
{  
    bool isExist = StaticData.UserList.Where(u = > u.UserName.ToLowerInvariant().Equals(userName.ToLower()) && u.Email.ToLowerInvariant().Equals(email.ToLower())).FirstOrDefault() != null;  
    return Json(!isExist, JsonRequestBehavior.AllowGet);  

Now we call this method on the Email property of UserViewModel as in the following code snippet.

using System.Web.Mvc;  
 
namespace RemoteValidation.Models   
{  
    public class UserViewModel   
    {  
        [Remote("IsUserNameExist", "Validation", ErrorMessage = "User name already exist")]  
        public string UserName   
        {  
            get;  
            set;  
        }  
        [Remote("IsUserExist", "Validation", ErrorMessage = "User already exist", AdditionalFields = "UserName")]  
        public string Email   
        {  
            get;  
            set;  
        }  
    }  
}

As in the preceding code snippet, we are passing an additional field using AdditionalFields in Remote. If we must pass more than one parameter then these will be comma-separated. Now run the application and the result will be as shown in the following image.  


ASP.NET 5 Hosting - ASPHostPortal.com :: Cookie Based Authentication in ASP.NET 5

clock July 30, 2015 06:27 by author Dan

This post is about cookie based authentication in ASP.NET 5. I am implementing a cookie authentication in ASP.NET MVC application. Similar to other middleware components in ASP.NET, Cookie Authentication is also a middleware component, which you need to plug into ASP.NET pipeline.

For implementing cookie authentication, you require reference of Cookie middleware, here is the project.json file.

{
    "dependencies": {
        "Microsoft.AspNet.Diagnostics": "1.0.0-beta1",
        "Microsoft.AspNet.Hosting": "1.0.0-beta1",
        "Microsoft.AspNet.Mvc": "6.0.0-beta1",
        "Microsoft.AspNet.Server.WebListener": "1.0.0-beta1",
        "Microsoft.AspNet.Security": "1.0.0-beta1",
        "Microsoft.AspNet.Security.Cookies": "1.0.0-beta1",
        "Microsoft.AspNet.StaticFiles": "1.0.0-beta1",
    },
    "commands": {
        "web": "Microsoft.AspNet.Hosting --server Microsoft.AspNet.Server.WebListener --server.urls http://localhost:5001"
    },
     "frameworks": {
        "aspnet50": {}
  }
}

All the components used in this project are available in ASP.NET Core Framework as well.

Now you need to plug the Cookie authentication module to use in ASP.NET pipeline, you can do this via Startup.cs file.

public class Startup
{
    public void Configure(IApplicationBuilder app)
    {
        app.UseErrorPage();
 
        app.UseServices(services =>
        {
            services.AddMvc();
        });
     
        app.UseCookieAuthentication(options => {
            options.LoginPath = new PathString("/Home/Login");
        });
        app.UseMvc();                       
    }       
}

Now, you need to apply the Authorize filter to protect resources, I am applying it in the class level. When there is a unauthorized request to such resource, filter returns 401 and the cookie middleware redirects to /Home/Login.

Note: You need to set the LoginPath property explicitly, otherwise it may not redirect.

[Authorize]
public class HomeController : Controller
{
    public IActionResult Index()
    {
        return View();
    }
}

And here is the Login action method, this code is for illustration purpose only, I not validating against database, if username and password matches the hard coded credentials, identity is established with that username.

[AllowAnonymous]
public IActionResult Login()
{
    return View();
}
 
[HttpPost, AllowAnonymous]
public IActionResult Login(User user)
{
    if(user.UserName == "admin" && user.Password == "Password")
    {
        var claims = new[]
        {
            new Claim("name", user.UserName)
        };
        var identity = new ClaimsIdentity(claims,
            CookieAuthenticationDefaults.AuthenticationType);
        Context.Response.SignIn(identity);
 
        return Redirect("~/");
    }
    else
    {
        ModelState.AddModelError("LogOnError",
            "The user name or password provided is incorrect.");
    }
    return View(user);
}
 
public IActionResult Logout()
{
    Context.Response.SignOut
    (CookieAuthenticationDefaults.AuthenticationType);
    return View("Login");
}

And here is the Login view

@using(Html.BeginForm())
{
    @Html.LabelFor(model => model.UserName)
    @Html.EditorFor(model => model.UserName)
    @Html.LabelFor(model => model.Password)
    @Html.PasswordFor(model => model.Password)
    <input type="submit" value="Sign In" />
    <br/>
    @Html.ValidationMessage("LogOnError")
}

To verify the implementation, install the required packages using kpm restore command, once it finishes, execute k web command. If web server is started, browse http://localhost:5001/, which will redirect to /Home/Login page, where you can enter the credentials, you will redirect back to /Home/Index page.

Best ASP.NET 5 Hosting Recommendation

ASPHostPortal.com provides its customers with Plesk Panel, one of the most popular and stable control panels for Windows hosting, as free. You could also see the latest .NET framework, a crazy amount of functionality as well as Large disk space, bandwidth, MSSQL databases and more. All those give people the convenience to build up a powerful site in Windows server. ASPHostPortal.com offers ASP.NET MVC hosting starts from $1/month only. They also guarantees 30 days money back and guarantee 99.9% uptime. If you need a reliable affordable ASP.NET Hosting, ASPHostPortal.com should be your best choice.


ASP.NET Hosting - ASPHostPortal.com :: 4 Steps to designate appropriate permissions to App_Data folder of WebMail Pro ASP.NET

clock July 3, 2015 06:07 by author Dan

If you got one of the following errors during WebMail Pro ASP.NET installation:

Creating/deleting folders Error, can't create folders in the data folder.
Creating/deleting files Error, can't create files in the data folder.
Error, can't read/write "C:\Inetpub\wwwroot\WebMailPro\App_Data\settings\*.xml" file.

This means WebMail Pro ASP.NET doesn't have permissions enough to read/write contents of App_Data subfolder.

Note: In this article, we assume your WebMail Pro ASP.NET is deployed to C:\Inetpub\wwwroot\WebMailPro\ folder, but if you've deployed it to another folder, you should take this into account when looking at the paths here.

To resolve the issue, you should grant Full Control permission to ASPNET, NETWORK SERVICE and Internet Guest Account system accounts over App_Data folder:

1. In Windows Explorer, go to C:\Inetpub\wwwroot\WebMailPro\ folder, right-click App_Data folder and choose Properties:

2. In General tab, make sure "Read-only" option is not set:

3. In Security tab, gran "Full Control" permission to ASPNET, NETWORK SERVICE and Internet Guest Account accounts:

4. Click OK. Now, WebMail Pro ASP.NET should have enough permissions to read/write files and folders in the App_Data folder.

Note: If you're installing WebMail Pro ASP.NET to a shared hosting, you'll be unable to assign permissions on your server via Windows Explorer as shown at the screenshots above. However, the control panel provided by your hosting should allow you to do the same. Please refer to your control panel documentation to learn how to do that or ask your hosting provider to assign the permissions for you.

Best ASP.NET Hosting Recommendation

ASPHostPortal.com provides its customers with Plesk Panel, one of the most popular and stable control panels for Windows hosting, as free. You could also see the latest .NET framework, a crazy amount of functionality as well as Large disk space, bandwidth, MSSQL databases and more. All those give people the convenience to build up a powerful site in Windows server. ASPHostPortal.com offers ASP.NET MVC hosting starts from $1/month only. They also guarantees 30 days money back and guarantee 99.9% uptime. If you need a reliable affordable ASP.NET Hosting, ASPHostPortal.com should be your best choice.


ASP.NET Hosting - ASPHostPortal.com :: How to Fix ASP.NET Menu Control Cannot Work in Google Chrome

clock May 22, 2015 06:16 by author Dan

Problem

If your website is using ASP.NET Menu Control, the menu part will not work in Google Chrome browser and Apple Safari browser. The look and feel of the main menu is different. Submenu does not show up.

Solution

There is an easy fix for this problem. Just copy and paste the following codes to your page load event of your code behind master page file. You may need to copy it to every page if you do not use master page.

     Partial Class Main
        Inherits System.Web.UI.MasterPage

        Protected Sub Page_Load(ByVal sender As Object, ByVal e As System.EventArgs) Handles Me.Load
            If Request.UserAgent.IndexOf("AppleWebKit") > 0 Then
                Request.Browser.Adapters.Clear()
            End If
        End Sub
    End Class

Best ASP.NET Hosting Recommendation

ASPHostPortal.com provides its customers with Plesk Panel, one of the most popular and stable control panels for Windows hosting, as free. You could also see the latest .NET framework, a crazy amount of functionality as well as Large disk space, bandwidth, MSSQL databases and more. All those give people the convenience to build up a powerful site in Windows server. ASPHostPortal.com offers ASP.NET hosting starts from $1/month only. They also guarantees 30 days money back and guarantee 99.9% uptime. If you need a reliable affordable ASP.NET Hosting, ASPHostPortal.com should be your best choice.


Free ASP.NET Hosting with ASPHostPortal.com :: How to Using Facebook Graph API With ASP.NET MVC

clock April 20, 2015 05:52 by author Mark

This article series covers the use of the Facebook Graph API integration with an ASP.NET MVC web applications to learn how to incorporate Facebook features server-side.In this article series we will learn how to implement custom social media integration into our ASP NET web application using the Facebook SDK.
Here we will see in practical terms how to access and update Facebook data utilizing the Graph API.
Before we proceed let's see the few terms.

  • OAuth 2.0: Open standard for authorization

Provides secure delegate access specifically from Facebook as an OAuth provider. It specifies a process for resource owners to authorize third-party access to their server resources without sharing their credentials.

  • OWIN: Open Web Interface for .NET
  • Defines a standard interface between .NET web servers and web applications.
  • User Access Token: Encodes an App Id + User Id + Permissions
  • AppSecret_Proof: Encrypted Hash of the Access Token using App Secret key

So let's get started learning about Facebook Graph API integration.

Step 1: Open https://developers.facebook.com/ then click on My Apps and then add a new App as shown below.

Step 2: Select website and provide the Display name and namespace as shown below.
Here namespace is an alternative way to identify our application so don't confuse it with namespaces in C#.

Step 3: Click on settings and then click on Add Platform.

Step 4: Select website and we will get a couple of options as shown below.

Step 5: Now Let's create a test app which is best practice.

Summary

In this article we learn how to create a Facebook App. In the next article we will see how to authenticate with ASP.NET MVC applications.

Best ASP.NET Hosting Recommendation

ASPHostPortal.com provides its customers with Plesk Panel, one of the most popular and stable control panels for Windows hosting, as free. You could also see the latest .NET framework, a crazy amount of functionality as well as Large disk space, bandwidth, MSSQL databases and more. All those give people the convenience to build up a powerful site in Windows server. ASPHostPortal.com offers ASP.NET hosting starts from $1/month only. They also guarantees 30 days money back and guarantee 99.9% uptime. If you need a reliable affordable ASP.NET Hosting, ASPHostPortal.com should be your best choice.


Free ASP.NET Hosting with ASPHostPortal.com :: State Management in ASP.NET

clock April 15, 2015 05:53 by author Mark

State Management in ASP.NET

  • A new instance of the Web page class is created each time the page is posted to the server.
  • In traditional Web programming, all information that is associated with the page, along with the controls on the page, would be lost with each roundtrip.
  • The Microsoft ASP.NET framework includes several options to help you preserve data on both a per-page basis and an application-wide basis. These options can be broadly divided into the following two categories:
    • Client-Side State Management Options
    • Server-Side State Management Options

Client-Side State Management

  • Client-based options involve storing information either in the page or on the client computer.
  • Some client-based state management options are:
    • Hidden fields
    • View state
    • Cookies
    • Query strings

Hidden Fields

  • A hidden field is a control similar to a TextBox control.
  • A hidden field does not render in a Web browser. A user cannot type anything into it.
  • Hidden fields can be used to store information that needs to be submitted along with the web page, but should not be displayed on the page.
  • Hidden fields can also be used to pass session information to and from forms, transparently.

To pass the information from one page to another, you can invoke the Server.Transfer method on the Click event of a Button control, as shown in the following example: 

protected void Button1_Click(object sender, EventArgs e)
    {
        Server.Transfer("Page2.aspx");
    }

  • The target page can access the passed information by referring to individual controls on the source page, as shown in the following example: 

     String name = Request.Form["TextBox1"];
   String color = Request.Form["HiddenField1"];

View State

  • Each Web page and controls on the page have a property called ViewState.
  • This property is used to automatically save the values of the Web page and each control on the Web page prior to rendering the page.
  • The view state is implemented using a hidden form field called _VIEWSTATE.
  • This hidden form field is automatically created in every Web page.
  • When ASP.NET executes a Web page on the Web server, the values stored in the ViewState property of the page and controls on it are collected and formatted into a single encoded string.
  • The encoded string is:    
    • Assigned to the Value attribute of the hidden form field, _VIEWSTATE.
    • Sent to the client as part of the Web page.       
    • During postback of a Web page to itself, one of the tasks performed by ASP.NET is to restore the values in _VIEWSTATE.

Enabling and disabling view state

  • By default, the view state is enabled for a Web page and the controls on the Web page.
  • You can enable or disable view state for a page by setting the EnableViewState property of a Web page, as shown in the following example: 

<%@ Page Language="C#"AutoEventWireup="true"EnableViewState="false"CodeFile="Page1.aspx.cs"Inherits="Page1" %> 

  • You can enable or disable view state for a control by setting its EnableViewState property to false.
  • When view state is disabled for a page, the view state for the controls on the page is automatically disabled.

Cookies

  • Cookies
    • Cookies are: 
    • Used to store small pieces of information related to a user's computer such as its IP address, browser type, operating system, and Web pages last visited.
    • Sent to a client computer along with the page output.      

Types of cookies 

  • Temporary Cookies     
  • Exist in the memory space of a browser.
  • Also known as session cookies.
  • Are useful for storing information required for only a short time.         

Persistent Cookies     

  • Are saved as a text file in the file system of the client computer.
  • Are used when you want to store information for a longer period.
  • Are useful for storing information required for only a short time.      
  • Creating Cookies 

     Response.Cookies["userName"].Value = "Peter";
    Response.Cookies["userName"].Expires = DateTime.Now.AddDays(2);
    Reading Cookies

  • You can access the value of a cookie using the Request built-in object.   

    if (Request.Cookies["userName"].Value != null)
    {
        Label1.Text = Request.Cookies["userName"].Value;
    }

Query String

  • A query string: 
  • Provides a simple way to pass information from one page to another.
  • Is the part of a URL that appears after the question mark (?) character.    
  • You can pass data from one page to another page in the form of a query string using the Response.Redirect method, as shown in the following example:

Response.Redirect("BooksInfo.aspx?Category=fiction&Publisher=Sams");

Server-Side State Management

There are situations where you need to store the state information on the server side.
Server-side state management enables you to manage application-related and session-related information on the server.
ASP.NET provides the following options to manage state at the server side:

  • Application state
  • Session state
  • Application State

ASP.NET provides application state as a means of storing application-specific information such as objects and variables.
The following describes the information in the application state:

  • Is stored in a key-value pair.
  • Is used to maintain data consistency between server round trips and among pages.     
  • Application state is created the first time a user accesses any URL resource in an application.
  • After an application state is created, the application-specific information is stored in it. 

Storing and Reading information in application state

You can add application-specific information to an application state by creating variables and objects and adding them to the application state.
For example: 

Application ["MyVariable"] = "Hello";
You can read the value of MyVariable using the following code snippet:
stringval = (string) Application["MyVariable"];
  

Removing information from application state

  • You can remove an existing object or variable, such as MyVariable from an application state using the following code snippet:

Application.Remove(["MyVariable"]);

  • You can also remove all the application state variables and objects by using the following code snippet: 

Application.RemoveAll();  

Synchronizing application state

Multiple pages within an ASP.NET web application can simultaneously access the values stored in an application state, that can result in conflicts and deadlocks.
To avoid such situations, the HttpApplicationState class provides two methods, Lock() and Unlock().
These methods allow only one thread at a time to access application state variables and objects.

Session State

  • In ASP.NET, session state is used to store session-specific information for a web application.
  • The scope of session state is limited to the current browser session.
  • Session state is structured as a key-value pair for storing session-specific information that needs to be maintained between server round trips and between requests for pages.
  • Session state is not lost if the user revisits a Web page by using the same browser window.

However, session state can be lost in the following ways: 

  • When the user closes and restarts the browser.
  • When the user accesses the same Web page in a different browser window.
  • When the session times out because of inactivity.
  • When the Session.Abandon() method is called within the Web page code.  
  • Each active ASP.NET session is identified and tracked by a unique 120-bit SessionID string containing American Standard Code for Information Interchange (ASCII) characters.
  • You can store objects and variables in a session state.
  • You can add a variable, MyVariable with the value HELLO in the session state using the following code snippet:  

Session["MyVariable"]="HELLO";     

  • You can retrieve the value of the variable, MyVariable, using the following code snippet:  

String val = (string)Session["MyVariable"];

Best ASP.NET Hosting Recommendation

ASPHostPortal.com provides its customers with Plesk Panel, one of the most popular and stable control panels for Windows hosting, as free. You could also see the latest .NET framework, a crazy amount of functionality as well as Large disk space, bandwidth, MSSQL databases and more. All those give people the convenience to build up a powerful site in Windows server. ASPHostPortal.com offers ASP.NET hosting starts from $1/month only. They also guarantees 30 days money back and guarantee 99.9% uptime. If you need a reliable affordable ASP.NET Hosting, ASPHostPortal.com should be your best choice.


ASP.NET Hosting - ASPHostPortal.com :: How to Import or Upload and Display Excel File in GridView Using C# in ASP.NET

clock April 13, 2015 06:19 by author Ben

My previous article discussed about How Displaying Validation Errors with ASP.NET MVC. Now in this article, I’ve covered a brief introduction about How to Import or Upload and Display Excel File in GridView Using C# in ASP.NET. There are lots of ways for Importing data from Excel to ASP.NET using C#, and here I’m going to introduce one simple common method to import data.

First we will create a new excel sheet with some data.

So for this article 1st I'll create a new asp.net application and add the beneath code inside your web page.

<%@ Page Language="C#" AutoEventWireup="true" CodeBehind="WebForm1.aspx.cs" Inherits="WebApplication1.WebForm1" %>

<!DOCTYPE html PUBLIC "-//W3C//DTD XHTML 1.0 Transitional//EN" "http://www.w3.org/TR/xhtml1/DTD/xhtml1-transitional.dtd">
<html xmlns="http://www.w3.org/1999/xhtml">
<head runat="server">
    <title>Excel File Upload Or Import and Display In GridView Using C# In Asp.Net</title>
</head>
<body>
    <form id="form1" runat="server">
    <asp:FileUpload ID="FileUpload1" runat="server" />
    <asp:Button ID="btnUpload" runat="server" Text="Upload & Display" OnClick="btnUpload_Click" />
    <br />
    <br />
    <asp:GridView ID="GridView1" runat="server">
    </asp:GridView>
    <asp:Label ID="lblMessage" runat="server" Text=""></asp:Label>
    <br />
    </form>
</body>
</html>

Now please check the code.

using System;
using System.Collections.Generic;
using System.Linq;
using System.Web;
using System.Web.UI;
using System.Web.UI.WebControls;
using System.IO;
using System.Data.OleDb;
using System.Data;

namespace WebApplication1
{
    public partial class WebForm1 : System.Web.UI.Page
    {
        protected void Page_Load(object sender, EventArgs e)
        {

        }

        protected void btnUpload_Click(object sender, EventArgs e)
        {
            if (FileUpload1.HasFile)
            {
                string fileExtention = System.IO.Path.GetExtension(FileUpload1.FileName);
                if (fileExtention == ".xls" || fileExtention == ".xlsx")
                {
                    string fileName = System.IO.Path.GetFileName(FileUpload1.FileName);
                    FileUpload1.SaveAs(Server.MapPath("~/ExcelSheet/" + fileName));
                   /*Read excel sheet*/
                    string excelSheetFilename = "Provider=Microsoft.ACE.OLEDB.12.0;Data Source=" + Server.MapPath("~/ExcelSheet/" + fileName) + ";Extended Properties=\"Excel 12.0;HDR=Yes;IMEX=2\"";
                    OleDbConnection objcon = new OleDbConnection(excelSheetFilename);
                    string queryForExcel = "Select * from [UserDetail$];";
                    OleDbDataAdapter objda = new OleDbDataAdapter(queryForExcel, objcon);
                    DataSet objds = new DataSet();
                    objda.Fill(objds);
                    if (objds.Tables[0].Rows.Count > 0)
                    {
                        GridView1.DataSource = objds.Tables[0];
                        GridView1.DataBind();
                    }
                }
                else
                {
                    lblMessage.Text = "Please upload excel sheet.";
                }
            }
        }
    }
}

Now in above code I've very first read the file and saved inside a folder and also the I study the excel sheet and stored in dataset and bind it towards the gridview manage.

Now we will develop the folder.


Within this folder we'll upload the file as shown in code.

Now we've accomplished run the application and check the output.


Best ASP.NET Hosting Recommendation

ASPHostPortal.com provides its customers with Plesk Panel, one of the most popular and stable control panels for Windows hosting, as free. You could also see the latest .NET framework, a crazy amount of functionality as well as Large disk space, bandwidth, MSSQL databases and more. All those give people the convenience to build up a powerful site in Windows server. ASPHostPortal.com offers ASP.NET hosting starts from $1/month only. They also guarantees 30 days money back and guarantee 99.9% uptime. If you need a reliable affordable ASP.NET Hosting, ASPHostPortal.com should be your best choice.


ASP.NET MVC Hosting - ASPHostPortal.com :: How Displaying Validation Errors with ASP.NET MVC

clock April 2, 2015 06:21 by author Ben

Today, I write about how Displaying Validation Errors with ASP.NET MVC. We all know how crucial it is to validate user input, but it’s equally crucial how we present validation errors for the user. Take the following type:


The e mail field needs to be optional but any address entered must be valid. If a validation error happens, it ought to replace the optional label using the error message.

Behind the scenes I’m employing Data Annotations to validate the email address, so any errors is going to be passed into the ModelState. MVC has built-in help for displaying these errors (using the ValidateMessageFor helper) so it is easy to create a wrapper around that, supplying the ‘optional’ text as a parameter.

Here’s an extension method for the HtmlHelper:

public static class ExtensionMethods
{
    public static MvcHtmlString HelpMessageFor<TModel, TProperty>(this HtmlHelper<TModel> htmlHelper, Expression<Func<TModel, TProperty>> expression, string helpText)
    {
        var validation = htmlHelper.ValidationMessageFor(expression);
        if (validation == null)
            return new MvcHtmlString("<span class='help-inline muted'>" + helpText + "</span>");
        else
            return validation;
    }
}

Here’s it’s usage:

<fieldset>
  <div class="control-group">
        @Html.LabelFor(x => x.EmailAddress, "Email", new { @class = "control-label" })
        <div class="controls">
            @Html.TextBoxFor(x => x.EmailAddress, new { @class = "input-xlarge", placeholder = "Enter an email address" })
            @Html.HelpMessageFor(x => x.EmailAddress, "Optional")
        </div>
    </div>
</fieldset>

Best ASP.NET MVC Hosting Recommendation

ASPHostPortal.com provides its customers with Plesk Panel, one of the most popular and stable control panels for Windows hosting, as free. You could also see the latest .NET framework, a crazy amount of functionality as well as Large disk space, bandwidth, MSSQL databases and more. All those give people the convenience to build up a powerful site in Windows server. ASPHostPortal.com offers ASP.NET hosting starts from $1/month only. They also guarantees 30 days money back and guarantee 99.9% uptime. If you need a reliable affordable ASP.NET Hosting, ASPHostPortal.com should be your best choice.


Cheap ASP.NET 4.5 Hosting

We’re a company that works differently to most. Value is what we output and help our customers achieve, not how much money we put in the bank. It’s not because we are altruistic. It’s based on an even simpler principle. "Do good things, and good things will come to you".

Success for us is something that is continually experienced, not something that is reached. For us it is all about the experience – more than the journey. Life is a continual experience. We see the Internet as being an incredible amplifier to the experience of life for all of us. It can help humanity come together to explode in knowledge exploration and discussion. It is continual enlightenment of new ideas, experiences, and passions


Author Link

 photo ahp banner aspnet-01_zps87l92lcl.png


Corporate Address (Location)

ASPHostPortal
170 W 56th Street, Suite 121
New York, NY 10019
United States

Tag cloud

Sign in