All About ASP.NET and ASP.NET Core 2 Hosting BLOG

Tutorial and Articles about ASP.NET and the latest ASP.NET Core

ASP.NET Hosting - ASPHostPortal.com :: SQL Split Function to Split an Input String

clock September 28, 2015 06:02 by author Dan

Today, we will explain about SQL Split Function to Split an Input String. Generally when posting an article in a blog, we have to define tags (Like  C#.NET, AJAX, ASP.NET,HTML) upon the article. We usually take these tags in a TextBox with separated them by comma(,). To insert these into database we have two ways to do.

First Method using C# :

Using C# you can split the TextBox items and use a for loop to insert into the database. Code is as follow.
   
string []tags = txtTags.Text.<span class="IL_AD" id="IL_AD10">Trim</span>().Split(',');
 
/* With for loop */
for (int i=0;i<tags.Count ;i++)
{
 /* perform db query with tags[i].ToSting();
}
 
/* with foreach */
foreach (string i in tags)
{
  /* perform db query with i.ToSting();
}

Second SQL Method :

Here in the SQL we pass the whole items of TextBox into SQL function to split it and then insert these into specific table. Lets see how to do this.
   
CREATE FUNCTION SplitText
(   
      @Input NVARCHAR(MAX),
      @Character CHAR(1)
)
RETURNS @Output TABLE (
      Item NVARCHAR(1000)
)
AS
BEGIN
      DECLARE @StartIndex INT, @EndIndex INT
 
      SET @StartIndex = 1
      IF SUBSTRING(@Input, LEN(@Input) - 1, LEN(@Input)) <> @Character
      BEGIN
            SET @Input = @Input + @Character
      END
 
      WHILE CHARINDEX(@Character, @Input) > 0
      BEGIN
            SET @EndIndex = CHARINDEX(@Character, @Input)
           
            INSERT INTO @Output(Item)
            <span class="IL_AD" id="IL_AD12">SELECT</span> SUBSTRING(@Input, @StartIndex, @EndIndex - 1)
           
            SET @Input = SUBSTRING(@Input, @EndIndex + 1, LEN(@Input))
      END
 
      RETURN
END
GO
 
-- Create a temporary table to insert tags
create #tblTemp
(
Id identity (1,1),
tag nvarchar(50)
)
 
-- Inserting into tmpTable
insert into #tblTemp (temp) values
SELECT Item FROM dbo.SplitText('ASP.NET,C#.NET,ADO.NET,JavaScript', ',') 
-- Seperated by Comma(,). Place any thing according to you.


Execute your SQL batch query to inserting the tags into table.

Best ASP.NET 4.6 Hosting Recommendation

ASPHostPortal.com provides its customers with Plesk Panel, one of the most popular and stable control panels for Windows hosting, as free. You could also see the latest .NET framework, a crazy amount of functionality as well as Large disk space, bandwidth, MSSQL databases and more. All those give people the convenience to build up a powerful site in Windows server. ASPHostPortal.com offers ASP.NET hosting starts from $1/month only. They also guarantees 30 days money back and guarantee 99.9% uptime. If you need a reliable affordable ASP.NET Hosting, ASPHostPortal.com should be your best choice.


ASP.NET Hosting - ASPHostPortal.com :: Create DropDown and MultiselectDropDown Controls for ASP.NET

clock September 7, 2015 06:32 by author Dan

Description

This article discusses about two user controls written in ASP.NET. Working on a project recently, I needed to develop a custom DropDown control with multiselect options in the form of CheckBox. I searched around for something simple, yet useful for my needs, and I wasn't able to find anything, so I developed my own control. Later, I reused the code to create a regular DropDown control (no multiselect checkbox options). The two controls can be merged into one, but I might do that at a later stage. On to the controls.

DropDown

This control can be bound to a IListSource to fetch data to be populated, in addition to the regular Items collection that can be populated from the asp. Here are a few examples of how this control can be used in ASPX.

<%@ Register Src="Controls/DropDown.ascx" TagName="DropDown" TagPrefix="thp" %>

<thp:DropDown ID="DropDown1" runat="server" Width="200">
     <Items>
          <asp:ListItem Text="Some text" Value="0" Selected="True" />
          <asp:ListItem Text="Another option" Value="1" />
     </Items>
</thp:DropDown>

<thp:DropDown ID="DropDown2" runat="server" Width="200" DataSourceID="DataSource1"
            DataTextField="Name" DataValueField="Id" />

<thp:DropDown ID="DropDown3" runat="server" Width="200"
 OnNeedDataSource="DropDown3_NeedDataSource"
         DataTextField="Name" DataValueField="Id" OnClientChange="onDropDownChange" />

Here's a screenshot of what the above code would render:

Both controls support the following data events:

  • ItemDataBound - Fired after the object has been bound to an Item. The argument passes both the bound object (DataObject) and theListItem.
  • NeedDataSource - Fired when there's no DataSourceID specified. This event is helpful when you want to manually populate the controls with your data. See the source code provided for specifics on this, you can use either Items collection or create custom list source (or both).

MultiselectDropDown

The code and usage is exactly as the DropDown control. Here's a screenshot of all of the above scenarios:

The styling in the attached project uses .skin files in the default theme. You can easily modify these to fit your needs. Everything can be styled.

I hope you find this code useful. I recommend this to anyone that wants to start developing custom controls as it has very important features implemented, such as the IPostBackDataHandler interface to pass data between postbacks in a custom manner. It also features some niceDataBinding examples and how you can use and modify these to perform specific tasks.

Best ASP.NET 4.6 Hosting Recommendation

ASPHostPortal.com provides its customers with Plesk Panel, one of the most popular and stable control panels for Windows hosting, as free. You could also see the latest .NET framework, a crazy amount of functionality as well as Large disk space, bandwidth, MSSQL databases and more. All those give people the convenience to build up a powerful site in Windows server. ASPHostPortal.com offers ASP.NET MVC hosting starts from $1/month only. They also guarantees 30 days money back and guarantee 99.9% uptime. If you need a reliable affordable ASP.NET Hosting, ASPHostPortal.com should be your best choice.


ASP.NET MVC 6 Hosting - ASPHostPortal :: Remote Validation in ASP.NET MVC

clock August 24, 2015 08:07 by author Kenny

Remote Validation in ASP.NET MVC

ASP.NET is an open-source server-side Web application framework designed for Web development to produce dynamic Web pages. It was developed by Microsoft to allow programmers to build dynamic web sites, web applications and web services. ASP.NET MVC gives you a powerful, patterns-based way to build dynamic websites that enables a clean separation of concerns and that gives you full control over markup. Remote validation is used to make server calls to validate data without posting the entire form to the server when server side validation is preferable to client side.  It's all done set up model and controller which is pretty neat. 

Using the Code

To implement remote validation in an application we have two scenarios, one is without an additional parameter and the other is with an additional parameter. First we create an example without an additional parameter. In this example we check whether a username exists or not. If the username exists then that means the input user name is not valid. We create a view model class "UserViewModel" under the Models folder and that code is:

using System.Web.Mvc;  
namespace RemoteValidation.Models   
{  
    public class UserViewModel   
    {  
        public string UserName   
        {  
            get;  
            set;  
        }  
        public string Email   
        {  
            get;  
            set;  
        }  
    }  
}


Now we create a static data source, in other words we create a static list of UserViewModel in which we could check whether a username exists or not. You can also use the database rather than a static list. The following code snippet is for StaticData.

using RemoteValidation.Models;  
using System.Collections.Generic;  
 
namespace RemoteValidation.Code   
{  
    public static class StaticData   
    {  
        public static List < UserViewModel > UserList   
        {  
            get {  
                return new List < UserViewModel >   
                {  
                    new UserViewModel   
                    {  
                        UserName = "User1", Email = "[email protected]"  
                    },  
                    new UserViewModel   
                    {  
                        UserName = "User2", Email = "[email protected]"  
                    }  
                }  
            }  
        }  
    }  


Now we create a controller "ValidationController" in which we create an action method to check whether a user name exists or not and return a result as a JSON format. If the username exists then it returns false so that the validation is implemented on the input field. The following code snippet shows ValidationController under the Controllers folder.

using RemoteValidation.Code;  
using System.Linq;  
using System.Web.Mvc;  
 
namespace RemoteValidation.Controllers   
{  
    public class ValidationController: Controller   
    {  
        [HttpGet]  
        public JsonResult IsUserNameExist(string userName)   
        {  
            bool isExist = StaticData.UserList.Where(u = > u.UserName.ToLowerInvariant().Equals(userName.ToLower())).FirstOrDefault() != null;  
            return Json(!isExist, JsonRequestBehavior.AllowGet);  
        }  
    }  
}


Now we add remote validation on the UserName of the UserViewModel property as in the following code snippet.

using System.Web.Mvc;  
 
namespace RemoteValidation.Models   
{  
    public class UserViewModel   
    {  
        [Remote("IsUserNameExist", "Validation", ErrorMessage = "User name already exist")]  
        public string UserName   
        {  
            get;  
            set;  
        }  
        public string Email   
        {  
            get;  
            set;  
        }  
    }  


As in the preceding code snippet, the IsUserNameExist is a method of ValidationController that is called on the blur of an input field using a GET request. Now we create UserController under the Controllers folder to render a view on the UI.

using RemoteValidation.Models;  
using System.Web.Mvc;  
 
namespace RemoteValidation.Controllers   
{  
    public class UserController: Controller   
    {  
        [HttpGet]  
        public ActionResult AddUser()   
        {  
            UserViewModel model = new UserViewModel();  
            return View(model);  
        }  
    }  

Now we add jquery.validate.js and jquery.validate.unobtrusive.js to the project and create a bundle as in the following code snippet.

using System.Web.Optimization;  
 
namespace RemoteValidation.App_Start   
{  
    public class BundleConfig   
    {  
        public static void RegisterBundles(BundleCollection bundles)   
        {  
            bundles.Add(new StyleBundle("~/Content/css").Include(  
                "~/Content/css/bootstrap.css",  
                "~/Content/css/font-awesome.css",  
                "~/Content/css/site.css"));  
 
            bundles.Add(new ScriptBundle("~/bundles/jquery").Include(  
                "~/Scripts/jquery-{version}.js"));  
 
            bundles.Add(new ScriptBundle("~/bundles/jqueryval").Include(  
                "~/Scripts/jquery.validate*"));  
        }  
    }  

Thereafter we add the following keys in the web.config file.

<add key="ClientValidationEnabled" value="true" />   
<add key="UnobtrusiveJavaScriptEnabled" value="true" />  


Thereafter we create a view for the AddUser action method. The following code snippet is for the AddUser view.

@model RemoteValidation.Models.UserViewModel  
 
< div class = "panel panel-primary" > < div class = "panel-heading panel-head" > Add User < /div>    
    <div class="panel-body">    
        @using (Html.BeginForm())    
        {    
            <div class="form-horizontal">    
                <div class="form-group">    
                    @Html.LabelFor(model => model.UserName, new { @class = "col-lg-2 control-label" })    
                    <div class="col-lg-9">    
                        @Html.TextBoxFor(model => model.UserName, new { @class = "form-control" })    
                        @Html.ValidationMessageFor(model => model.UserName)    
                    </div > < /div>    
                <div class="form-group">    
                    @Html.LabelFor(model => model.Email, new { @class = "col-lg-2 control-label" })    
                    <div class="col-lg-9">    
                        @Html.TextBoxFor(model => model.Email, new { @class = "form-control" })    
                        @Html.ValidationMessageFor(model => model.Email)    
                    </div > < /div>                    
                <div class="form-group">    
                    <div class="col-lg-9"></div > < div class = "col-lg-3" > < button class = "btn btn-success"  
                     id = "btnSubmit"  
                     type = "submit" > Submit < /button>    
                    </div >
               < /div>    
            </div >  
} < /div>    
</div >   
@section scripts   
{  
    @Scripts.Render("~/bundles/jqueryval")  

Let's run the application and put values into the user name field to execute the remote validation as in the following image.

Figure 1: Remote validation on user name


Now we move to another option, we pass an additional parameter in the remote validation. We pass both the user name and email as a parameter and check whether the username and email combination exist or not on the email input. That's why we add one more method in ValidationController as in the following code snippet for it.

[HttpGet]  
public JsonResult IsUserExist(string email, string userName)   
{  
    bool isExist = StaticData.UserList.Where(u = > u.UserName.ToLowerInvariant().Equals(userName.ToLower()) && u.Email.ToLowerInvariant().Equals(email.ToLower())).FirstOrDefault() != null;  
    return Json(!isExist, JsonRequestBehavior.AllowGet);  

Now we call this method on the Email property of UserViewModel as in the following code snippet.

using System.Web.Mvc;  
 
namespace RemoteValidation.Models   
{  
    public class UserViewModel   
    {  
        [Remote("IsUserNameExist", "Validation", ErrorMessage = "User name already exist")]  
        public string UserName   
        {  
            get;  
            set;  
        }  
        [Remote("IsUserExist", "Validation", ErrorMessage = "User already exist", AdditionalFields = "UserName")]  
        public string Email   
        {  
            get;  
            set;  
        }  
    }  
}

As in the preceding code snippet, we are passing an additional field using AdditionalFields in Remote. If we must pass more than one parameter then these will be comma-separated. Now run the application and the result will be as shown in the following image.  


ASP.NET Hosting - ASPHostPortal.com :: How to Solve HTTP Error 500.19 and 500.21 in ASP.NET 4.0

clock June 18, 2015 08:48 by author Dan

I was attempting to set up a new ASP.NET 4.0 web on my dev machine, running Windows 7 and IIS 7. I ran into several errors, that I suspect others may encounter, and I had to search all over the web to find all the answers. So I’ve written this post in the hopes it saves some other dev the same headache I had!

So, first I created the new website and app pool identity, but when I hit the site for the first time, I got the following error:

HTTP Error 500.19 – Internal Server Error

The requested page cannot be accessed because the related configuration data for the page is invalid.
After searching for solutions, I found most had to do with permissions to the web.config file or actual locking of sections of the web.config file. I confirmed that the app pool identity had permissions to the file, and there were no locking attributes in the file. So something else had to be the issue. Then I found some post on asp.net forum.
It turns out that ASP.NET had not been configured fully on my machine. So, according to one of the answers on the post, the solution is to do the following steps:
1. Open control panel
2. Click on “Programs and Features”
3. Click on ”Turn windows features on/off”
4. Locate ”Internet Information services IIS” in the pop up window and expand its node
5. Expand the ”World Wide Web Service” node
6. Expand “Application Development Features” node
7. Check the check box of”ASP.NET”
8. Then click ok button
9. You will need to restart your computer (go get a cup of coffee…)

After restarting, and hitting the site again, I got this new error:

HTTP Error 500.21 – Internal Server Error

Handler “PageHandlerFactory-Integrated” has a bad module “ManagedPipelineHandler” in its module list
Another web search revealed that even though the step above enabled ASP.NET, it was not fully installed. To fix this problem basically, just open a command window and enter the command shown below (command is slightly different for 32-bit vs. 64-bit).
64-bit:
%windir%\Microsoft.NET\Framework64\v4.0.30319\aspnet_regiis.exe -i

32 bit:
%windir%\Microsoft.NET\Framework\v4.0.21006\aspnet_regiis.exe -i

If you get a permissions error, you need to run the window as an administrator. To do this, go to start |run, and type ‘cmd’, but hit Ctrl-Shift-Enter, instead of just Enter.
After doing that, I hit the site again, and it worked! Hope this has helped!

Best ASP.NET Hosting Recommendation

ASPHostPortal.com provides its customers with Plesk Panel, one of the most popular and stable control panels for Windows hosting, as free. You could also see the latest .NET framework, a crazy amount of functionality as well as Large disk space, bandwidth, MSSQL databases and more. All those give people the convenience to build up a powerful site in Windows server. ASPHostPortal.com offers ASP.NET MVC hosting starts from $1/month only. They also guarantees 30 days money back and guarantee 99.9% uptime. If you need a reliable affordable ASP.NET Hosting, ASPHostPortal.com should be your best choice.


ASP.NET Hosting - ASPHostPortal.com :: How to Convert DataTable To JSON String in ASP.NET

clock February 24, 2015 06:34 by author Mark

First of all you need to create an "ASP.NET Empty Web Site". Then use the following procedure.

Step 1

Create a ConvertDataTableToJson class in the App_Code folder and provide the following:

Convert DataTable To JSON String.       
    using System.Data 
    using System.Text; 
    public class ConvertDatatableToJson 
    { 
       public string DataTableToJson(DataTable dt) 
       { 
          DataSet ds = new DataSet(); 
          ds.Merge(dt); 
          StringBuilder JsonStr = new StringBuilder(); 
          if (ds != null && ds.Tables[0].Rows.Count > 0) 
          { 
             JsonStr.Append("["); 
             for (int i = 0; i < ds.Tables[0].Rows.Count; i++) 
             { 
                JsonStr.Append("{"); 
                for (int j = 0; j < ds.Tables[0].Columns.Count; j++) 
                { 
                   if (j < ds.Tables[0].Columns.Count - 1) 
                   { 
                      JsonStr.Append("\"" + ds.Tables[0].Columns[j].ColumnName.ToString() + "\":" + "\"" + ds.Tables[0].Rows[i][j].ToString() + "\","); 
                   } 
                   else if (j == ds.Tables[0].Columns.Count - 1) 
                   { 
                      JsonStr.Append("\"" + ds.Tables[0].Columns[j].ColumnName.ToString() + "\":" + "\"" + ds.Tables[0].Rows[i][j].ToString() + "\""); 
                   } 
                } 
                if (i == ds.Tables[0].Rows.Count - 1) 
                { 
                   JsonStr.Append("}"); 
                } 
                else    
                { 
                   JsonStr.Append("},"); 
                } 
             } 
             JsonStr.Append("]"); 
             return JsonStr.ToString(); 
          } 
          else 
          { 
             return null; 
          } 
       }

Step 2

Insert the grid view control into the Default.aspx page then write the following design code:

<asp:GridView ID="ui_grdVw_EmployeeDetail" runat="server" Width="50%" AutoGenerateColumns="false" HeaderStyle-CssClass="pageheading"> 
    <Columns> 
    <asp:TemplateField HeaderText="S.NO"> 
    <ItemTemplate> 
    <%#Container.DataItemIndex+1 %> 
    </ItemTemplate> 
    </asp:TemplateField> 
    <asp:TemplateField HeaderText="Employee ID"> 
    <ItemTemplate> 
    <asp:Label ID="ui_lbl_EmployeeID" runat="server" Text='<%# DataBinder.Eval(Container.DataItem, "Emp_id") %>'></asp:Label> 
    </ItemTemplate> 
    </asp:TemplateField> 
    <asp:TemplateField HeaderText="Employee Name"> 
    <ItemTemplate> 
    <asp:Label ID="ui_lbl_EmployeeName" runat="server" Text='<%# DataBinder.Eval(Container.DataItem, "Emp_Name") %>'></asp:Label> 
    </ItemTemplate> 
    </asp:TemplateField> 
    <asp:TemplateField HeaderText="Employee Post"> 
    <ItemTemplate> 
    <asp:Label ID="ui_lbl_EmpJob" runat="server" Text='<%# DataBinder.Eval(Container.DataItem, "Emp_job") %>'></asp:Label> 
    </ItemTemplate> 
    </asp:TemplateField> 
    <asp:TemplateField HeaderText="Department"> 
    <ItemTemplate> 
    <asp:Label ID="ui_lbl_Department" runat="server" Text='<%# DataBinder.Eval(Container.DataItem, "Emp_Dep") %>'></asp:Label> 
    </ItemTemplate> 
    </asp:TemplateField> 
    </Columns> 
    </asp:GridView> 
    <br /> 
    <asp:Button ID="ui_btn_Convert1" runat="server" Text="Manually Convert To Json" OnClick="ui_btn_Convert1_Click" /><br /><br /><br /> 
    <asp:Label ID="ui_lbl_JsonString1" runat="server"></asp:Label>

Step 3

Now, open the Deafult.asps.cs then write the following code:
    using System; 
    using System.Data;
 

    public partial class _Default : System.Web.UI.Page 
    { 
       #region Global Variable 
       DataTable dt; 
       ConvertDatatableToJson dtJ; 
       string JsonString = string.Empty;    
       #endregion 
        
       protected void Page_Load(object sender, EventArgs e) 
       { 
          if (!IsPostBack) 
          { 
             ui_grdvw_EmployeeDetail_Bind(); 
          } 
       }       
       protected void ui_grdvw_EmployeeDetail_Bind() 
       { 
          dt = new DataTable(); 
          EmployeeRecord employeeRecord = new EmployeeRecord(); 
          dt = employeeRecord.EmpRecord(); 
          ViewState["dt"] = dt; 
          ui_grdVw_EmployeeDetail.DataSource = dt; 
          ui_grdVw_EmployeeDetail.DataBind(); 
       }       
       protected void ui_btn_Convert1_Click(object sender, EventArgs e) 
       { 
          dtJ = new ConvertDatatableToJson(); 
          JsonString = dtJ.DataTableToJson((DataTable)ViewState["dt"]); 
          ui_lbl_JsonString1.Text = JsonString; 
       } 
    }

Step 4

Press F5, run the project.

Now, convert the DataTable to a JSON string using the newtonsoft DLL.

Step 1

Download the Newtonsoft DLL and move it to the ASP.Net project's bin folder.

Step 2

Then, insert a button and label UI Control in the Deafult.aspx page as in the following:

<asp:Button ID="iu_btn_Convert2" runat="server" Text="Newtonsoft Convert To Json" OnClick="iu_btn_Convert2_Click" /> 
    <br /> 
    <br /> 
    <asp:Label ID="ui_lbl_JsonString2" runat="server"></asp:Label>

Step 3

Now, write the following code in Default.aspx.cs:
using this namespace

using Newtonsoft.Json;

And then:

protected void iu_btn_Convert2_Click(object sender, EventArgs e) 
    { 
       dt = (DataTable)ViewState["dt"]; 
       JsonString = JsonConvert.SerializeObject((DataTable)ViewState["dt"]); 
       ui_lbl_JsonString2.Text = JsonString; 
    }

Now, run the project and click on the Newtonsoft Convert to JSON     

Best ASP.NET Hosting Recommendation

ASPHostPortal.com provides its customers with Plesk Panel, one of the most popular and stable control panels for Windows hosting, as free. You could also see the latest .NET framework, a crazy amount of functionality as well as Large disk space, bandwidth, MSSQL databases and more. All those give people the convenience to build up a powerful site in Windows server. ASPHostPortal.com offers ASP.NET hosting starts from $1/month only. They also guarantees 30 days money back and guarantee 99.9% uptime. If you need a reliable affordable ASP.NET Hosting, ASPHostPortal.com should be your best choice.   


ASP.NET Hosting - ASPHostPortal.com :: Sending an email using exchange server from the ASP.NET Application

clock February 2, 2015 07:27 by author Dan

The .NET Framework 1.x had a System.web.mail class to send an email from the ASP.NET system. While this namespace and these classes still exist in the .NET Framework form 2.0 and later, they have been expostulated and supplanted by the new Mail API in the System.net.mail namespace in the Asp.net 2.0 structure. Asp.net 1.x's System.web.mail API was focused around CDO libraries. With the new Apis, Microsoft moved far from CDONTS based wrapper Apis and composed the new API utilizing Com+ segments to enhance the execution.

ASP.NET 2.0 sends an email utilizing Smtpclient class. In the most fundamental arrangement, You need to set the hostname of the hand-off server in the event that you are utilizing trade server or localhost in the event that you are utilizing neighborhood SMTP administration, port (25 as a matter of course), authentican certifications, or pointed out pickup index through the Deliverymethod property.

Here is the template for the System.NET.Mail configuration.

<configuration>
<!– Add the email settings to the element –>
<system.net>
<mailSettings>
<smtp deliveryMethod=”PickupDirectory” from=”fromemailaddress”>
<network
host=”relayServerHost”
port=”portNumber”
userName=”username”
password=”password”
defaultCredentials=”true/false”/>
</smtp>
</mailSettings>
</system.net>
</configuration>

localhost – local web server SMTP administration – If you need to send an email through neighborhood SMTP Service of the web server, basically include emulating lines of code in your web.config to send an email from the ASP.NET Pages.

<system.net>
<mailSettings>
<smtp deliveryMethod=”PickupDirectoryFromIis”>
<network host=”(localhost)” port=”25″ defaultCredentials=”true” />
</smtp>
</mailSettings>
</system.net>

Exchange Server – If you need to send an email from existing trade server email account, you need to setup the transfer administration from your webserver to trade server. Emulating web.config setup permits you utilize hand-off administration for trade server.

How about we say's exchange server name is "exmail.domainname.com", exchange username and secret key is "exchangeuserid" and "exchangepassword", you web.config settings would be

<system.net>
<mailSettings>
<smtp>
<network host=”exmail.domainname.com” port=”25″ userName=”exchangeuserid” password=”exchangepassword” defaultCredentials=”false” />
</smtp>
</mailSettings>
</system.net>

Next step would be to make a class to send a messages utilizing SMTP Service: Note that emulating code utilizes Web.config settings. Remarked out code won't utilize web.config mail settings. In spite of the fact that its preferrable, on the off chance that you don't need email designs in web.config document, utilize the remarked out code to design and send an email from the ASP.NET pages.

using System;using System.Net;using System.Net.Mail;
public class SMTPEmailSender
{
public SMTPEmailSender()
{
//
// TODO: Add constructor logic here
//
}

public static void SendSMTPEmail(string senderMailAddress,
string recipientMailAddress,
string mailSubject,
string mailBody)
{

//Create MailMessage to send an email.
MailMessage message = new MailMessage(senderMailAddress, recipientMailAddress);
message.Subject = mailSubject;
message.Body = mailBody;

//Use SMTPClient to send an email.
//Uses SMTP settings from web.config
SmtpClient client = new SmtpClient();
client.Send(message);

//Uses SMTP Settings from Code
/*
//Sample Code
//SmtpClient smtp = new SmtpClient(“exmail.domainname.com”, portnumber);
//smtp.Credentials = new NetworkCredential(“exchangeuserid”, “exchangepassword”, “DOMAIN”);
//smtp.DeliveryMethod = SmtpDeliveryMethod.Network; //smtp.Send(message);
*/
}
}

Create a Test Page to send out emails. Here is the source code from the code behind to send an email from the test email page.

public partial class TestEmail : System.Web.UI.Page
{
protected void Page_Load(object sender, EventArgs e)
{
string fromEmailAddress = “[email protected]“;
string recipientEmailAddress = “[email protected]“;
string mailSubject = “Nik’s Website: Test Email”;
string mailBody = “Test Email.”;
if (recipientEmailAddress != null && recipientEmailAddress.Trim().Length != 0)
{
SMTPEmailManager.SendSMTPEmail(fromEmailAddress, recipientEmailAddress, mailSubject, mailBody);
}
Response.Write(“Test Email Sent Out”);
}
}

Best ASP.NET Hosting Recommendation

ASPHostPortal.com provides its customers with Plesk Panel, one of the most popular and stable control panels for Windows hosting, as free. You could also see the latest .NET framework, a crazy amount of functionality as well as Large disk space, bandwidth, MSSQL databases and more. All those give people the convenience to build up a powerful site in Windows server. ASPHostPortal.com offers ASP.NET hosting starts from $1/month only. They also guarantees 30 days money back and guarantee 99.9% uptime. If you need a reliable affordable ASP.NET Hosting, ASPHostPortal.com should be your best choice.


ASP.NET Hosting - ASPHostPortal :: How To Show Data In Doughnut Chart Using ASP.NET

clock January 15, 2015 06:49 by author Mark

Doughnut Chart In ASP.Net

Today i will explains about how to show data in doughnut chart. In this article we will learn about the Doughnut Chart of ASP.Net.
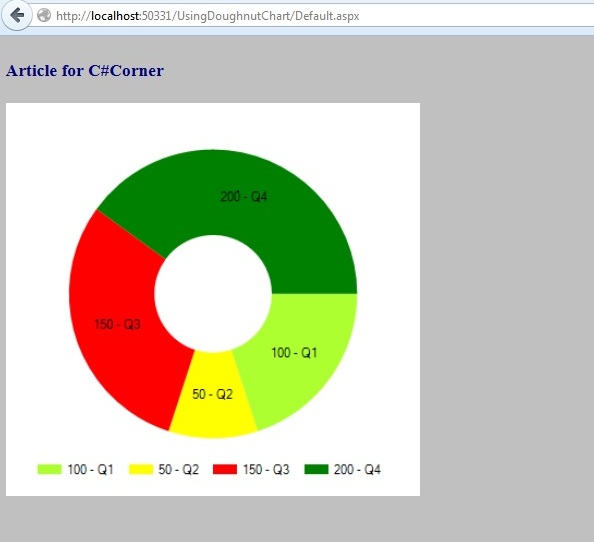
what's Donut or Doughnut chart?? Donut or Doughnut chart is just a simple pie chart with a hole inside. You can define hole radius to any size you need, both in percent or pixels. Sometimes we need to show data in a chart like a Doughnut chart, such as to show quarterly data and on, so by considering the preceding requirement and to introduce the ASP.Net Doughnut Chart controls I have decided to write this article.

Let us learn about the ASP.Net chart type Doughnut chart that provides a powerful UI and great design quality. We will learn about these chart type controls step-by-step. All the charts are in the System.Web.UI.DataVisualization.Charting namespace.
The chart data is represented using the following points:

  • X Axis: the horizontal line of the chart termed the X axis
  • Y Axis: the vertical line of the chart termed the Y axis

Now let us learn about the properties of the Doughnut chart. A Doughnut chart type has the following common properties:

  • AlternetText: Sets the alternate text when the image is not available.
  • Annotation: Stores the chart annotations.
  • AntiAliasing: sets a value that determines whether anti-aliasing is used when text and graphics are drawn.
  • BackGradientStyle: sets the orientation for the background gradient for the Chart control. Also determines whether a gradient is used, the default is None.
  • Backcolor: sets the background color for a chart, the default color is White.
  • BackImage: sets the background image for the chart control.
  • BackHatchStyle: sets the hatching style for the chart control, the default is None.
  • Height: Sets the height for the chart control.
  • Width: Sets the width for the chart control.
  • Palette: Sets the style with the color for the chart control, the default style is Chocolate.
  • PaletteCustomColors: Sets the custom color for the chart control.
  • Series: Sets the series collection for the chart control.
  • Legends: Sets the series of legends to the chart.

Now let us show the preceding explanation with a practical example by creating a simple web application.

Step 1: Create the table for the chart data

  • Now before creating the application, let us create a table named QuarterwiseSale in a database from where we show the records in the chart using the following script:

CREATE TABLE [dbo].[QuarterwiseSale](    
    [id] [int] IDENTITY(1,1) NOT NULL,    
    [Quarter] [varchar](50) NULL,    
    [SalesValue] [money] NULL,    
 CONSTRAINT [PK_QuarterwiseSale] PRIMARY KEY CLUSTERED     
    (    
    [id] ASC    
    )WITH (PAD_INDEX = OFF, STATISTICS_NORECOMPUTE = OFF,IGNORE_DUP_KEY = OFF,ALLOW_ROW_LOCKS = ON, ALLOW_PAGE_LOCKS = ON) ON [PRIMARY]    
    ) ON [PRIMARY]   

  • The table has the following fields (shown in the following image): 
  • Now insert some records using the following script: 

SET IDENTITY_INSERT [dbo].[QuarterwiseSale] ON          
    GO    
    INSERT [dbo].[QuarterwiseSale] ([id], [Quarter], [SalesValue]) VALUES     (1, N'Q1', 100.0000)    
    GO    
    INSERT [dbo].[QuarterwiseSale] ([id], [Quarter], [SalesValue]) VALUES     (2, N'Q2', 50.0000)    
    GO    
    INSERT [dbo].[QuarterwiseSale] ([id], [Quarter], [SalesValue]) VALUES     (3, N'Q3', 150.0000)    
    GO    
    INSERT [dbo].[QuarterwiseSale] ([id], [Quarter], [SalesValue]) VALUES     (4, N'Q4', 200.0000)    
    GO    
    SET IDENTITY_INSERT [dbo].[QuarterwiseSale] OFF    
    GO   

Now the records will look as in the following image:
Now create the Stored Procedure to fetch the records from the database as in the following:

Create Procedure [dbo].[GetSaleData]    
    (    
    @id int=null             
    )    
    as    
    begin    
    Select Quarter,SalesValue from QuarterwiseSale    
    End 
  

I hope you have the same type of table and records as above.

Step: 2 Create Web Application

  • Now create the project using the following:
  • "Start" - "All Programs" - "Microsoft Visual Studio 2013".
  • "File" - "New Project" - "C#" - "Empty Project" (to avoid adding a master page).
  • Provide the project a name such as UsingDoughnutChart or another as you wish and specify the location.
  • Then right-click on Solution Explorer and select "Add New Item" then select Default.aspx page.
  • Drag and Drop a Chart control from the ToolBox onto the Default.aspx page.
  • Now the Default.aspx source code will be as follows:

    <%@ Page Language="C#" AutoEventWireup="true" CodeFile="Default.aspx.cs" Inherits="_Default" %>         
    <%@ Register Assembly="System.Web.DataVisualization, Version=4.0.0.0, Culture=neutral, PublicKeyToken=31bf3856ad364e35"  
        Namespace="System.Web.UI.DataVisualization.Charting" TagPrefix="asp" %>  
    <!DOCTYPE html PUBLIC "-//W3C//DTD XHTML 1.0 Transitional//EN" "http://www.w3.org/TR/xhtml1/DTD/xhtml1-transitional.dtd">  
    <html xmlns="http://www.w3.org/1999/xhtml">  
    <head runat="server">  
        <title>Article by Vithal Wadje</title>  
    </head>  
    <body bgcolor="silver">  
        <form id="form1" runat="server">  
        <h4 style="color: Navy;">  
            Article for C#Corner  
        </h4>  
        <asp:Chart ID="Chart1" runat="server" BackColor="0, 0, 64" BackGradientStyle="LeftRight"  
            BorderlineWidth="0" Height="360px" Palette="None" PaletteCustomColors="Maroon"  
            Width="380px" BorderlineColor="64, 0, 64">  
            <Titles>  
                <asp:Title ShadowOffset="10" Name="Items" />  
            </Titles>  
            <Legends>  
                <asp:Legend Alignment="Center" Docking="Bottom" IsTextAutoFit="False" Name="Default"  
                    LegendStyle="Row" />  
            </Legends>  
            <Series>  
                <asp:Series Name="Default" />  
            </Series>  
            <ChartAreas>  
                <asp:ChartArea Name="ChartArea1" BorderWidth="0" />  
            </ChartAreas>  
        </asp:Chart>  
        </form>  
    </body>  
    </html> 

  • Create a method to bind the chart control. Then open the default.aspx.cs page and create the following function named Bindchart to bind the Chart Control as in the following:

private void Bindchart()  
        {  
            connection();  
            com = new SqlCommand("GetSaleData", con);  
            com.CommandType = CommandType.StoredProcedure;  
            SqlDataAdapter da = new SqlDataAdapter(com);  
            DataSet ds = new DataSet();  
            da.Fill(ds);         
            DataTable ChartData = ds.Tables[0];  
            //storing total rows count to loop on each Record  
            string[] XPointMember = new string[ChartData.Rows.Count];  
            int[] YPointMember = new int[ChartData.Rows.Count];         
            for (int count = 0; count < ChartData.Rows.Count; count++)  
            {  
                //storing Values for X axis  
                XPointMember[count] = ChartData.Rows[count]["Quarter"].ToString();  
                //storing values for Y Axis  
                YPointMember[count] = Convert.ToInt32(ChartData.Rows[count]["SalesValue"]);  
            }  
            //binding chart control  
            Chart1.Series[0].Points.DataBindXY(XPointMember, YPointMember);         
            //Setting width of line  
            Chart1.Series[0].BorderWidth = 10;  
            //setting Chart type   
            Chart1.Series[0].ChartType = SeriesChartType.Doughnut;       
            foreach (Series charts in Chart1.Series)  
            {  
                foreach (DataPoint point in charts.Points)  
                {  
                    switch (point.AxisLabel)  
                    {  
                        case "Q1": point.Color = Color.YellowGreen; break 
                        case "Q2": point.Color = Color.Yellow; break;  
                        case "Q3": point.Color = Color.SpringGreen; break;
                    }  
                    point.Label = string.Format("{0:0} - {1}", point.YValues[0], point.AxisLabel);         
                }  
            }           
            //Enabled 3D  
          //  Chart1.ChartAreas["ChartArea1"].Area3DStyle.Enable3D = true;
            con.Close();         
        } 

Note that we have written a small code snippet to provide the different color for each point as in the following:

//To give different color for each point             
    foreach (Series charts in Chart1.Series)      
           {      
               foreach (DataPoint point in charts.Points)      
               {      
                   switch (point.AxisLabel)      
                   {      
                       case "Q1": point.Color = Color.RoyalBlue; break;   
                       case "Q2": point.Color = Color.SaddleBrown; break; 
                       case "Q3": point.Color = Color.SpringGreen; break; 
                   }      
                   point.Label = string.Format("{0:0} - {1}", point.YValues[0], point.AxisLabel);                
               }      
           }       

  • Now, call the preceding function on page load as in the following:

protected void Page_Load(object sender, EventArgs e)      
        {      
            if (!IsPostBack)      
            {      
                Bindchart();                 
            }      
        }  
  

  • The entire code of the default.aspx.cs page will look as follows:

      using System;  
    using System.Collections.Generic;  
    using System.Linq;  
    using System.Web;  
    using System.Web.UI;  
    using System.Web.UI.WebControls;  
    using System.Data.SqlClient;  
    using System.Configuration;  
    using System.Data;  
    using System.Web.UI.DataVisualization.Charting;  
    using System.Drawing;         
    public partial class _Default : System.Web.UI.Page  
    {  
        private SqlConnection con;  
        private SqlCommand com;  
        private string constr, query;  
        private void connection()  
        {  
            constr = ConfigurationManager.ConnectionStrings["getconn"].ToString();  
            con = new SqlConnection(constr);  
            con.Open();  
               }  
        protected void Page_Load(object sender, EventArgs e)  
        {  
            if (!IsPostBack)  
            {  
                Bindchart();    
            }  
        }     
        private void Bindchart()  
        {  
            connection();  
            com = new SqlCommand("GetSaleData", con);  
            com.CommandType = CommandType.StoredProcedure;  
            SqlDataAdapter da = new SqlDataAdapter(com);  
            DataSet ds = new DataSet();  
            da.Fill(ds);         
            DataTable ChartData = ds.Tables[0];         
            //storing total rows count to loop on each Record  
            string[] XPointMember = new string[ChartData.Rows.Count];  
            int[] YPointMember = new int[ChartData.Rows.Count];         
            for (int count = 0; count < ChartData.Rows.Count; count++)  
            {  
                //storing Values for X axis  
                XPointMember[count] = ChartData.Rows[count]["Quarter"].ToString();  
                //storing values for Y Axis  
                YPointMember[count] = Convert.ToInt32(ChartData.Rows[count]["SalesValue"]);         
            }  
            //binding chart control  
            Chart1.Series[0].Points.DataBindXY(XPointMember, YPointMember);         
            //Setting width of line  
            Chart1.Series[0].BorderWidth = 10;  
            //setting Chart type   
            Chart1.Series[0].ChartType = SeriesChartType.Doughnut;      
            foreach (Series charts in Chart1.Series)  
            {  
                foreach (DataPoint point in charts.Points)  
                {  
                    switch (point.AxisLabel)  
                    {  
                        case "Q1": point.Color = Color.YellowGreen; break 
                        case "Q2": point.Color = Color.Yellow; break;  
                        case "Q3": point.Color = Color.SpringGreen; break;
                    }  
                    point.Label = string.Format("{0:0} - {1}", point.YValues[0], point.AxisLabel);  
                }  
            }    
            //Enabled 3D  
          //  Chart1.ChartAreas["ChartArea1"].Area3DStyle.Enable3D = true;  
            con.Close();  
        }  
    } 

We now have the entire logic to bind the chart from the database, let us run the application. The chart will look as follows:
I hope this article work for you.

TOP No#1 Recommended ASP.NET 5 Hosting

ASPHostPortal.com

ASPHostPortal.com  is the leading provider of Windows hosting and affordable ASP.NET Hosting. ASPHostPortal proudly working to help grow the backbone of the Internet, the millions of individuals, families, micro-businesses, small business, and fledgling online businesses. ASPHostPortal has ability to support the latest Microsoft and ASP.NET technology, such as: WebMatrix, WebDeploy, Visual Studio 2015, .NET 5/ASP.NET 4.5.2, ASP.NET MVC 6.0/5.2, Silverlight 6 and Visual Studio Lightswitch, ASPHostPortal guarantees the highest quality product, top security, and unshakeable reliability, carefully chose high-quality servers, networking, and infrastructure equipment to ensure the utmost reliability.


ASP.NET Hosting - ASPHostPortal :: Tips Diagnostic And Performance Monitoring in .Net

clock January 8, 2015 06:42 by author Mark

Diagnostic And Performance Monitoring in .Net

In this article we will have a look at what is newer in .Net to help determine the problem area or scope for improvements in your program.
There are a number of tools and utilities available to monitor and tune your .Net application's performance. The .Net framework itself provides a very good infrastructure for performance monitoring and analysis.
Allows the user to monitor application domain level Memory and Processor usage statistics. Previous to .Net we had limited APIs available, which can provide support for reading only the Process level memory usage and CPU usage information. In .net you have access to Processor and Memory usage estimates for a given application domain.

The application domain based resource monitoring feature is available in:

  • Hosting APIs and
  • Event Tracing for Windows(ETW).

By default, application domain level resource monitoring is disabled. This feature has to be enabled in a process to get application domain level resouce consumption details within that process.
The AppDomain class has been enhanced to provide support for this new feature. A process can enable this feature using the AppDomain class's static property MonitoringIsEnabled.

(bool) AppDomain.MonitoringIsEnabled

It is a boolean property. Once this property is enabled in the process, it stays active until the process exits. You can assign only the value 'true'; even though it is a boolean property, assigning the value 'false' to this property causes an Invalid Argument exception.
The AppDomain class provides the following properties to access the Appdomain's resource usage.

AppDomain.MonitoringSurvivedMemorySize

It is a readonly instance property. Provides the number of bytes which is currently allocated by the Appdomain in the managed heap. In other words this property provides the size of memory which is survived the last cycle of garbage collection. This property is updated only after a full, blocking collection occurred.

AppDomain.MonitoringSurvivedProcessMemorySize

It is a readonly static property, provides the number of bytes currently allocated by the current process in the managed heap memory. This an equivalent of GC.GetTotalMemory property.

AppDomain.MonitoringTotalAllocatedMemorySize

This is a readonly instance property. It returns the total size, in bytes, of all memory allocations that have been made by the application domain since it was created, without subtracting memory that has been collected.

AppDomain.MonitoringTotalProcessorTime

It is a readonly instance property. Returns the total processor time utilized by the application domain since the process started. The total time reported by this property includes the time each thread in the process spent executing in that application domain.
The excution time of unmanaged calls made by an application domain, is also counted for that application domain.
The sleeping time of a thread is not counted in association with the application domain's processor usage.

Using Event Tracing for Windows (ETW)

You can now access the ETW events for diagnostic purposes to improve performance.


ASP.NET 4.5 Hosting - ASPHostPortal :: How to Drag Drop Elements in ASP.NET MVC 5 using HTML 5, Web API and jQuery

clock December 22, 2014 05:24 by author Mark

Providing rich web UI experiences like Charts, Editable tabular interface, offline capabilities, dragging-dropping data on the page etc. can be a challenging task. To implement these features, a developer must plan the application based upon different browsers capabilities. A couple of years ago, this was achievable with a lot of efforts using some complex JavaScript code.

As the web progressed, modern browsers has made it possible to take web development to the next level. To complement, there are several libraries like jQuery, Angular, DOJO, etc. that can provide new UI rich features to enhance your applications. But wouldn’t it be nicer if the HTML itself provides some of these cool features using markup?
HTML5 has been developed with the current and future browser development in mind. Apart from being backward compatible, HTML5 contains many new elements and APIs for adding Rich UX capabilities to the application. Drag-Drop is one such useful feature available in HTML5 that can be used for data management on the page.
In HTML 5, an element can be made draggable using draggable=true in the markup. To monitor the process of drag-drop, we need to make use of the following events: dragstart, drag, dragenter, dragleave, dragover, drop, dragend.
The process of implementation has the following elements:

  • The source element applied with attribute draggable=true.
  • The data payload which means the data to be dragged and dropped.
  • The target where the drop is made.

Drag-Drop in ASP.NET MVC 5 using HTML 5, Web API and jQuery

To implement the Drag-Drop application, we will be using the following technologies:
ASP.NET MVC 5
WEB API with Attribute Routing
jQuery

  • Step 1: Open Visual Studio 2013 (the application uses Ultimate with Update 3), and create an Empty MVC application.
  • Step 2: In the App_Data folder of the application add a new SQL Server database with the name ‘Application.mdf’ as below:

In this database, add a new table called ‘Products’ using the following script:
CREATE TABLE [dbo].[Products] (
    [ProductId]   INT          IDENTITY (1, 1) NOT NULL,
    [ProductName] VARCHAR (50) NOT NULL,
    [Quantity]    INT          NOT NULL,
    PRIMARY KEY CLUSTERED ([ProductId] ASC)
);

The above table will contain products which we will fetch in our View.

  • Step 3: In the Models folder, add a new EntityFramework with the name ApplicationEDMX. In the wizard that comes up, select the Application.mdf database and the Products table designed in the above step. After completing the wizard, the following table mapping gets displayed.

  • Step 4: In the controllers folder, add a new Empty WEB API Controller with the name ProductsAPIController. In this API controller add the following code:

using System.Collections.Generic;
using System.Linq;
using System.Web.Http;
using A1_HTML5_DragDrop.Models;
namespace A1_HTML5_DragDrop.Controllers
{
    public class ProductsAPIController : ApiController
    {
        ApplicationEntities ctx;
 
        public ProductsAPIController()
        {
            ctx = new ApplicationEntities();
        }
 
        [Route("Products")]
        public IEnumerable<Product> GetProducts()
        {
            return ctx.Products.ToList();
        }
    }
}

The above code declares an object of ApplicationEntities, which got generated using EntityFramework. The GetProducts() returns a list of products. This method is applied with an Attribute Route ‘[Route(“Products”)]’ which will provide the URL to make call to this method using client-side framework (e.g. ajax method). You can read more on Attribute routing in my other article Practical Use of ASP.NET Web API Attribute Routing in an MVC application.

  • Step 5: In the controllers folder, add a new Empty MVC controller of the name ProductController. This controller class will generate an Index method. Scaffold a new Empty view from the Index method.
  • Step 6: Add the following markup in the Index view:

<table>
    <tr>
        <td>
            <h1>Product List</h1>
        </td>
        <td>
            <h1>Selected Products</h1>
        </td>
    </tr>
    <tr>
        <td>
            <div id="dvleft">
                <ul id="lstproducts">
                </ul>
            </div>
        </td>
        <td>
            <div id="dvright">
                <ul id="lstselectedproducts"></ul>
            </div>
        </td>
    </tr>
</table>

The above markup has a table with two rows. The first row shows headers for Product List and selected products. The second row contains <div>s containing list in it. The ‘lstproducts’ list will show the Products retrieved from the server. The ‘lstselectedproducts’ will show selected products by the end-user using Drag-Drop.
Add the following styles in the View (better to use a separate stylesheet but I will keep it here for readability):
<style type="text/css">
    table, td {
        background-color:azure;
     border:double;
    }
    #dvright,#dvleft {
        background-color:azure;
       height:200px;
       width:300px;
    }
</style>

  • Step 7: In the page add the following Script:

<script type="text/javascript">
    $(document).ready(function () {
        loadProducts();
        //Function to set events for Drag-Drop
        function setEvents() {
            var lstProducts = $('li');
            //Set Drag on Each 'li' in the list
                $.each(lstProducts, function (idx, val) {
                    $('li').on('dragstart', function (evt) {
                        evt.originalEvent.dataTransfer.setData("Text", evt.target.textContent);
                        evt.target.draggable = false;
                    });
                });
            //Set the Drop on the <div>
                $("#dvright").on('drop', function (evt) {
                    evt.preventDefault();
                    var data = evt.originalEvent.dataTransfer.getData("Text");
                    var lst = $("#lstselectedproducts");
                    var li = "<li>"+data+"</li>";
                    li.textContent = data;
                    lst.append(li);
                });
 
            //The dragover
                $("#dvright").on('dragover', function (evt) {
                    evt.preventDefault();
                });
        }
        ///Function to load products using call to WEB API
        function loadProducts() {
            var items="";
            $.ajax({
                url: "/Products",
                type: "GET"
            }).done(function (resp) {
                $.each(resp, function (idx, val) {
                    items += "<li draggable='true'>" + val.ProductName + "</li>";
                });
                $("#lstproducts").html(items);
                setEvents();
            }).error(function (err) {
                alert("Error! " + err.status);
            });
        }
    });
</script>

The script has the following specifications:

  • The function ‘loadProducts()’ makes an ajax call to WEB API. When the call is successful, the iteration is done through the response. This iteration adds the <li> tag in the ‘lstproducts’ list with the draggable attribute set to true.
  • The function ‘setEvents()’ performs the following two step operations:
  • subscribe to the ‘dragstart’ event for each <li> and set the data transfer with the ‘Text’ property. This is the text content of the <li> selected. Once any <li> is dragged, the drag on the same is disabled using evt.target.draggable =false; statement.
  • The <div> of id ‘dvright’ is subscribed to ‘drop’ event, it accepts the dragged Text. Once the text is accepted, it is set to the <li> which is dynamically appended in the list with id as ‘lstselectedproducts’.
  • Step 8: Run the application, the Products data gets loaded:

    Drag the Product from the ‘Product List’ and drop it in the ‘Selected Products’ as seen here:

    • The above Red Mark shows the Drag Action. Once the drop operation is over the result will be as seen here:

Conclusion:

The HTML 5 Native support for Drag-Drop provides an easy mechanism of handling Data as well as UI operations. Since the support is native to HTML 5, no additional library is required.


ASP.NET 4.5 Hosting - ASPHostPortal.com :: How to use OnClick and OnClientClick events to Prevent Double Clicking on your ASP.Net Buttons

clock December 9, 2014 04:46 by author Dan

While ASP.NET gives a great validator set of controls, now and then you have to "move your own" so to talk when making your controls. What's more, on the off chance that you have some AJAX preparing with your buttons in the background (for instance, sparing a record in a popup window) you run the danger of having "twofold spares" happening when the client clicks on the button and nothing happens instantly.

Having battled with this issue myself recently, it took somewhat more work than expected to get this to work legitimately. Here's the manner by which you get everything to play pleasantly together.

The first step is to wire up your code behind occasion that does your handling. In case you're doing this in C# you setup your Onclick occasion:

<asp:Button ID="btnSave" runat="server" Text="Save" OnClick="btnSave_Click" />

In case you're doing this in Vb.net, there's no compelling reason to utilize the Onclick value as a part of your button, you can go straight to the code behind, make your strategy name, and utilize the Handles pivotal word, pointing out your buttons click occasion:

Protected Void Sub btnSave_Click Handles btnSave.Click
' Code here
End Sub

The next step is to do our validation using Javascript (we’re using jQuery in here).

function validatePage()
{
    var check = true;

    // Check only simple textbox for now
    if ($("#txtImportant").val() == '') check = false;

    if (!check)
    {
       alert('Missing data. Please complete');
       return false;
    }
    else
    {
       $("#MainContent_btnSave").val('Processing...');
       $("#MainContent_btnSave").attr("disabled", true);
       return true;
    }
}

There are several vital notes to this capacity. The main is not to overlook that Asp.net as a matter of course likes to help particularly name your server controls, subsequently the "Maincontent_" prefix on our spare button. You can utilize the Clientidmode property in the event that you have to get around this. The following is that we keep the client from twofold clicking the spare catch by handicapping the catch and transforming its content to say "Handling… " Finally, we just debilitate the button if the acceptance succeeds. This keeps us from needing to handicap and re-empower the button focused around the results. Strangely it likewise verifies that our return value in the HTML component forms accurately, which was likely one of the greatest glitches I ran crosswise over amid this process.

Presently we have to wire up the Javascript handling. To do this, we utilize the Onclientclick technique that is accessible for most .Net server controls. While taking a gander at our code above looks clear enough (return false to prematurely end the script or valid to proceed with the post back) we do need to change our rationale somewhat. Having a "return genuine" explanation doesn't let the button proceed with its post back, it will make it quit handling (very nearly the same as a return false summon). Rather, we let our rationale just prematurely end if our acceptance fizzled:

<asp:Button ID="btnSave" runat="server"
            Text="Save"
            OnClick="btnSave_Click"
            OnClientClick="if (!validatePage()) {return false;}" />

At long last, following we're overriding the HTML onclick occasion on the control (on account of the Oncilentclick property) that regardless of the possibility that your acceptance strategy succeeds, the code behind system won't shoot. To work around this, we utilize the Usesubmitbehavior property of the button control and set it to false. What this does is attaches the suitable __dopostback call after our Javascript code. The last code for your button resembles this:

<asp:Button ID="btnSave" runat="server"
            Text="Save"
            OnClick="btnSave_Click"
            OnClientClick="if (!validatePage()) {return false;}"
            UseSubmitBehavior="false" />

That is all there is to it. Presently when you click on the button, if the acceptance falls flat, you'll get the caution box. Something else, the button will get to be crippled with a "handling" message and your code behind strategy will run.


Cheap ASP.NET 4.5 Hosting

We’re a company that works differently to most. Value is what we output and help our customers achieve, not how much money we put in the bank. It’s not because we are altruistic. It’s based on an even simpler principle. "Do good things, and good things will come to you".

Success for us is something that is continually experienced, not something that is reached. For us it is all about the experience – more than the journey. Life is a continual experience. We see the Internet as being an incredible amplifier to the experience of life for all of us. It can help humanity come together to explode in knowledge exploration and discussion. It is continual enlightenment of new ideas, experiences, and passions


Author Link

 photo ahp banner aspnet-01_zps87l92lcl.png


Corporate Address (Location)

ASPHostPortal
170 W 56th Street, Suite 121
New York, NY 10019
United States

Tag cloud

Sign in