All About ASP.NET and ASP.NET Core 2 Hosting BLOG

Tutorial and Articles about ASP.NET and the latest ASP.NET Core

ASP.NET Hosting - ASPHostPortal.com :: Tips to to using Microsoft Enterprise Library in ASP.NET for data access

clock August 23, 2016 19:37 by author Armend

Microsoft Enterprise Library is a collection of reusable software components used for  logging, validation, data access, exception handling etc.

Here I am describing how to use Microsoft Enterprise Library for data access.

Step 1: First download the project from http://entlib.codeplex.com/ URL.

Step 2: Now extract the project to get

Microsoft.Practices.EnterpriseLibrary.Common.dll
Microsoft.Practices.EnterpriseLibrary.Configuration.Design.dll
Microsoft.Practices.EnterpriseLibrary.Data.dll
Microsoft.Practices.ObjectBuilder.dll


And give reference in the Bin directory by Right click on Bin -> Add Reference -> then give the path of these 4 dlls. Then

Step 3: Modification in the web.config for Connection String.

<add name="ASPHostPortalConnection" providerName="System.Data.SqlClient" connectionString="DataSource=ASPHostPortalSQLEXPRESS;Initial Catalog=ASPHostPortal;User ID=sa;Password=admintest;Min Pool Size=10;Max Pool Size=100;Connect Timeout=100"/>

Give the connection string as above where Datasource is your data source name, Initial Catalog is your database name and User ID and Password as in your sql server.

Step 4:

Now it is time to write the code.


Write the below 2 lines in the using block.

using System.Data.Common;
using Microsoft.Practices.EnterpriseLibrary.Data;

Here I am writting some examples how to work on:

public DataTable Read()
    {
        try
        {
            Database db = DatabaseFactory.CreateDatabase("ASPHostPortalConnection");
            DbCommand dbCommand = db.GetStoredProcCommand("[Topics_Return]");
            DataSet dataSet = db.ExecuteDataSet(dbCommand);
            return dataSet.Tables[0];
        }
        catch
        {
            return null;
        }
    }


The above code is a sample that will return a dataset. Here Fewlines4bijuConnection is the connection name and Topics_Return is the stored procedure name that is nothing but a Select statement.

But if the stored procedure is taking parameter then the code will be like:

 public int Save()
    {
        Database db = DatabaseFactory.CreateDatabase("ASPHostPortalConnection");
        DbCommand dbCommand = db.GetStoredProcCommand("Topics_Save");

        db.AddInParameter(dbCommand, "@Subject", DbType.AnsiString, "Here is the subject");
        db.AddInParameter(dbCommand, "@Description", DbType.AnsiString, "Here is the Descriptiont");      
        db.AddInParameter(dbCommand, "@PostedBy", DbType.Int32, 4);       
        db.AddOutParameter(dbCommand, "@Status", DbType.AnsiString, 255);
        try
        {
            db.ExecuteNonQuery(dbCommand);
            return Convert.ToInt32(db.GetParameterValue(dbCommand, "Status"));
        }
        catch
        {
            return 0;
        }
    }

As the code explained above ASPHostPortalConnection is the connection name and Topics_Save is the stored procedure name that is taking 3 (Subject,Description,PostedBy) input parameters and 1(Status) output parameter.

You may give values from textbox, I am here provideing sample values like  "Here is the subject", "Here is the Descriptiont" or you may give the UserID from session, I am here giving 4. The output parameter will give you a string as defined and the code to get the value is

int returnValue=Convert.ToInt32(db.GetParameterValue(dbCommand, "Status"));

you can pass input parameter as below

db.AddInParameter(dbCommand, "@Subject", DbType.AnsiString, "Here is the subject");

DbType.AnsiString since Subject is of string time, you can select different values like AnsiString, DateTime from the Enum as be the parameter type.
The above code describes if you are using any stored procedure.
Below is an example that shows how to use inline SQL statements.

public DataSet GetID(string title)
    {
       DataSet ds=new DataSet();

        try
        {
            Database db = DatabaseFactory.CreateDatabase("ASPHostPortalConnection");
            DbCommand dbCommand = db.GetSqlStringCommand("Select * FROM Topics where UserID=1 and
IsDeleted=0");          
            ds= db.ExecuteDataSet(dbCommand);
           return ds;         
        }
        catch
        {
            return ds;
        }
         return ds;
    }


Happy coding!!


About ASPHostPortal.com :

ASPHostPortal.com is The Best, Cheap and Recommended ASP.NET & Linux Hosting. ASPHostPortal.com has ability to support the latest Microsoft, ASP.NET, and Linux technology, such as: such as: WebMatrix, Web Deploy, Visual Studio 2015, .NET 5/ASP.NET 4.5.2, ASP.NET MVC 6.0/5.2, Silverlight 6 and Visual Studio Light Switch, Latest MySql version, Latest PHPMyAdmin, Support PHP 5. x, etc. Their service include shared hosting, reseller hosting, and Sharepoint hosting, with speciality in ASP.NET, SQL Server, and Linux solutions. Protection, trustworthiness, and performance are at the core of hosting operations to make certain every website and software hosted is so secured and performs at the best possible level.


ASP.NET Core 1.0 Hosting - ASPHostPortal.com :: Easy step to make custom config section in ASP.NET

clock August 22, 2016 21:45 by author Dan

You can extend ASP.NET configuration settings with XML configuration elements of your own. To do this, you create a custom configuration section handler. The handler must be a .NET Framework class that inherits from the System.Configuration.ConfigurationSection class. The section handler interprets and processes the settings that are defined in XML configuration elements in a specific section of a Web.config file. You can read and write these settings through the handler's properties.

using System;
using System.Collections.Generic;
using System.Configuration;
using System.Linq;
using System.Web;
namespace CustomConfigSection
{
    public class LoginRedirectByRoleSection : ConfigurationSection
    {
        [ConfigurationProperty("roleRedirects")]
    public RoleRedirectCollection RoleRedirects
        {
    get
            {
    return (RoleRedirectCollection)this["roleRedirects"];
            }
    set
            {
    this["roleRedirects"] = value;
            }
        }
    }
    public class RoleRedirect : ConfigurationElement
    {
        [ConfigurationProperty("role", IsRequired = true)]
    public string Role
        {
    get
            {
    return (string)this["role"];
            }
    set
            {
    this["role"] = value;
            }
        }
        [ConfigurationProperty("url", IsRequired = true)]
    public string Url
        {
    get
            {
    return (string)this["url"];
            }
    set
            {
    this["url"] = value;
            }
        }
    }
    public class RoleRedirectCollection : ConfigurationElementCollection
    {
    public RoleRedirect this[int index]
        {
    get
            {
    return (RoleRedirect)BaseGet(index);
            }
        }
    public RoleRedirect this[object key]
        {
    get
            {
    return (RoleRedirect)BaseGet(key);
            }
        }
    protected override ConfigurationElement CreateNewElement()
        {
    return new RoleRedirect();
        }
    protected override object GetElementKey(ConfigurationElement element)
        {
    return ((RoleRedirect)element).Role;
        }
    }
}


<configSections>
    <section name="loginRedirectByRole" type="CustomConfigSection.LoginRedirectByRoleSection,CustomConfigSection" allowLocation="true" allowDefinition="Everywhere" />
    </configSections>
    <loginRedirectByRole>
    <roleRedirects>
    <add role="Administrator" url="~/Admin/Default.aspx" />
    <add role="User" url="~/User/Default.aspx" />
    </roleRedirects>
    </loginRedirectByRole>


using System;
using System.Collections.Generic;
using System.Configuration;
using System.Linq;
using System.Web;
using System.Web.Security;
using System.Web.UI;
using System.Web.UI.WebControls;
using CustomConfigSection;
namespace CustomConfigSection
{
    public partial class WebForm1 : System.Web.UI.Page
    {
    protected void Page_Load(object sender, EventArgs e)
        {
           LoginRedirectByRoleSection roleRedirectSection = (LoginRedirectByRoleSection)ConfigurationManager.GetSection("loginRedirectByRole");
    foreach (RoleRedirect roleRedirect in roleRedirectSection.RoleRedirects)
            {
    if (Roles.IsUserInRole("", roleRedirect.Role))
                {
                    Response.Redirect(roleRedirect.Url);
                }
            }
        }
    }
}

Best ASP.NET Hosting Recommendation

ASPHostPortal.com provides its customers with Plesk Panel, one of the most popular and stable control panels for Windows hosting, as free. You could also see the latest .NET framework, a crazy amount of functionality as well as Large disk space, bandwidth, MSSQL databases and more. All those give people the convenience to build up a powerful site in Windows server. ASPHostPortal.com offers ASP.NET hosting starts from $1/month only. They also guarantees 30 days money back and guarantee 99.9% uptime. If you need a reliable affordable ASP.NET Hosting, ASPHostPortal.com should be your best choice.


ASP.NET Hosting - ASPHostPortal.com :: Convert DataTable To JSON String in ASP.NET

clock August 16, 2016 19:56 by author Armend

In this post we will explain about how to Convert DataTable To JSON String in ASP.NET . First of all you need to create an "ASP.NET Empty Web Site". Then use the following procedure.


Step 1

Create a ConvertDataTableToJson class in the App_Code folder and provide the following:

Convert DataTable To JSON String.       
    using System.Data 
    using System.Text; 
    public class ConvertDatatableToJson 
    { 
       public string DataTableToJson(DataTable dt) 
       { 
          DataSet ds = new DataSet(); 
          ds.Merge(dt); 
          StringBuilder JsonStr = new StringBuilder(); 
          if (ds != null && ds.Tables[0].Rows.Count > 0) 
          { 
             JsonStr.Append("["); 
             for (int i = 0; i < ds.Tables[0].Rows.Count; i++) 
             { 
                JsonStr.Append("{"); 
                for (int j = 0; j < ds.Tables[0].Columns.Count; j++) 
                { 
                   if (j < ds.Tables[0].Columns.Count - 1) 
                   { 
                      JsonStr.Append("\"" + ds.Tables[0].Columns[j].ColumnName.ToString() + "\":" + "\"" + ds.Tables[0].Rows[i][j].ToString() + "\","); 
                   } 
                   else if (j == ds.Tables[0].Columns.Count - 1) 
                   { 
                      JsonStr.Append("\"" + ds.Tables[0].Columns[j].ColumnName.ToString() + "\":" + "\"" + ds.Tables[0].Rows[i][j].ToString() + "\""); 
                   } 
                } 
                if (i == ds.Tables[0].Rows.Count - 1) 
                { 
                   JsonStr.Append("}"); 
                } 
                else    
                { 
                   JsonStr.Append("},"); 
                } 
             } 
             JsonStr.Append("]"); 
             return JsonStr.ToString(); 
          } 
          else 
          { 
             return null; 
          } 
       }

Step 2

Insert the grid view control into the Default.aspx page then write the following design code:

<asp:GridView ID="ui_grdVw_EmployeeDetail" runat="server" Width="50%" AutoGenerateColumns="false" HeaderStyle-CssClass="pageheading"> 
    <Columns> 
    <asp:TemplateField HeaderText="S.NO"> 
    <ItemTemplate> 
    <%#Container.DataItemIndex+1 %> 
    </ItemTemplate> 
    </asp:TemplateField> 
    <asp:TemplateField HeaderText="Employee ID"> 
    <ItemTemplate> 
    <asp:Label ID="ui_lbl_EmployeeID" runat="server" Text='<%# DataBinder.Eval(Container.DataItem, "Emp_id") %>'></asp:Label> 
    </ItemTemplate> 
    </asp:TemplateField> 
    <asp:TemplateField HeaderText="Employee Name"> 
    <ItemTemplate> 
    <asp:Label ID="ui_lbl_EmployeeName" runat="server" Text='<%# DataBinder.Eval(Container.DataItem, "Emp_Name") %>'></asp:Label> 
    </ItemTemplate> 
    </asp:TemplateField> 
    <asp:TemplateField HeaderText="Employee Post"> 
    <ItemTemplate> 
    <asp:Label ID="ui_lbl_EmpJob" runat="server" Text='<%# DataBinder.Eval(Container.DataItem, "Emp_job") %>'></asp:Label> 
    </ItemTemplate> 
    </asp:TemplateField> 
    <asp:TemplateField HeaderText="Department"> 
    <ItemTemplate> 
    <asp:Label ID="ui_lbl_Department" runat="server" Text='<%# DataBinder.Eval(Container.DataItem, "Emp_Dep") %>'></asp:Label> 
    </ItemTemplate> 
    </asp:TemplateField> 
    </Columns> 
    </asp:GridView> 
    <br /> 
    <asp:Button ID="ui_btn_Convert1" runat="server" Text="Manually Convert To Json" OnClick="ui_btn_Convert1_Click" /><br /><br /><br /> 
    <asp:Label ID="ui_lbl_JsonString1" runat="server"></asp:Label>

Step 3

Now, open the Deafult.asps.cs then write the following code:
    using System; 
    using System.Data;
 

    public partial class _Default : System.Web.UI.Page 
    { 
       #region Global Variable 
       DataTable dt; 
       ConvertDatatableToJson dtJ; 
       string JsonString = string.Empty;    
       #endregion 
        
       protected void Page_Load(object sender, EventArgs e) 
       { 
          if (!IsPostBack) 
          { 
             ui_grdvw_EmployeeDetail_Bind(); 
          } 
       }       
       protected void ui_grdvw_EmployeeDetail_Bind() 
       { 
          dt = new DataTable(); 
          EmployeeRecord employeeRecord = new EmployeeRecord(); 
          dt = employeeRecord.EmpRecord(); 
          ViewState["dt"] = dt; 
          ui_grdVw_EmployeeDetail.DataSource = dt; 
          ui_grdVw_EmployeeDetail.DataBind(); 
       }       
       protected void ui_btn_Convert1_Click(object sender, EventArgs e) 
       { 
          dtJ = new ConvertDatatableToJson(); 
          JsonString = dtJ.DataTableToJson((DataTable)ViewState["dt"]); 
          ui_lbl_JsonString1.Text = JsonString; 
       } 
    }

Step 4

Press F5, run the project.

Now, convert the DataTable to a JSON string using the newtonsoft DLL.

Step 1

Download the Newtonsoft DLL and move it to the ASP.Net project's bin folder.

Step 2

Then, insert a button and label UI Control in the Deafult.aspx page as in the following:

<asp:Button ID="iu_btn_Convert2" runat="server" Text="Newtonsoft Convert To Json" OnClick="iu_btn_Convert2_Click" /> 
    <br /> 
    <br /> 
    <asp:Label ID="ui_lbl_JsonString2" runat="server"></asp:Label>

Step 3

Now, write the following code in Default.aspx.cs:
using this namespace

using Newtonsoft.Json;

And then:

protected void iu_btn_Convert2_Click(object sender, EventArgs e) 
    { 
       dt = (DataTable)ViewState["dt"]; 
       JsonString = JsonConvert.SerializeObject((DataTable)ViewState["dt"]); 
       ui_lbl_JsonString2.Text = JsonString; 
    }

Now, run the project and click on the Newtonsoft Convert to JSON     

Best ASP.NET Hosting Recommendation

ASPHostPortal.com provides its customers with Plesk Panel, one of the most popular and stable control panels for Windows hosting, as free. You could also see the latest .NET framework, a crazy amount of functionality as well as Large disk space, bandwidth, MSSQL databases and more. All those give people the convenience to build up a powerful site in Windows server. ASPHostPortal.com offers ASP.NET hosting starts from $1/month only. They also guarantees 30 days money back and guarantee 99.9% uptime. If you need a reliable affordable ASP.NET Hosting, ASPHostPortal.com should be your best choice.   


ASP.NET Core 1.0 Hosting - ASPHostPortal.com :: 7 Ways To Boost Your ASP.NET Performance

clock August 12, 2016 23:59 by author Dan

ASP.NET is a web application server framework that has been designed to make the process of website development easier , especially for the creation of dynamic web pages . It is important to understand the usefulness of ASP.NET applications in building efficient , robust and reliable .

Below are my top 7 tips to improving ASP.net application Performance :

1 . Use HTTPServerUtility.Transfer instead of Response.Redirect

Redirect 's are also very chatty . They should only be used when you are transferring people to another physical web server . For any transfers within your server , use . Transfer! You will save a lot of needless HTTP requests.

2 . Always check Page.IsValid when using Validator Controls

So you've dropped on some validator controls , and you think your good to go Because ASP.net does everything for you ! Right ? Wrong ! All that happens if bad the data is received is the IsValid flag is set to false . So the make sure you check Page.IsValid before processing your forms !

3 . Deploy with Release Build

Make sure you use the Release Build mode and not Debug Build when you deploy your site to production . If you think this does not matter , think again . By running in debug mode , you are creating PDB 's and cranking up the timeout . Deploy Release mode and you will see the speed improvements .

4 . Pre - Compiling ASP.NET Application

When compiling an ASP.NET application project , a single assembly is created to hold all the application 's code but the web pages ( . Aspx ) and user controls ( . Ascx ) not compiled and be deployed as it is . In the first request ASP.NET dynamically compiles the web pages and user control and places the compiled files in the ASP.NET temporary files folder .

To reduce the time of the first request a web application can be pre-compiled , Including all the code , pages , and user controls , by using the ASP.NET compilation tool ( Aspnet_compiler.exe ) . Running this tool in production servers can reduce the delay users experience on first requests .

a. Open a command prompt in your production server .
b. Navigate to the % windir % Microsoft.Net folder
c. Navigate to either the Framework or Framework64 According to the configuration of the web application 's application pool .
d. Navigate to the framework version 's folder .
e. Enter the following command to start the compilation

Aspnet_compiler.exe - v / FullPathOfYourWebApplication

5 . Disable Session State

Disable Session State if you're not going to use it . By default it 's on . You can actually turn this off for specific pages, instead of for every page :

< % @ Page language = " c # " Codebehind = " WebForm1.aspx.cs "

AutoEventWireup = "false " Inherits = " WebApplication1.WebForm1 "

">EnableSessionState = "false " % >


mode value to Off. ">You can also disable it across the application in the web.config by setting the value to Off mode .

6 . Repeater Control Good, DataList, DataGrid, and DataView controls Bad

Asp.net is a great platform , unfortunately a lot of the controls that were developed are heavy in html , and create not the greatest scaleable html from a performance standpoint . ASP.net repeater control is awesome ! Use it ! You might write more code , but you will thank me in the long run !

7 . Create Per -Request Cache

Use HTTPContect.Items to add single page load to create a per - request caching.

Best ASP.NET Core 1.0 Hosting Recommendation

ASPHostPortal.com provides its customers with Plesk Panel, one of the most popular and stable control panels for Windows hosting, as free. You could also see the latest .NET framework, a crazy amount of functionality as well as Large disk space, bandwidth, MSSQL databases and more. All those give people the convenience to build up a powerful site in Windows server. ASPHostPortal.com offers ASP.NET hosting starts from $1/month only. They also guarantees 30 days money back and guarantee 99.9% uptime. If you need a reliable affordable ASP.NET Hosting, ASPHostPortal.com should be your best choice.


ASP.NET Hosting - ASPHostPortal.com :: How to Create Dynamic menu with SQL Server Database in ASP.NET

clock August 5, 2016 22:44 by author Dan

Hi friends,in this article I will explain about How to Create Dynamic menu is one of the most important parts if a website development. So today I will show you how you can create dynamic css menu with database(SQL Server using in ASP.NET using CSS.

First we will search for the menu which we want to implement dynamically. After this we will create table in which we will add the menu item detail. In this article I have used two table one for parent and other for child table. In this child table contains the reference of parent table.

DBScript:


 CREATE TABLE Parent_Menu (
  ID int IDENTITY,
  ParentMenu_Name varchar(50),
  ParentMenu_URL varchar(150)
)

CREATE TABLE Child_Menu (
  ID int IDENTITY,
  Parent_ID int,
  ChildMenu_Name varchar(50),
  ChildMenu_URL varchar(150)
)

INSERT INTO Parent_Menu (ParentMenu_Name, ParentMenu_URL)
  VALUES ('Home', '#')
INSERT INTO Parent_Menu (ParentMenu_Name, ParentMenu_URL)
  VALUES ('Technology', '#')
INSERT INTO Parent_Menu (ParentMenu_Name, ParentMenu_URL)
  VALUES ('Contact US', '#')

INSERT INTO Child_Menu (Parent_ID, ChildMenu_Name, ChildMenu_URL)
  VALUES (1, 'Home', '~/Home.aspx')
INSERT INTO Child_Menu (Parent_ID, ChildMenu_Name, ChildMenu_URL)
  VALUES (2, 'ASP.NET', '~/Asp_Net.aspx')
INSERT INTO Child_Menu (Parent_ID, ChildMenu_Name, ChildMenu_URL)
  VALUES (2, 'C#', '~/CSharp.aspx')
INSERT INTO Child_Menu (Parent_ID, ChildMenu_Name, ChildMenu_URL)
  VALUES (2, 'MVC', '~/MVC.aspx')


ASP.NET:


<html xmlns="http://www.w3.org/1999/xhtml">
<head runat="server">
    <title>Creating Dynamic CSS Menu From Database SQL Server in ASP.Net Using C#.Net/VB.NET
    </title>
    <style type="text/css">
        .ParentMenu
        {
            font-size: small;
            font-family: Tahoma;
            font-weight: bold;
            padding-left: 6px;
            padding-right: 6px;
            text-align: center;
            background-color: #8B008B;
            color: White;
            border: 1px solid black;
        }
      
        .ParentMenu:hover
        {
            font-family: Tahoma;
            font-weight: bold;
            padding-left: 6px;
            padding-right: 6px;
            text-align: center;
            border: 1px solid black;
            font-size: small;
        }
      
        .ChildMenu
        {
            background-color: #8B008B;
            font-weight: bold;
            font-family: Tahoma;
            padding-top: 4px;
            padding-bottom: 4px;
            padding-right: 5px;
            padding-left: 5px;
            text-align: left;
            font-size: small;
            color: White;
            border: 1px solid black;
        }
        .ChildMenu:hover
        {
            font-weight: bold;
            font-family: Tahoma;
            padding-top: 4px;
            padding-bottom: 4px;
            padding-right: 6px;
            padding-left: 6px;
            text-align: left;
            font-size: small;
            border: 1px solid black;
            background-color: Black;
        }
    </style>
</head>
<body>
    <form id="form1" runat="server">
    <div>
        <asp:Menu DynamicSelectedStyle-Font-Italic="true" ID="dynamicMENU" runat="server"
            Orientation="Horizontal" DynamicVerticalOffset="4" OnMenuItemClick="dynamicMENU_MenuItemClick">
            <StaticMenuItemStyle Width="100" CssClass="ParentMenu" />
            <DynamicMenuItemStyle Width="250" CssClass="ChildMenu" />
        </asp:Menu>
    </div>
    </form>
</body>
</html>


C#.NET:


using System;
using System.Collections.Generic;
using System.Linq;
using System.Web;
using System.Web.UI;
using System.Web.UI.WebControls;
using System.Data;
using System.Configuration;
using System.Data.SqlClient;

public partial class DynamicCSSMenu : System.Web.UI.Page
{
    protected void Page_Load(object sender, EventArgs e)
    {
        if (!IsPostBack)
        {
            GetMenu();
        }
    }

    public void GetMenu()
    {
        DataSet dsParentMenu = getPARENTMENU();
        DataRowCollection drcParentMenu = dsParentMenu.Tables[0].Rows;
        DataSet dsChildMenuAll = getCHILDMENU();
        DataTable drcChildMenuAll = dsChildMenuAll.Tables[0];

        MenuItem mainMENUITEM;
        MenuItem childMENUITEM;
        foreach (DataRow drParentMenu in drcParentMenu)
        {
            mainMENUITEM = new MenuItem(drParentMenu["ParentMenu_Name"].ToString());
            dynamicMENU.Items.Add(mainMENUITEM);
            DataRow[] drcChildMenu = drcChildMenuAll.Select("Parent_ID=" + "'" + drParentMenu["ID"].ToString() + "'");
            foreach (DataRow drSUBMENUITEM in drcChildMenu)
            {
                childMENUITEM = new MenuItem(drSUBMENUITEM["ChildMenu_Name"].ToString());
                mainMENUITEM.ChildItems.Add(childMENUITEM);

                childMENUITEM.NavigateUrl = drSUBMENUITEM["ChildMenu_URL"].ToString();
            }
        }
        mainMENUITEM = new MenuItem("Logout");
        dynamicMENU.Items.Add(mainMENUITEM);
    }

    public DataSet getPARENTMENU()
    {
        SqlConnection myConnection = new SqlConnection(System.Configuration.ConfigurationManager.ConnectionStrings["con"].ToString());
        string str_query = string.Empty;
        str_query = "SELECT * FROM Parent_Menu";
        SqlDataAdapter daPARENT = new SqlDataAdapter(str_query, myConnection);
        DataSet dsTEMP = new DataSet();
        daPARENT.Fill(dsTEMP, "tablePARENT");
        return dsTEMP;
    }

    public DataSet getCHILDMENU()
    {
        SqlConnection myConnection = new SqlConnection(System.Configuration.ConfigurationManager.ConnectionStrings["con"].ToString());
        string str_querychild = string.Empty;
        str_querychild = "SELECT * FROM Child_Menu";
        SqlDataAdapter daCHILD = new SqlDataAdapter(str_querychild, myConnection);
        DataSet dsTEMP = new DataSet();
        daCHILD.Fill(dsTEMP, "tableCHILD");
        return dsTEMP;
    }
    protected void dynamicMENU_MenuItemClick(object sender, MenuEventArgs e)
    {
        Response.Redirect("~/index.aspx");
    }
}


VB.NET:


Imports System.Collections.Generic
Imports System.Linq
Imports System.Web
Imports System.Web.UI
Imports System.Web.UI.WebControls
Imports System.Data
Imports System.Configuration
Imports System.Data.SqlClient

Partial Public Class DynamicCSSMenu
    Inherits System.Web.UI.Page
    Protected Sub Page_Load(sender As Object, e As EventArgs)
        If Not IsPostBack Then
            GetMenu()
        End If
    End Sub

    Public Sub GetMenu()
        Dim dsParentMenu As DataSet = getPARENTMENU()
        Dim drcParentMenu As DataRowCollection = dsParentMenu.Tables(0).Rows
        Dim dsChildMenuAll As DataSet = getCHILDMENU()
        Dim drcChildMenuAll As DataTable = dsChildMenuAll.Tables(0)

        Dim mainMENUITEM As MenuItem
        Dim childMENUITEM As MenuItem
        For Each drParentMenu As DataRow In drcParentMenu
            mainMENUITEM = New MenuItem(drParentMenu("ParentMenu_Name").ToString())
            dynamicMENU.Items.Add(mainMENUITEM)
            Dim drcChildMenu As DataRow() = drcChildMenuAll.[Select]("Parent_ID=" + "'" + drParentMenu("ID").ToString() + "'")
            For Each drSUBMENUITEM As DataRow In drcChildMenu
                childMENUITEM = New MenuItem(drSUBMENUITEM("ChildMenu_Name").ToString())
                mainMENUITEM.ChildItems.Add(childMENUITEM)

                childMENUITEM.NavigateUrl = drSUBMENUITEM("ChildMenu_URL").ToString()
            Next
        Next
        mainMENUITEM = New MenuItem("Logout")
        dynamicMENU.Items.Add(mainMENUITEM)
    End Sub

    Public Function getPARENTMENU() As DataSet
        Dim myConnection As New SqlConnection(System.Configuration.ConfigurationManager.ConnectionStrings("con").ToString())
        Dim str_query As String = String.Empty
        str_query = "SELECT * FROM Parent_Menu"
        Dim daPARENT As New SqlDataAdapter(str_query, myConnection)
        Dim dsTEMP As New DataSet()
        daPARENT.Fill(dsTEMP, "tablePARENT")
        Return dsTEMP
    End Function

    Public Function getCHILDMENU() As DataSet
        Dim myConnection As New SqlConnection(System.Configuration.ConfigurationManager.ConnectionStrings("con").ToString())
        Dim str_querychild As String = String.Empty
        str_querychild = "SELECT * FROM Child_Menu"
        Dim daCHILD As New SqlDataAdapter(str_querychild, myConnection)
        Dim dsTEMP As New DataSet()
        daCHILD.Fill(dsTEMP, "tableCHILD")
        Return dsTEMP
    End Function
    Protected Sub dynamicMENU_MenuItemClick(sender As Object, e As MenuEventArgs)
        Response.Redirect("~/index.aspx")
    End Sub
End Class

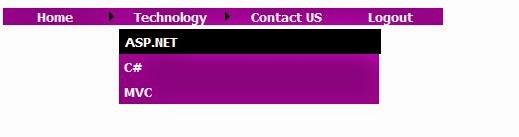
The output of the above code as shown in the below figure.
Best ASP.NET Core 1.0 Hosting Recommendation

ASPHostPortal.com provides its customers with Plesk Panel, one of the most popular and stable control panels for Windows hosting, as free. You could also see the latest .NET framework, a crazy amount of functionality as well as Large disk space, bandwidth, MSSQL databases and more. All those give people the convenience to build up a powerful site in Windows server. ASPHostPortal.com offers ASP.NET hosting starts from $1/month only. They also guarantees 30 days money back and guarantee 99.9% uptime. If you need a reliable affordable ASP.NET Hosting, ASPHostPortal.com should be your best choice.


ASP.NET Core 1.0 Hosting - ASPHostPortal.com :: Easy Steps to Add Numeric String in ASP.NET

clock July 25, 2016 20:20 by author Dan

Must Know Issue: Basics of String Format in .Net

Numeric Format

double dValue = 55000.54987D;

//displaying number in different formats

Response.Write("Currency Format: " + dValue.ToString("C") + "
");

Response.Write("Scientific Format: " + dValue.ToString("E") + "
");

Response.Write("Percentage Format: " + dValue.ToString("P") + "
");

/* OUTPUT */

Currency Format: $55,000.55
Scientific Format: 5.500055E+004
Percentage Format: 5,500,054.99 %

Getting Culture Specific String


double dValue = 55000.54987D;

//You can Remove this line

Thread.CurrentThread.CurrentCulture = new CultureInfo("de-DE");

//This line will automatically detect client culture

//and display data accordingly

//Here culture has forcefully changed to german to

//view difference in output

CultureInfo ci = Thread.CurrentThread.CurrentCulture;

//displaying number in different formats

Response.Write("Currency Format: " + dValue.ToString("C",ci) + "
");

Response.Write("Scientific Format: " + dValue.ToString("E",ci) + "
");

Response.Write("Percentage Format: " + dValue.ToString("P",ci) + "
");

/* OUTPUT */

Currency Format: 55.000,55 €
Scientific Format: 5,500055E+004
Percentage Format: 5.500.054,99%

Best ASP.NET Core 1.0 Hosting Recommendation

ASPHostPortal.com provides its customers with Plesk Panel, one of the most popular and stable control panels for Windows hosting, as free. You could also see the latest .NET framework, a crazy amount of functionality as well as Large disk space, bandwidth, MSSQL databases and more. All those give people the convenience to build up a powerful site in Windows server. ASPHostPortal.com offers ASP.NET hosting starts from $1/month only. They also guarantees 30 days money back and guarantee 99.9% uptime. If you need a reliable affordable ASP.NET Hosting, ASPHostPortal.com should be your best choice.


Cheap ASP.NET 4.5 Hosting

We’re a company that works differently to most. Value is what we output and help our customers achieve, not how much money we put in the bank. It’s not because we are altruistic. It’s based on an even simpler principle. "Do good things, and good things will come to you".

Success for us is something that is continually experienced, not something that is reached. For us it is all about the experience – more than the journey. Life is a continual experience. We see the Internet as being an incredible amplifier to the experience of life for all of us. It can help humanity come together to explode in knowledge exploration and discussion. It is continual enlightenment of new ideas, experiences, and passions


Author Link

 photo ahp banner aspnet-01_zps87l92lcl.png


Corporate Address (Location)

ASPHostPortal
170 W 56th Street, Suite 121
New York, NY 10019
United States

Tag cloud

Sign in