
February 26, 2014 06:51 by
 Kenny
Kenny
Search engines like human-readable URLs with keywords in it, and hesitate to respect messy URLs with a lot of query-string parameters. So, to make our ASP.NET database-driven website SEO-friendly we have to get rid of our complex URLs.
SEO or Search Engine Optimization is the process of affecting the visibility of a website or a web page in a search engine's "natural" or un-paid ("organic") search results. In general, the earlier (or higher ranked on the search results page), and more frequently a site appears in the search results list, the more visitors it will receive from the search engine's users. SEO may target different kinds of search, including image search, local search, video search, academic search, news search and industry-specific vertical search engines.

Solution 1: Fake pages and "Server.Transfer".
As you can see the two URLs above point to the same page. Basically it is the same page and it works like this: the page mailjet-newsletter-software.aspx contains no code at all and performs a Server.Transfer (aka server-side redirect) to product.aspx like this:
Server.Transfer("product.aspx?ProductID=18");
That's it. We have one "product.aspx" page which expects a "ProductID" parameter and a lot of "fake pages" with SEO-friendly names like firstproduct.aspx, secondproduct.aspx etc., which simply perform a Server.Transfer to the "product.aspx" with the right ProductID.
Simple, isn't it?
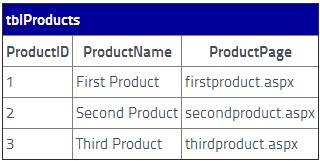
But this solution requires a lot of hard-coding - we will have to create all these fake pages and add a Server.Transfer command. So let's go a little further: we will create one base class for all our "fake pages" and add a record to the "tblProducts" table in the database:
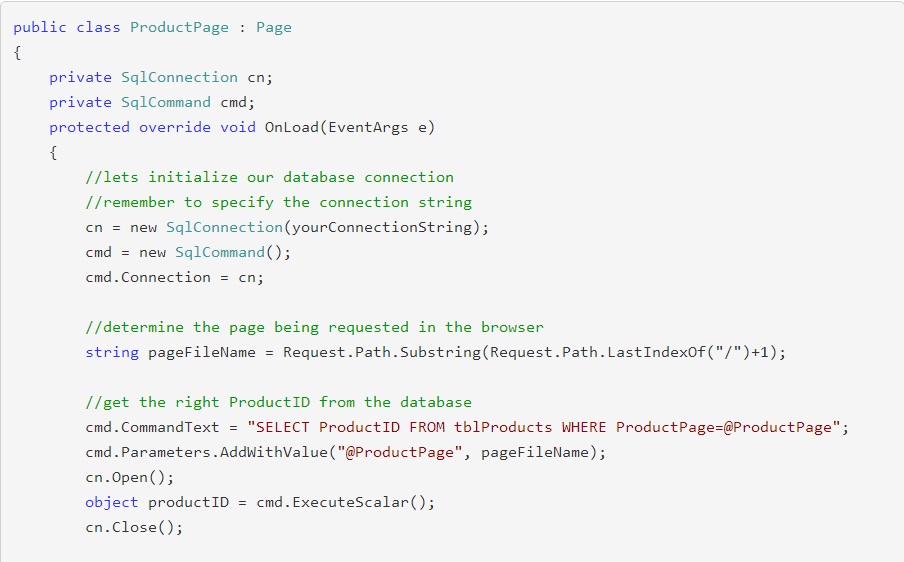
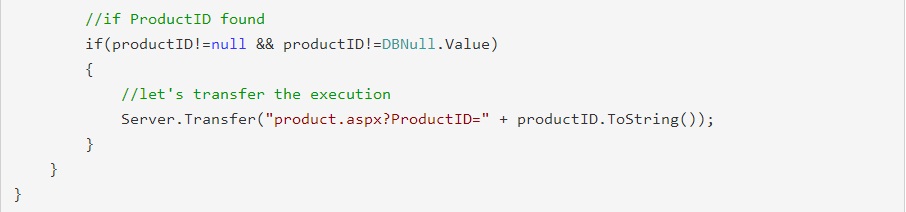
Now we have to create our fake pages, inherit them all from the ProductPage class and voi la - that's it! We can also optionally remove all the HTML-code from the aspx-files, leaving the "Page" directive only.
Solution 2: Virtual Pages.
This method is pretty similar, except that we don't need to create any pages at all. Instead, we will add an HttpModule, which intercepts HTTP requests, and the user requests a non-existent page, performs a Rewrite operation. First we will create our HttpModule:
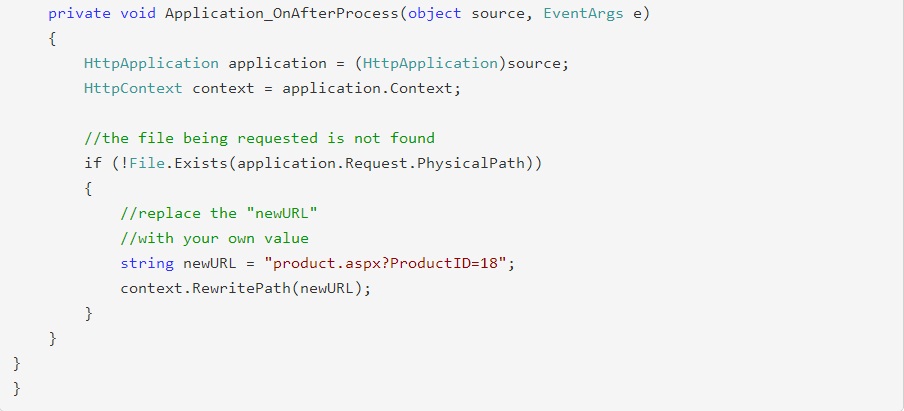
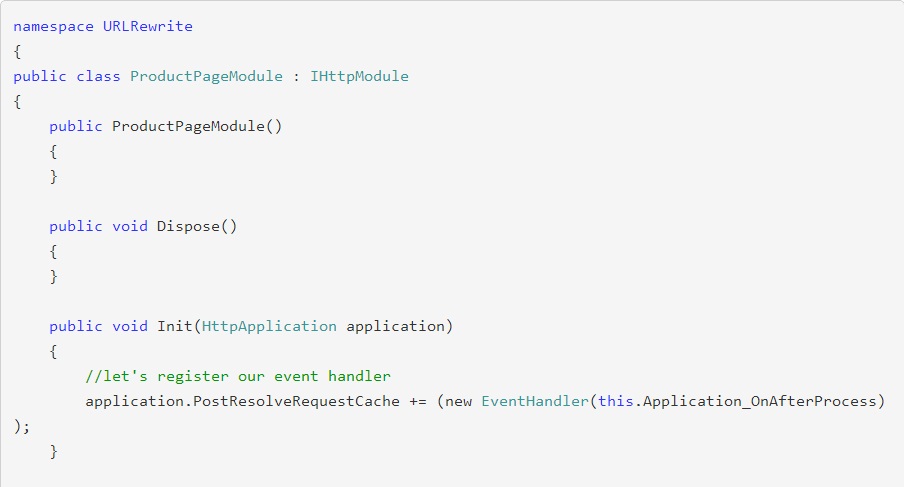
Now we have to register our HttpModule in the web.config:
<httpModules>
<add type="URLRewrite.ProductPageModule, URLRewrite" name="ProductPageModule" />
<httpModules>
610ab07c-36ee-401a-a49e-226687589da4|0|.0
February 24, 2014 05:09 by
Diego
NumericUpDown is an ASP.NET AJAX extender that can be attached to an ASP.NET TextBox control to add "up" and "down" buttons that increment and decrement the value in the TextBox. The increment and decrement can be simple +1/-1 arithmetic, they can cycle through a provided list of values (like the months of the year), or they can call a Web Service to determine the next value. Page authors can also provide custom images to be used instead of the default up/down button graphics. In this article, I will show you step by step procedure, how to use a Up Down Extender

In ASP.NET using Visual Studio 2005 or Visual Studio 2008.
Step 1 : Open Visual Studio.
- Go to File->New->WebSite
- Select ASP.NET WebSite
Step 2 :
Under Visual Studio Installed Template-> Choose ASP.NET WEB SITE -> Choose File System from the location combo box -> Set the path by the browse button - > Choose the language from the Language ComboBox (Visual C# , Visual Basic , J #)
Step 3 :
Click on the OK Button.
This is the source code window :
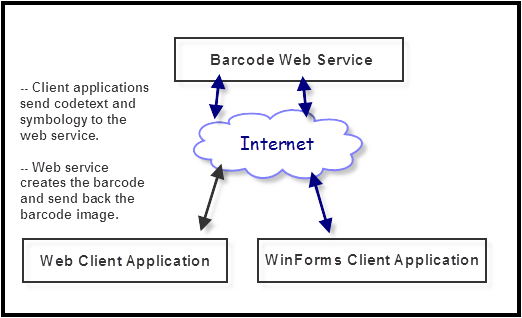
Step 4 :
See here is a tab named Design in the bottom of this page. Click on this tab and you will see a blank web page where you can drag any control from the toolbox (which is in the left side of this window).
Step 5 :
Now drag some controls under the AJAX Extensions. First control you are going to drag and drop on the page is - Script Manager.
- first add a tag on the top of your source code window:
<%@ Register Assembly="AjaxControlToolkit" Namespace="AjaxControlToolkit" TagPrefix="cc1" %>
- Under the form tag,NumericUpDownExtender control
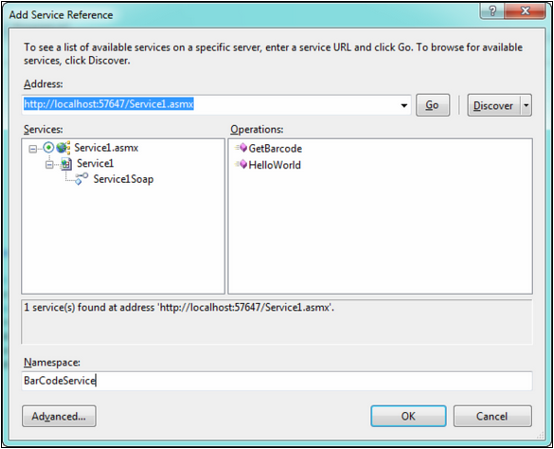
Step 6:
Now run the application by pressing ctrl + F5.
Step 7 :
When you run the Up Down Extender will seem like this...
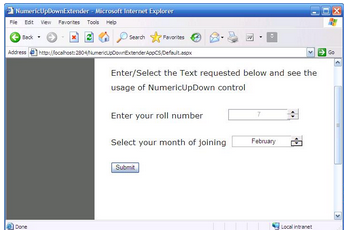
1042661b-f143-4a52-81d4-d11a0d9af1c5|0|.0
February 19, 2014 09:14 by
Diego
One of the mainline features about ASP.NET Identity is to make it easy to Adding Email Confirmation. This process will send an email to the user with a link they can click on to confirm their registration and log in to the system. Prior to confirmation they will not be able to log in.
This post shows how you can adding email confirmation to ASP.NET Identity in MVC 5.
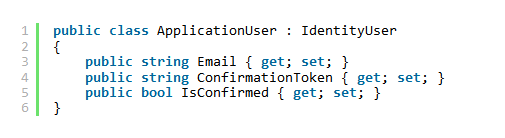
First I started by creating a new MVC 5 application. You no longer select whether you want an Internet or Intranet application, you just select the MVC template and select the authentication type you want to use. For an Internet type application you select Individual User Accounts. Once your web application is created open IdentityModels.cs in the Models directory. You will see a class called ApplicationUser which is analogues to the UserProfile in SimpleMembership. It is an empty class that inherits from IdentityUser which has these properties.
You must to modify the user information to store a the confirmation token and a flag indicating whether confirmation was completed or not.
Now let’s implement the method in the AccountMembershipService class:
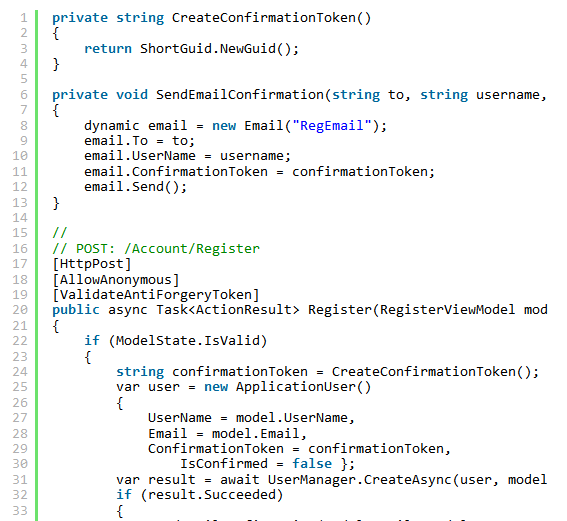
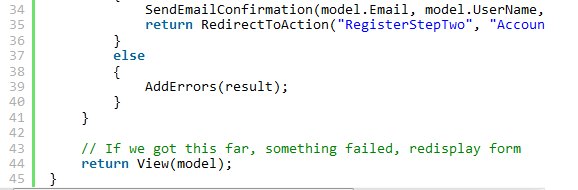
Here, we’re setting the confirmationGuid to user. This is the GUID stored in the database that uniquely identifies the user. We then set the verifyUrl to the Verify action on the Account controller – passing the confirmationGuid as the ID parameter. The redirect to the RegisterStepTwo action just displays a view to the user that tells them to look for the email to complete the registration process.
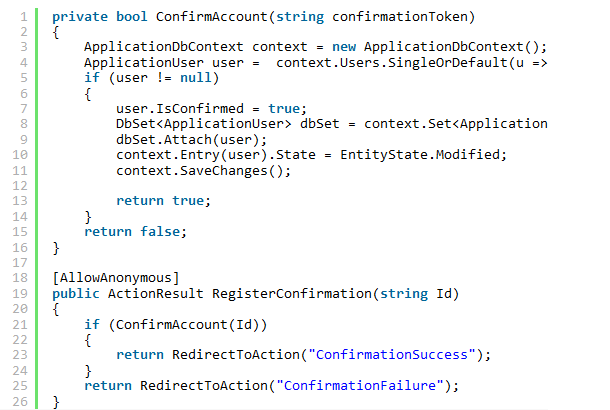
Once the user gets the email they click on the link that will take us back to the controller action RegisterConfirmation. With that configured, when the user clicks the register button, they’ll be sent an email with the confirmation link it, and they’ll be redirected to the confirmation page. If we find a user we set IsConfirmed to true and return true from the method; otherwise we return false. If the user is confirmed they will be able to log in.
That is all there is to setting up email confirmation using ASP.NET Identity in MVC 5.
Thanks.
c17d90f9-f51a-4fe6-bca7-cfb7704f9d9e|0|.0
January 15, 2014 07:02 by
BenASP.NET MVC 5 is the latest update to Microsoft's popular MVC (Model-View-Controller) technology - an established web application framework. MVC enables developers to build dynamic, data-driven web sites. MVC 5 adds sophisticated features like single page applications, mobile optimization, adaptive rendering, and more.
In this article, We'll look into how to create default user roles in ASP.NET MVC 5. Let's begin by establishing where the user role is assigned, and that is the registration stage. In the default template, you have the AccountController that contains a Register action. The default implementation looks like this:

[HttpPost]
[AllowAnonymous]
[ValidateAntiForgeryToken]
public ActionResult Register(RegisterModel model)
{
if (ModelState.IsValid)
{
// Attempt to register the user
try
{
WebSecurity.CreateUserAndAccount(model.UserName, model.Password);
WebSecurity.Login(model.UserName, model.Password);
return RedirectToAction("Index", "Home");
}
catch (MembershipCreateUserException e)
{
ModelState.AddModelError("", ErrorCodeToString(e.StatusCode));
}
}
// If we got this far, something failed, redisplay form
return View(model);
}
What's missing here is the role assignment, so let's add that. Right after the CreateUserAndAccount call, we can check whether a specific role exists, and if it is - add the registered user to it. In case the role is new, create it.
if (!Roles.RoleExists("Standard"))
Roles.CreateRole("Standard");
Roles.AddUserToRole(model.UserName, "Standard");
Here I am working with a role called Standard, but obviously you can use another identifier for it. If you open the database that is carrying the app data, you will notice that there are two new tables introduced in the existing context - Roles and UsersInRoles.
As the data skeleton is established, you can now limit content access based on roles. In views, you could use the Authorize attribute:
[Authorize(Roles = "Admin")]
Or you could check for the role directly:
@if (Roles.GetRolesForUser().Contains("Admin"))
{
}
That's the tutorial How to create Default User Roles in ASP.NET MVC 5, for more information about ASP.NET MVC 5 Hosting please feel free to visit ASPHostPortal.com.
ASPHostPortal.com is Microsoft No #1 Recommended Windows and ASP.NET Spotlight Hosting Partner in United States. Microsoft presents this award to ASPHostPortal.com for ability to support the latest Microsoft and ASP.NET technology, such as: WebMatrix, WebDeploy, Visual Studio 2012, .NET 4.5.1/ASP.NET 4.5, ASP.NET MVC 5.0/4.0, Silverlight 5 and Visual Studio Lightswitch. Click here for more information.
c233d9d9-44b1-4005-83f0-7543993bd76f|1|3.0
January 10, 2014 07:17 by
Ben
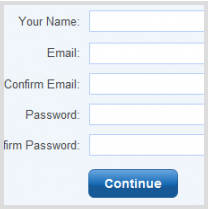
Here is the simple step to create a sign up/registration page in ASP.NET. Lets check this out :
1. Open the Microsoft Visual Studio
2. Select one New Asp.Net Web application
3. Open the Design Default.aspx page
4. Drag and Drop one DropDown list and button from the Tool box.
5. Add one new item( i.e., New Registration Page) for the Drop down list
6. Procedure for adding items : Right click on the DropDown List and select properties and select items and add NewRegistration in Text Field.
7. Change the properties of the Dropdown list
a.Kept AutopostBack = True;
b.select the SelectedIndexChanged Event for that..
8. Open the code page that is Default.aspx.cs and and create a method in SelectedIndexChanged event of dropdownlist

using System;
using System.Collections;
using System.Configuration;
using System.Data;
using System.Linq;
using System.Web;
using System.Web.Security;
using System.Web.UI;
using System.Web.UI.HtmlControls;
using System.Web.UI.WebControls;
using System.Web.UI.WebControls.WebParts;
using System.Xml.Linq;
using System.Data.SqlClient;
public partial class Dynamic_controls : System.Web.UI.Page
{
SqlConnection con;
SqlCommand com;
protected void Page_Load(object sender, EventArgs e)
{
}
protected void ddlist_SelectedIndexChanged(object sender, EventArgs e)
{
Createnewaccount();
}
9. Create new methods for Different controls by using the main method(i.e., Createnewaccount)
private void Createnewaccount ()
{
CreateDynamicTextBoxes ();
CreateDynamicTextBoxes1 ();
CreateDynamicCheckBoxes ();
CreateDynamicCheckBoxes1 ();
CreateDynamicRadioButtons1 ();
BindDropDownLists ();
}
10. Create all types of dynamic controls
protected void CreateDynamicTextBoxes ( )
{
int c = 1 ;
TextBox [ ] textBoxArr = new TextBox [ c ] ;/ / array of textboxes
for (int i = 0 ; i < c ; i + + )
{
textBoxArr [ i ] = new TextBox ( ) ;
textBoxArr [ i ] . ID = " txtBox " + i.ToString ( ) ;
PH_Name.Controls.Add ( textBoxArr [ i ] ) ;
RequiredFieldValidator reqfldVal = new RequiredFieldValidator ( ) ;
reqfldVal.ID = " RequiredValidator " + i ;
reqfldVal.ControlToValidate = " txtBox " + i ;
reqfldVal.ErrorMessage = " Not Empty " ;
reqfldVal.SetFocusOnError = true ;
PH_Name.Controls.Add ( reqfldVal ) ;
}
}
protected void CreateDynamicTextBoxes1 ( )
{
int c = 1 ;
TextBox [ ] textBoxArr1 = new TextBox [ c ] ;/ / array of textboxes
for (int i = 0 ; i < c ; i + + )
{
textBoxArr1 [ i ] = new TextBox ( ) ;
textBoxArr1 [ i ] . ID = " txtBox1 " + i.ToString ( ) ;
PH_pwd.Controls.Add ( textBoxArr1 [ i ] ) ;
RequiredFieldValidator reqfldVal1 = new RequiredFieldValidator ( ) ;
reqfldVal1.ID = " RequiredValidator1 " + i ;
reqfldVal1.ControlToValidate = " txtBox1 " + i ;
reqfldVal1.ErrorMessage = " Not Empty " ;
reqfldVal1.SetFocusOnError = true ;
PH_pwd.Controls.Add ( reqfldVal1 ) ;
}
}
private void BindDropDownLists ( )
{
SqlDataSource sqlDS = new SqlDataSource ( ) ;
sqlDS.ConnectionString = ConfigurationManager.ConnectionStrings [ " SAMPLE_2 " ] . ToString ( ) ;
sqlDS.SelectCommand = " Select CountryID , COUNTRY_NAME from countrynames " ;
PH_country.Controls.Add ( sqlDS ) ;
DropDownList ddl = new DropDownList ( ) ;
ddl.ID = " ddlrank " ;
ddl.DataSource = sqlDS ;
ddl.DataTextField = " COUNTRY_NAME " ;
ddl.DataValueField = " CountryID " ;
PH_country.Controls.Add ( ddI ) ;
foreach ( Control ctl in PH_country.Controls )
{
if ( ctl is DropDownList )
{
( ctl as DropDownList ) . DataBind ( ) ;
}
}
}
protected void CreateDynamicCheckBoxes ( )
{
CheckBox chk ;
chk = new CheckBox ( ) ;
chk.ID = " chkhobbies " ;
chk.Text = " savings " ;
chk.AutoPostBack = false ;
PH_trans.Controls.Add ( chk ) ;
}
protected void CreateDynamicCheckBoxes1 ( )
{
int c = 1 ;
CheckBox [ ] chk = new CheckBox [ c ] ;
for (int i = 0 ; i < c ; i + + )
{
chk [ i ] = new CheckBox ( ) ;
chk [ i ] . ID = " chkhobbies1 " + i.ToString ( ) ;
chk [ i ] . Text = " Current" ;
chk [ i ] . AutoPostBack = false ;
PH_trans.Controls.Add ( chk [ i ] ) ;
}
}
protected void CreateDynamicRadioButtons ( )
{
Male = new RadioButton RadioButton ( ) ;
Female = new RadioButton RadioButton ( ) ;
male = new RadioButton ( ) ;
female = new RadioButton ( ) ;
male.Text = " Male " ;
female.Text = " Female " ;
male.Checked = false ;
female.Checked = false ;
male.GroupName = " unknown " ;
female.GroupName = " unknown " ;
male.ID = " malegender " ;
female.ID = " unknown " ;
male.AutoPostBack = false ;
female.AutoPostBack = false ;
PH_gender.Controls.Add ( male ) ;
PH_gender.Controls.Add (female ) ;
}
protected void CreateDynamicRadioButtons1 ( )
{
RadioButtonList radio = new RadioButtonList ( ) ;
radio.ID = " rblRow " ;
radio.Items.Add ( new ListItem ( " Male " ) ) ;
radio.Items.Add ( new ListItem ( " Female " ) ) ;
PH_gender.Controls.Add ( radio ) ;
}
protected void CreateDynamicPanel ( )
{
int c = 1 ;
TextPanel panel = new Panel ( ) ;
for (int i = 0 ; i < c ; i + + )
{
TextPanel.ID = " txtPanel " + i.ToString ( ) ;
PlaceHolder1.Controls.Add ( TextPanel ) ;
}
}
11. Add the following code to store the data in database
protected void btn_submit_Click ( object sender , EventArgs e )
{
for (int i = 0 ; i < 1 ; i + + )
{
txtvalue string = " txtBox " + i.ToString ( ) ;
txtvalue1 string = " txtBox1 " + i.ToString ( ) ;
ddlvalue string = " ddlrank " ;
chkvalue string = " chkhobbies " ;
chkvalue1 string = " chkhobbies1 " + i.ToString ( ) ;
rbvalue string = " rblRow " ;
TextBox txt = ( TextBox ) PlaceHolder1.FindControl ( txtvalue ) ;
TextBox txt1 = ( TextBox ) PlaceHolder1.FindControl ( txtvalue1 ) ;
DropDownList Dddl = ( DropDownList ) PlaceHolder1.FindControl ( ddlvalue ) ;
CheckBox Dchk = ( CheckBox ) PlaceHolder1.FindControl ( chkvalue ) ;
CheckBox Dchk1 = ( CheckBox ) PlaceHolder1.FindControl ( chkvalue1 ) ;
RadioButtonList Drd = ( RadioButtonList ) PlaceHolder1.FindControl ( rbvalue ) ;
if ( txt ! = null )
{
try
{
string strText = txt.Text ;
strText1 string = txt1.Text ;
strddl string = Dddl.SelectedItem.Text ;
strchk string = Dchk.Text ;
strchk1 string = Dchk1.Text ;
strrdb string = Drd.Text ;
/ / Store value in database textbox Cell
con = new SqlConnection ( ConfigurationManager.ConnectionStrings [ " SAMPLE_2 " ] . ToString ( ) ) ;
con.Open ( ) ;
com = new SqlCommand ( " insert into Dynamic_Form ( UserName , LastName , DropdownlistValue , Chksavings , Chkcurrent , Radiovalue ) values ( ' " + strText + " ' , ' " + strText1 + " ' , ' " + strddl + " ' , ' " strchk + + " ' , ' " + strchk1 + " ' , ' " + strrdb + " ' ) " , con ) ;
com.ExecuteNonQuery ( ) ;
con.Close ( ) ;
lbl_error.Text = " Account Successfully Created " ;
}
catch ( Exception ex )
{
throw ex ;
/ / lbl_error.Text = " There is a problem while creating Account " ;
}
}
}
}
Now, run your program and see the result :
2b0b2f77-7e86-4adb-9c1a-d4f0567fabbd|0|.0
December 27, 2013 11:03 by
Robert
In this article, I showed you how to use Page Instrumentation, a new feature in ASP.NET 4.5 which might be useful for you during debugging.
ASP.NET 4.5 include a hidden gem called Page Instrumentation, very few people aware of this gem. You can use page instrumentation in ASP.NET 4.5 WebForm and MVC 5 or 4(assuming it targets 4.5). It allows you to inspect/instrument a web form or a mvc view during the rendering process. Page instrumentation are useful in scenarios when you have some performance issues regarding view engine rendering. In this article, I will show you how to use this feature in ASP.NET 4.5.

To start instrumenting a page, you need to inherit PageExecutionListener class.

The BeginContext will be called by a view engine before it renders the output for the specified context. Similarly, EndContext called by a view engine after it renders the output for the specified context. Both of these methods accept PageExecutionContext class as a parameter which have the following members.

All the properties of PageExecutionContext class are self explanatory. Let assume we have the following MVC view(for understanding how many times and when the BeginContext and EndContext will be invoke by the framework).

The Razor View Engine will emit the following C# code

Finally, here is a simple implementation of PageExecutionListener class which calculates the total time each time whenever something is written to the output response.

4898627a-0269-4ee1-ad40-a2e3445c5bba|0|.0